Showing posts with label multiple. Show all posts

Sunday, March 11, 2018

Concurrent sandbox deployment


Version 0.3.0 of dbdeployer has gained the ability of deploying multiple sandboxes concurrently. Whenever we deploy a group of sandboxes (replication, multiple) we can use the --concurrent flag, telling dbdeployer that it should run operations concurrently.

What happens when a single sandbox gets deployed? There are six sets of operations:

  1. Create the sandbox directory and write down its scripts;
  2. Run the initialisation script;
  3. Start the database server;
  4. Run the pre-grants SQL commands (if any;)
  5. Load the grants;
  6. Run the post-grants SQL commands (if any;)

When several sandboxes are deployed concurrently, dbdeployer runs only the first step, and then creates a list of commands with an associated priority index. These commands are assembled for every sandbox, and then executed concurrently for every step.
The sequence of events for a deployment of three sandboxes in replication would be like this:

  1. Create the sandbox skeleton for every sandbox;
  2. Initialise all database servers;
  3. start all the servers;
  4. run the pre-grants, grants, post-grants scripts.
  5. Runs the group initialisation script (start master and slaves, or setup group replication).

Depending on the computer architecture, the server version, and the number of nodes, the speed of deployment can increase from 2 to 5 times.

Let's see an example:

$ time dbdeployer deploy replication 5.7.21
[...]
real    0m13.789s
user    0m1.143s
sys 0m1.873s

$ time dbdeployer deploy replication 5.7.21 --concurrent
[...]
real    0m7.780s
user    0m1.329s
sys 0m1.811s

There is a significant speed increase. The gain rises sharply if we use an higher number of nodes.

$ time dbdeployer deploy replication 5.7.21 --nodes=5
[...]
real    0m23.425s
user    0m1.923s
sys 0m3.106s

$ time dbdeployer deploy replication 5.7.21 \
    --nodes=5 --concurrent
[...]
real    0m7.686s
user    0m2.248s
sys 0m2.777s

As we can see, the time for deploying 5 nodes is roughly the same used for 3 nodes. While the sequential operations take time proportionally with the number of nodes, the concurrent task stays almost constant.

Things a re a bit different for group replication, as the group initialisation (which happens after all the servers are up and running) takes more time than the simple master/slave deployment, and can't be easily reduced using the current code.

A similar optimisation happens when we delete multiple sandboxes. Here the operation is at sandbox level (1 replication cluster = 1 sandbox) not at server level, and for that reason the gain is less sharp. Still, operations are noticeably faster.

There is room for improvement, but I have seen that the total testing time for dbdeployer test suite has dropped from 26 to 15 minutes. I think it was a week end well spent.

Monday, August 17, 2015

MySQL replication in action - Part 3: all-masters P2P topology

Previous episodes:


In the previous article, we saw the basics of establishing replication from multiple origins to the same destination. By extending that concept, we can deploy more complex topologies, such as the point-to-point (P2P) all-masters topology, a robust and fast way of moving data.

Introduction to P2P all-masters topology

A P2P (Point-to-point) topology is a kind of deployment where replication happens in a single step from the producer to the consumers. For example, in a master/slave topology, replication from the master (producer) reaches every slave (consumer) in one step. This is simple P2P replication. If we use a hierarchical deployment, where every slave that is connected to the master is also replicating to one or more slaves, we will have a 2-step replication (Figure 1). Similarly, in circular replication, we have as many steps as the number of nodes minus one (Figure 2.)
Hierarchical master slave processing Figure 1 - Hierarchical replication depth of processing

Friday, August 14, 2015

MySQL replication in action - Part 2 - Fan-in topology


Introduction: where we stand

Previous episodes:

In the latest releases of MySQL and MariaDB we have seen several replication improvements. One of the most exciting additions is the ability to enhance basic replication with multiple sources. Those who have used replication for a while should remember that one of the tenets of the “old” replication was that a slave couldn’t have more than one master. This was The Law and there was no escape ... until now. The only way to work around that prohibition was to use circular replication, also known as ring replication, where each node is slave of the previous node and master of the next one.
Circular replication

Tuesday, January 07, 2014

Multiple masters : attraction to the stars

In the last 10 years I have worked a lot with replication systems, and I have developed a keen interest in the topic of multiple masters in a single cluster. My interest has a two distinct origins:

  • On one hand, I have interacted countless times with users who want to use a replication system as a drop-in replacement for a single server. In many cases, especially when users are dealing with applications that are not much flexible or modular, this means that the replication system must have several points of data entry, and such points must work independently and in symbiosis with the rest of the nodes.
  • On the other hand, I am a technology lover (look it up in the dictionary: it is spelled geek), and as such I get my curiosity stirred whenever I discover a new possibility of implementing multi-master systems.

The double nature of this professional curiosity makes me sometimes forget that the ultimate goal of technology is to improve the users life. I may fall in love with a cute design or a clever implementation of an idea, but that cleverness must eventually meet with usability, or else it loses its appeal. There are areas where the distinction between usefulness and cleverness is clear cut. And there are others where we really don’t know where we stand because there are so many variables involved.

One of such cases is a star topology, where you have many master nodes, which are connected to each other through a hub. You can consider it a bi-directional master/slave. If you take a master/slave topology, and make every node able to replicate back to the master, then you have almost a star. To make it complete, you also need to add the ability of the master of broadcasting the changes received from the outside nodes, so that every node gets the changes from every other node. Compared to other popular topologies, say point-to-point all-masters, and circular replication, the star topology has the distinct advantage of requiring less connections, and of making it very easy to add a new node.
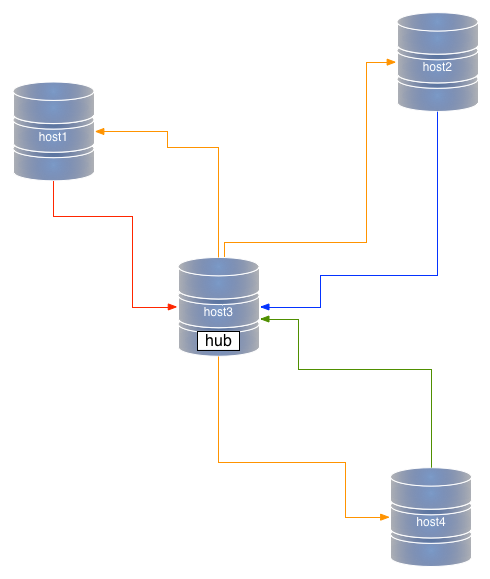
Star

Figure #1: Star topology

However, anyone can see immediately one disadvantage of the star topology: the hub is the cornerstone of the cluster. It’s a single point of failure (SPOF). If the hub fails, there is no replication anywhere. Period. Therefore, when you are considering a multi-master topology, you have to weigh in the advantages and disadvantages of the star, and usually you consider the SPOF as the most important element to consider.

Depending on which technology you choose, though, there is also another important element to consider, i.e. that data must be replicated twice when you use a star topology. It’s mostly the same thing that happens in a circular replication. If you have nodes A, B, C, and D, and you write data in A, the data is replicated three times before it reaches D (A->B, B->C, and C->D). A star topology is similar. In a system where A, B, and D are terminal nodes, and C is the hub, data needs to travel twice before it reaches D (A->C, C->D). Circular replication
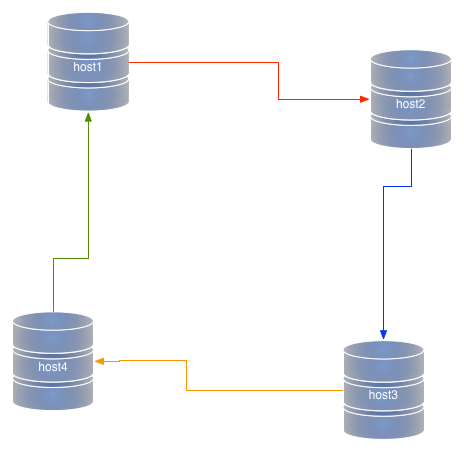
Figure #2: Circular replication

This double transfer is bad for two reasons: it affects performance, and it opens to the risk of unexpected transformations of data. Let’s explore this concept a bit. When we replicate data from a master to a slave, there is little risk of mischief. The data goes from the source to a reproducer. If we use row-based-replication, there is little risk of getting the wrong data in the slave. If we make the slave replicate to a further slave, we need to apply the data, generate a further binary log in the slave host, and replicate data from that second binary log. We can deal with that, but at the price of taking into account more details, like where the data came from, when to stop replicating in a loop, whether the data was created with a given configuration set, and so on. In short, if your slave server has been configured differently from the master, chances are that the data down the line may be different. In a star topology, this translates into the possibility of data in each spoke to be replicated correctly in the hub, but to be possibly different in the other spokes.

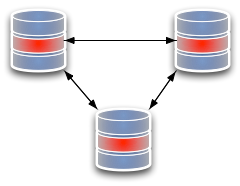
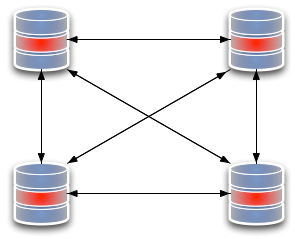
Compare this with a point-to-point all-masters. In this topology, there are no SPOFs. You pay for this privilege by having to set a higher number of connections between nodes (every node must connect to every other node), but there is no second hand replication. Before being applied to the slave service, the data is applied only once in the originating master.
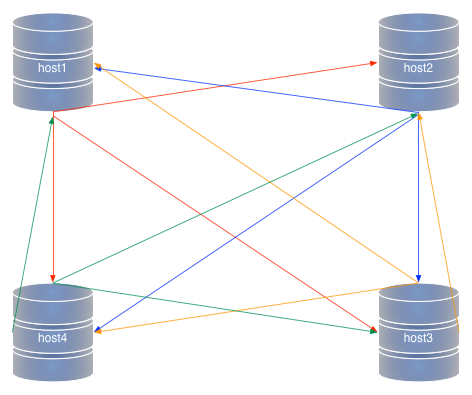
Point to point all masters

Figure #2: Point-to-point all-masters topology

Where do I want to go from all the above points? I have reached the conclusion that, much as user like star topologies, because of their simplicity, I find myself often recommending the more complex but more solid point-t-point all-masters setup. Admittedly, the risk of data corruption is minimal. The real spoiler in most scenarios is performance. When users realize that the same load will flow effortlessly in a point-to-point scenario, but cause slave lags in a star topology, then the choice is easy to make. If you use row-based replication, and in a complex topology it is often a necessary requirement, the lag grows to a point where it becomes unbearable.

As I said in the beginning, all depends on the use case: if the data load is not too big, a star topology will run just as fine as point-to-point, and if the data flow is well designed, the risk of bad data transformation becomes negligible. Yet, the full extent of star topologies weaknesses must be taken into account when designing a new system. Sometimes, investing some effort into deploying a point-to-point all-masters topology pays off in the medium to long term. Of course, you can prove that only if you deploy a star and try it out with the same load. If you deploy it on a staging environment, no harm is done. If you deploy in production, then you may regret. In the end, it all boils down to my mantra: don’t trust the theory, but test, test, test.

Monday, March 11, 2013

Deploying remote MySQL sandboxes

Stating the problem.

In my job, I do a lot of testing. And no matter how much organized we try to be, we end up with fewer machines than we would need to run all the tests that we want.

For some tasks, we can run MySQL Sandbox, and get the job done. But sometimes we need to make sure that applications and systems work well across the network, and we need to install and run systems on separate servers.

However, when you test replication systems, and every cluster takes three or four servers, you run our of available hosts very quickly. So you decide to use the clusters that are dedicated to automated testing to also run your own manual tests. Soon you realize that the tests that you are running manually are clashing with the automated ones, or with the ones that your colleagues are running.

A simple solution is installing additional sandboxes for the MySQL server in each host, and then run our operations against the new server. If we need more than one database server, MySQL Sandbox allows us to deploy them at will.

There are a few obstacles to overcome, for this approach to be useful:

  • Installing sandboxes in remote servers is time consuming and not automated. When we need to do automated tests, this is a serious issue.
  • By default, MySQL Sandbox works on the local host only. It can be installed to listen to remote clients, using an appropriate option.
  • Sandboxes for testing replication need to be configured on the fly. It can be done manually, but also this issue can be solved by using advanced installation options.
  • Installing via SSH can be challenging, when we need to provide several options on the command line, there are only two kinds of quotes available, and they can get messed up when we pass options across servers.

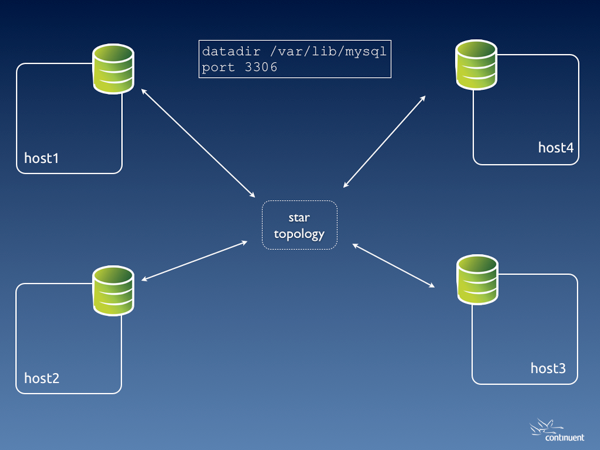
Remote sandboxes 001 001

Default deployment - with one MySQL server installed through rpm or deb

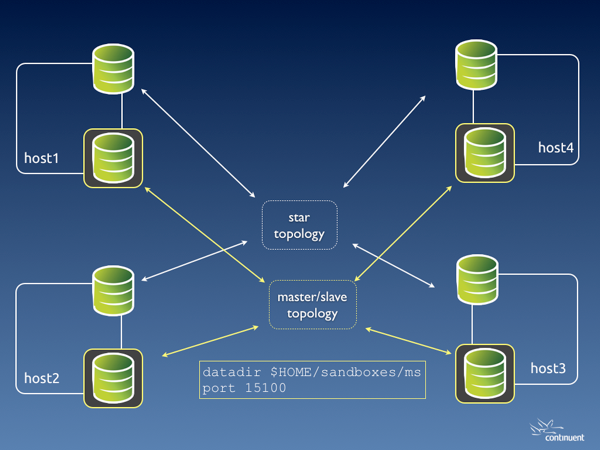
Remote sandboxes 002 001

Deployment with one additional sandbox per host

Remote sandboxes 003 001

Deployment with two additional sandbox per host

Remote sandboxes 004 001

Deployment with three additional sandbox per host

I faced this problem several times, and each time I was writing a quick shell script that would deploy the sandboxes in my servers. My O.S. user has access to all nodes in the cluster using SSH, and this makes the remote installation easier.

Remote deployment scripts

No manual installation is required. Following my experience with many different deployment in my clusters, I came up with a solid model that allows me to deploy remote sandboxes automatically. Initially, I had several sandboxes.sh scripts scattered around my code version control system. Then I implemented a general purpose script inside the Tungsten Toolbox. And finally I made an even more general script in the latest release of MySQL-Sandbox (3.0.31).

Remote database connection

This problem is easy to solve. By default, sandbox users are created as

msandbox@'127.%'
There is an option that installs the sandbox users with access from anywhere in the network (--remote_access='%'). We just need to pass this option correctly to the deployer. (See below)

Sandbox configuration

MySQL Sandboxes can be configured exactly as you need them. During the installation, you can pass options that change the configuration file according to your need. The syntax is :

make_sandbox tarball_name.tar.gz -- -c option=value -c another_option=value
The options passed with '-c' will be written to the configuration file, and used since the first start.

Passing complex options across servers

This is probably the most annoying problem. If you run

ssh myhost  "some_command --option='value' "
and there are quotes inside 'value', you may get an error, and a difficult one to debug.

The solution to this problem is to split the process into three phases:

  1. Create a deployment shell script, generated dynamically inside the remote_sandboxes script. This script will have all the needed quotes in the right places. There won't be any need of further quoting.
  2. Send the script to the remote host. Note that we generate a different script for every host.
  3. ssh to the remote host, and execute the deployment script remotely. The script will run all the commands you have prepared, without risk of contaminating the command line with unwanted quotes.

An additional advantage of this approach is that you can include some checks inside the dynamically generated script. Things that could not be easily done with an SSH call.

Try it out

The new script is installed along the rest of MySQL Sandbox executable, and it is called deploy_to_remote_sanboxes.sh. For example:

deploy_to_remote_sanboxes.sh -l host1,host2,host3 -P 19000 -d myGA -t ~/downloads/mysql-5.6.10-linux-blah-blah.tar.gz

This command will install a sandbox called 'myGA' with MySQL 5.6.10, using port 19000 and the given tarball.

Assumptions:

  • You must have ssh access between your current O.S. user and a corresponding user in the remote hosts. It is recommended that the user access through a SSH key.
  • MySQL Sandbox should be installed in all remote hosts.
  • The port that you have chosen for the sandboxed database server must be open (and not already used) in all hosts
  • If you have an existing sandbox with the same name it will be overwritten.

Friday, November 04, 2011

Replication stars

Working with replication, you come across many topologies, some of them sound and established, some of them less so, and some of them still in the realm of the hopeless wishes. I have been working with replication for almost 10 years now, and my wish list grew quite big during this time. In the last 12 months, though, while working at Continuent, some of the topologies that I wanted to work with have moved from the cloud of wishful thinking to the firm land of things that happen. My quest for star replication starts with the most common topology. One master, many slaves.
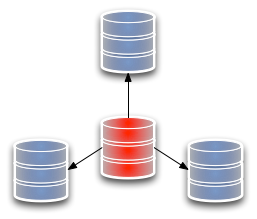
Replication 1 master slave

Fig 1. Master/Slave topology

Replication legend

Legend

It looks like a star, with the rays extending from the master to the slaves. This is the basis of most of the replication going on mostly everywhere nowadays, and it has few surprises. Setting aside the problems related to failing over and switching between nodes, which I will examine in another post, let's move to another star.
Replication 2 fan in slave

Fig 2. Fan-in slave, or multiple sources

The multiple source replication, also known as fan-in topology, has several masters that replicate to the same slave. For years, this has been forbidden territory for me. But Tungsten Replicator allows you to create multiple source topologies easily. This is kind of uni-directional, though. I am also interested in topologies where I have more than one master, and I can retrieve data from multiple points.
Replication 3 all to all three nodes

Fig 3. all-to-all three nodes

Replication 4 all to all four nodes

Fig 4. All-to-all four nodes

Tungsten Multi-Master Installation solves this problem. It allows me to create topologies where every node replicates to every other node. Looking at the three-node scheme, it appears a straightforward solution. When we add one node, though, we see that the amount of network traffic grows quite a lot. The double sided arrows mean that there is a replication service at each end of the line, and two open data channels. When we move from three nodes to four, we double the replication services and the channels needed to sustain the scheme. For several months, I was content with this. I thought: it is heavy, but it works, and it's way more than what you can do with native replication, especially if you consider that you can have a practical way of preventing conflicts using Shard Filters. But that was not enough. Something kept gnawing at me, and from time to time I experimented with Tungsten Replicator huge flexibility to create new topologies. But the star kept eluding me. Until … Until, guess what? a customer asked for it. The problem suddenly ceased to be a personal whim, and it became a business opportunity. Instead of looking at the issue in the idle way I often think about technology, I went at it with practical determination. What failed when I was experimenting in my free time was that either the pieces did not glue together the way I wanted, or I got an endless loop. Tungsten Replicator has a set of components that are conceptually simple. You deploy a pipeline between two points, open the tap, and data starts flowing in one direction. Even with multiple masters replication, the principle is the same. You deploy many pipes, and each one has one purpose only.
Replication 5 star topology 3 rays

Fig 5. All-masters star topology

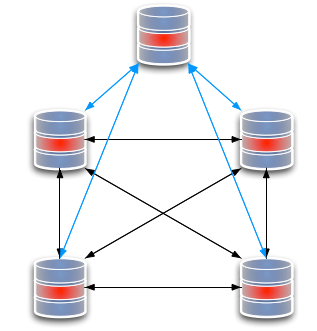
In the star topology, however, you need to open more taps, but not too many, as you need to avoid the data looping around. The recipe, as it turned out, is to create a set of bi-directional replication systems, where you enable the central node slave services to get changes only from a specific master, and the slave services on the peripheral nodes to accept changes from any master. It was as simple as that. There are, of course, benefits and drawbacks with a star topology, compared to a all-replicate-to-all design. In the star topology, we create a single point of failure. If the central node fails, replication stops, and the central node needs to be replaced. Instead, the all-to-all design has no weaknesses. Its abundance of connections makes sure that, if a node fails, the system continues working without any intervention. There is no need for fail-over.
Replication 6 all to all extending png

Fig 6. extending an all-to-all topology

Replication 7 star extending

Fig 7. Extending a star topology

However, there is a huge benefit in the node management. If you need to add a new node, it costs two services and two connections, while the same operation in the all-to-all replication costs 8 services and 8 connections. With the implementation of this topology, a new challenge has arisen. While conflict prevention by sharding is still possible, this is not the kind of scenario where you want to apply it. We have another conflict prevention mechanism in mind, and this new topology is a good occasion make it happen. YMMV. I like the additional choice. There are cases where a all-replicate-to-all topology is still the best option, and there are cases where a star topology is more advisable.

Thursday, March 31, 2011

MySQL replication for demanding users

I have been working with MySQL replication for quite a while. I have dealt with simple replication setups and I have experimented with complex ones. Five years ago I wrote an article about advanced MySQL replication, which was mostly a dream on what you could do with imagination and skill, but the matter from that article is still not even remotely ready for production. Yet, since that article, I have been approached by dozens of people who wanted to know how to make the multiple master dream become reality. To all of them, I had to say, "sorry, this is just a proof of concept.Come back in a few years, it may become possible". It still isn't.
Despite its latest great technological advance, MySQL native replication is is very poor of topologies. What you can do with MySQL native replication is master-to-slave (which also includes relayed slaves), master-to-master, and circular replication.
replication topologies
Of these, circular replication is the closest thing to multiple masters that you can get with MySQL native replication, without the addition of third party services.
Circular replication is tricky to set up, although not unreasonably so. It works. With some patience and precision, you can build a cluster of a few nodes in circular replication. With luck, you can get them to work properly, without loops and with the data flowing to all the servers. Your luck runs out the moment one of the servers fails, or replication breaks down for whatsoever reason. Then you see that circular replication is actually more complicated than what it looks on the surface, and it is also quite brittle. That doesn't mean that circular replication is not used in production. It is. I have known several people who use it successfully, although nobody is really happy about it.
In addition to its fragility, circular replication is slow. If you insert data into master A, it has to travel across three nodes before reaching master D.
Another topology that seems to be very popular is the multiple source scheme. It is the opposite of master/slave. Instead of having one master that sends data to many slaves, it is many masters that send data to one slave. Despite its popularity, this topology is yet unimplemented with MySQL native replication. The best you can do to simulate the desired outcome is to do round-robin replication with cron.
With this background, it is no surprise that I was thrilled at the idea of working for a company that has made these dreams become reality. Tungsten replicator allows users to have real multiple masters topologies, and even the much coveted multiple source topology is now within the users grasp.
Compared to MySQL replication, the drawback of using Tungsten is that you need to deal with bigger complexity. It's only natural. With so many more features, there come more pieces to take care of.
An interesting point about multiple masters is the matter of conflict resolution. Asynchronous replication convenience and robustness are countered by lack of means to deal with conflicts. This difficulty has been used many times as the reason for not implementing multiple source replication in MySQL. I have my own ideas on this issue. I am aware of the risks, but if I were allowed to do multiple master replication, I would be glad to take charge of the risks. Updating different databases, or different tables in separate masters is one way of defining a conflict-free scenario where multiple masters or multiple sources could be used safely. If only we could ...
My colleague Robert Hodges has posted some interesting aspects in his blog. The bottom line is that we focus on empowering users with advanced replication features. Conflict resolution can wait. I am sure many users would love to have the problem of how to avoid conflicts if the more demanding problem of how to replicate from many places to one cluster could be solved. The good news is that some sort of conflict detection (and possibly resolution) are possible even now, without slowing down the operations and without complicating our lives unnecessarily. For example, a simple conflict that could be avoided using Tungsten filters is the one resulting in a master that is updating tables that it was not supposed to do. In a scenario where multiple source replication works on the assumption that each master updates a given subset of the data, we can easily detect and eventually reject offending updates. It is not much, but in many practical cases it would be the difference between having robust multiple source replication and doing data load and consolidation manually.

Anyway, back to the present day with very much real multi-master replication available for everyone. To alleviate the fear of the unknown, we are organizing webinars on a regular basis, where we cover the theoretical points and give practical demos of how to use the new features.
If you are a demanding user, this upcoming webinar is for you: MySQL Multi-Master and Multi-Source Replication With Tungsten. Tomorrow, March 31st, 2011, at 10am PDT.

Tuesday, May 27, 2008

Chaining Proxies

If you need to combine two scripts with MySQL Proxy you have three choices.
  • You can manually rewrite the two scripts (good luck!)
  • you can use the load-multi module to load scripts on demand;
  • or you can use the proxy chaining technique.

To chain two proxies, you need to start one Proxy with the first Lua script, pointing at the real backend, listening to a non-standard port. Then you start the second Proxy with the second Lua script, having the first proxy as a backend, and listening to the standard proxy port.
It's a difficult and error prone procedure. You would forget about it, unless there were an easy workaround. And indeed you can have such a workaround. Just use the chain_proxy script from MySQL Forge and use it with this simple syntax:
$ chain_proxy first_script.lua second_script.lua
When I made this script, I had the problem of handling the standard output for each proxy instance. The brute force solution is to start each instance in a separate terminal window, but that is less than optimal. It would be almost as much work as doing things manually.
Considering that usually I need the output of a Proxy session only for debugging and that I am a frequent user of GNU screen, I made this arrangement:
The script starts each proxy inside a separate screen. At the end, it gives the list of screens being used, and creates a customized script in /tmp/ to kill the chained proxies and remove the screens.
$ chain_proxy digits.lua loop.lua
proxy started on screen "second_proxy" using script "loop.lua" - pid_file : /tmp/proxy1.pid
proxy started on screen "first_proxy" using script "digits.lua" - pid_file : /tmp/proxy_chain1.pid
stop script is /tmp/proxy_chain_stop
There are screens on:
21257.first_proxy (Detached)
21258.second_proxy (Detached)
2 Sockets in /tmp/uscreens/S-gmax.
In this example, the two proxies are started in sequence, and the script gives information on what is going on. The output of "loop.lua" is in the "first_proxy" screen. To see it, I only need to do
$ screen -r first_proxy
When I am finished using the chained Proxy, I type
$ /tmp/proxy_chain_stop
There are screens on:
21257.first_proxy (Detached)
21258.second_proxy (Detached)
2 Sockets in /tmp/uscreens/S-gmax.

No Sockets found in /tmp/uscreens/S-gmax.
This script can also be implemented by redirecting the output of each proxy to a different file. YMMV. I like the screen solution better.

I will be speaking about this feature (and more) during my MySQL University session on advanced Lua scripting.