Showing posts sorted by relevance for query multi-master. Sort by date Show all posts

Thursday, July 18, 2013

tpm, the multi-master composer

Multi master topologies blues

Tungsten Replicator is a powerful replication engine that, in addition to providing the same features as MySQL Replication, can also create several topologies, such as

  • all-masters: every master in the deployment is a master, and all nodes are connected point-to-point, so that there is no single point of failure (SPOF).
  • fan-in: Several masters can replicate into a single slave;
  • star: It’s an all-masters topology, where one node acts as hub which simplifies the deployment at the price of creating a SPOF.

The real weakness of these topologies is that they don’t come together easily. Installation requires several commands, and running them unassisted is a daunting task. Some time ago, we introduced a set of scripts (the Tungsten Cookbook) that allow you to install multi-master topologies with a single command. Of course, the single command is just a shell script that creates and runs all the commands needed for the deployment. The real downer is the installation time. For an all-masters topology with 4 nodes, you need 17 operations, which require a total of about 8 minutes. Until today, we have complex operations, and quite slow.

Meet The TPM

Notice: these examples require a recent night build of Tungsten Replicator (e.g. 2.1.1-120), which you can download from http://bit.ly/tr_21_builds

But technology advances. The current tungsten-installer, the tool that installs Tungsten-Replicator instances, has evolved into a tool that has been used for long time to install our flagship product, Continuent Tungsten (formerly known as ‘Tungsten Enterprise’). The ‘tpm’ (Tungsten Package Manager) has outsmarted its name, as it does way more than managing packages, and actually provides a first class installation experience. Among other things, it provides hundreds of validation checks, to make sure that the operating system, the network, and the database servers are fit for the installation. Not only that, but it installs all components, in all servers in parallel.

So users of our commercial solution have been enjoying this more advanced installation method for quite a long time, and the tpm itself has improved its features, becoming able to install single Tungsten Replicator instances, in addition to the more complex HA clusters. Looking at the tool a few weeks ago, we realized that tpm is so advanced that it could easily support Tungsten Replicator topologies with minimal additions. And eventually, we have it!

The latest nightly builds of Tungsten Replicator include the ability of installing multi-master topologies using tpm. Now, not only you can perform these installation tasks using the cookbook recipes, but the commands are so easy that you can actually run them without help from shell scripts.

Let’s start with the plain master/slave installation (Listing 1). The command looks similar to the one using tungsten-installer. The syntax has been simplified a bit. We say members instead of cluster-hosts, master instead of master-host, replication-user and replication-password instead of datasource-user and datasource-password. And looking at this command, it does not seem worth the effort to use a new syntax just to save a few keystrokes.

./tools/tpm install alpha \
    --topology=master-slave \
    --home-directory=/opt/continuent/replicator \
    --replication-user=tungsten \
    --replication-password=secret \
    --master=host1 \
    --slaves=host2,host3,host4 \
    --start

Listing 1: master/slave installation.

However, the real bargain starts appearing when we compare the installation time. Even for this fairly simple installation, which ran in less than 2 minutes with tungsten-installer, we get a significant gain. The installation now runs in about 30 seconds.

Tpm master slave
Image 1 - Master/slave deployment

Where we see the most important advantages, though, is when we want to run multiple masters deployments. The all-masters installation command, lasting 8 minutes, which I mentioned a few paragraphs above? Using tpm, now runs in 45 seconds, and it is one command only. Let’s have a look

./tools/tpm install four_musketeers \
    --topology=all-masters \
    --home-directory=/opt/continuent/replicator \
    --replication-user=tungsten \
    --replication-password=secret \
    --masters=host1,host2,host3,host4 \
    --master-services=alpha,bravo,charlie,delta \
    --start

Listing 2: all-masters installation.

It’s worth observing this new compact command line by line:

  • ./tools/tpm install four_musketeers: This command calls tpm with the ‘install’ mode, to the entity ‘four_musketeers’. This thing is a data service, which users of other Tungsten products and readers of Robert Hodges blog will recognize as a more precise definition of what we commonly refer to as ‘a cluster.’ Anyway, this data service appears in the installation and, so far, does not have much to say within the replicator usage. So just acknowledge that you can name this entity as you wish, and it does not affect much of the following tasks.
  • –topology=all-masters: Some of the inner working of the installer depend on this directive, which tells the tpm what kind of topology to expect. If you remember what we needed to do with tungsten-installer + configure-service, you will have some ideas of what this directive tells tpm to do and what you are spared now.
  • –home-directory=/opt/continuent/replicator: Nothing fancy here. This is the place where we want to install Tungsten.
  • –replication-user=tungsten: It’s the database user that will take care of the replication.
  • –replication-password=secret: The password for the above user;
  • –masters=host1,host2,host3,host4: This is the list of nodes where a master is deployed. In the case of an all-masters topology, there is no need of listing the slaves: by definition, every host will have a slave service for the remaining masters.
  • –master-services=alpha,bravo,charlie,delta: This is the list of service names that we will use for our topology. We can use any names we want, including the host names or the names of your favorite superheroes.
  • –start: with this, the replicator will start running immediately after the deployment.

This command produces, in 45 seconds, the same deployment that you get with tungsten-installer in about 8 minutes.

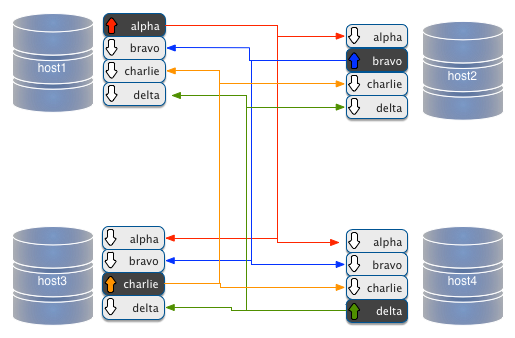
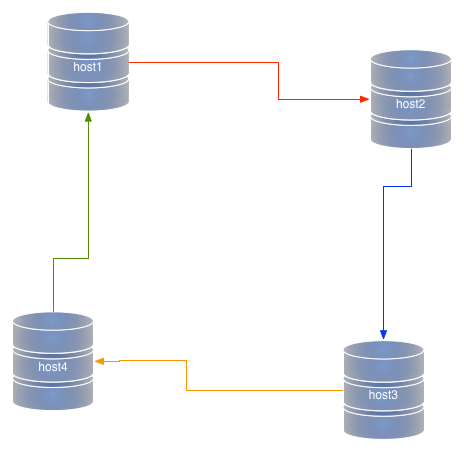
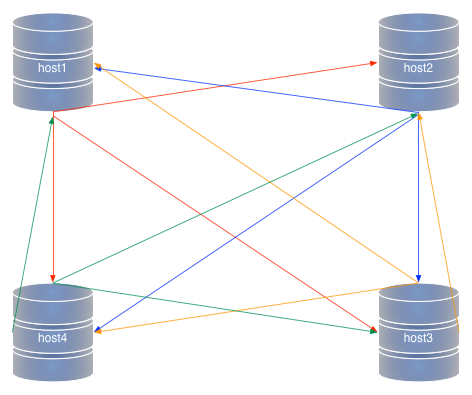
Tpm all masters
Image 2 - all-masters deployment

The command is so simple that you could use it without assistance. However, if you like the idea of Tungsten Cookbook assembling your commands and running them, giving you access to several commodity utilities in the process, you can do it right now. Besides, if you need to customize your installation with ports, custom paths and management tools, you will appreciate the help provided by Tungsten Cookbook.

# (edit ./cookbook/USER_VALUES.sh)
export USE_TPM=1
./cookbook/install_all_masters

Listing 3: invoking tpm installation for all-masters using a cookbook recipe.

When you define USE_TPM, the installation recipe will use tpm instead of tungsten-installer. Regardless of the verbosity that you have chosen, you realize that you are using the tpm because the installation is over very soon.

The above command (either the one done manually or the built-in recipe) will produce a data service with four nodes, all of which are masters, and you can visualize them as:

./cookbook/show_cluster
--------------------------------------------------------------------------------------
Topology: 'ALL_MASTERS'
--------------------------------------------------------------------------------------
# node host1
alpha    [master]   seqno:         15  - latency:   0.058 - ONLINE
bravo    [slave]    seqno:         15  - latency:   0.219 - ONLINE
charlie  [slave]    seqno:         15  - latency:   0.166 - ONLINE
delta    [slave]    seqno:         15  - latency:   1.161 - ONLINE

# node host2
alpha    [slave]    seqno:         15  - latency:   0.100 - ONLINE
bravo    [master]   seqno:         15  - latency:   0.179 - ONLINE
charlie  [slave]    seqno:         15  - latency:   0.179 - ONLINE
delta    [slave]    seqno:         15  - latency:   1.275 - ONLINE

# node host3
alpha    [slave]    seqno:         15  - latency:   0.093 - ONLINE
bravo    [slave]    seqno:         15  - latency:   0.245 - ONLINE
charlie  [master]   seqno:         15  - latency:   0.099 - ONLINE
delta    [slave]    seqno:         15  - latency:   1.198 - ONLINE

# node host4
alpha    [slave]    seqno:         15  - latency:   0.145 - ONLINE
bravo    [slave]    seqno:         15  - latency:   0.256 - ONLINE
charlie  [slave]    seqno:         15  - latency:   0.208 - ONLINE
delta    [master]   seqno:         15  - latency:   0.371 - ONLINE

Listing 4: The cluster overview after an all-masters installation.

More topologies: fan-in

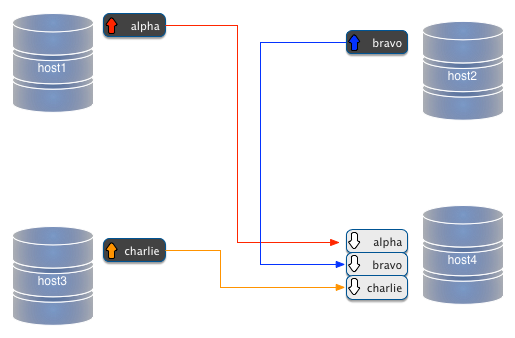
Here is the command that installs three masters in host1,host2, and host3, all fanning in to host4, which will only have 3 slave services, and no master.

./tools/tpm install many_towns \
    --replication-user=tungsten \
    --replication-password=secret \
    --home-directory=/opt/continuent/replication \
    --masters=host1,host2,host3 \
    --slaves=host4 \
    --master-services=alpha,bravo,charlie \
    --topology=fan-in \
    --start

Listing 5: Installing a fan-in topology.

Tpm fan in 1
Image 3 - Fan-in deployment

You will notice that it’s quite similar to the installation of all-masters. The most notable difference is that, in addition to the list of msters, the list of masters, there is also a list of slaves.

    --masters=host1,host2,host3 \
    --slaves=host4 \

Listing 6: How a fan-in topology is defined.

We have three masters, and one slave listed. We could modify the installation command this way, and we would have two fan-in slaves getting data from two masters.

    --masters=host1,host2 \
    --slaves=host3,host4 \
    #
    # The same as:
    #
    --masters=host1,host2 \
    --members=host1,host2,host3,host4 \

Listing 7: Reducing the number of masters increases the slaves in a fan-in topology.

Now we will have two masters in host1 and host2, and two fan-in slaves in host3 and host4.

Tpm fan in 2
Image 4 - Fan-in deployment with two slaves

If we remove another master from the list, we will end up with a simple master/slave topology.

And a star

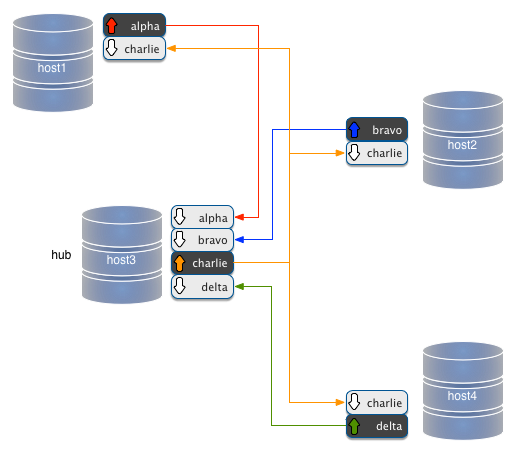
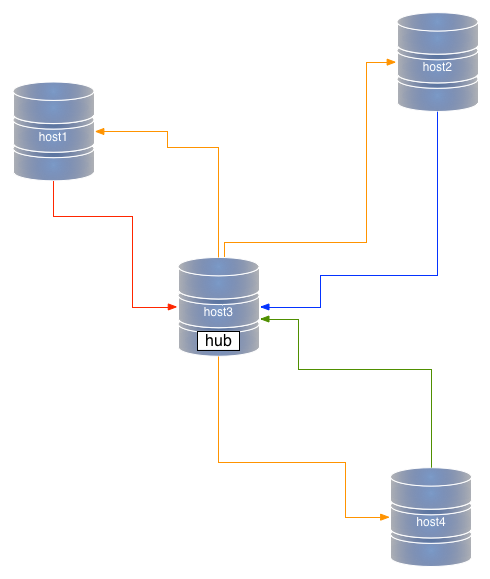
The most difficult topology is the star, where all nodes are masters and a node acts as a hub between each endpoint and the others.

./tools/tpm install constellation \
    --replication-user=tungsten \
    --replication-password=secret \
    --home-directory=/opt/continuent/replication \
    --masters=host1,host2,host4 \
    --hub=host3 \
    --hub-service=charlie \
    --master-services=alpha,bravo,delta \
    --topology=star \
    --start

Listing 8: Installing a star topology.

Tpm star
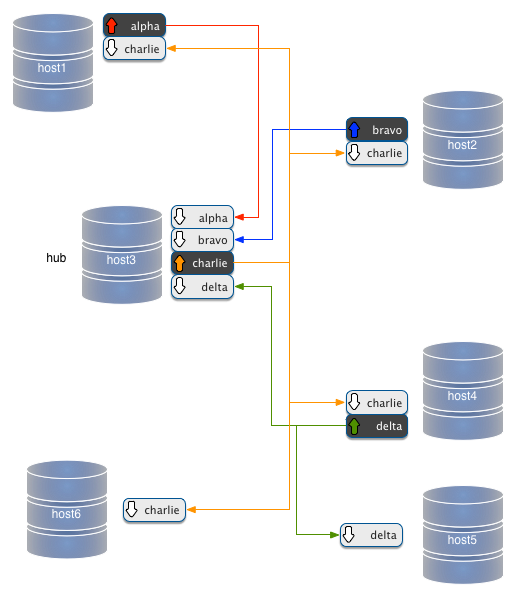
Image 5 - star deployment

Now the only complication about this topology is that it requires two more parameters than all-masters or fan-in. We need to define which node is the hub, and how to name the hub service. But this topology has the same features of the one that you could get by running 11 commands with tungsten-installer + configure-service.

More TPM: building complex clusters

The one-command installation is just one of tpm many features. Its real power resides in its ability of composing more complex topologies. The ones shown above are complex, and since they are common there are one-command recipes that simplify their deployment. But there are cases when we want to deploy beyond these well known topologies, and compose our own cluster. For example, we want an all-masters topology with two additional simple slaves attached to two of the masters. To compose a custom topology, we can use tpm in stages. We configure the options that are common to the whole deployment, and then we shape up each component of the cluster.

#1
./tools/tpm configure defaults  \
    --reset \
    --replication-user=tungsten \
    --replication-password=secret \
    --home-directory=/home/tungsten/installs/cookbook \
    --start

#2
./tools/tpm configure four_musketeers  \
    --masters=host1,host2,host3,host4 \
    --master-services=alpha,bravo,charlie,delta \
    --topology=all-masters

#3
./tools/tpm configure charlie \
    --hosts=host3,host5 \
    --slaves=host5 \
    --master=host3

#4
./tools/tpm configure delta \
    --hosts=host4,host6 \
    --slaves=host6 \
    --master=host4

#5
./tools/tpm install

Listing 9: A composite tpm command.

In Listing 9, we have 5 tpm commands, all of which constitute a composite deployment order. In segment #1, we tell tpm the options that apply to all the next commands, so we won’t have to repeat them. In segment #2, we define the same 4 masters topology that we did in Listing 2. Segments #3 and #4 will create a slave service each on hosts host5 and host6, with the respective masters being in host3 and host4. The final segment #5 tells tpm to take all the information created with the previous command, and finally run the installation. You may be wondering how the tpm will keep track of all the commands, and recognize that they belong to the same deployment. What happens after every command is that the tpm adds information to a file named deploy.cfg, containing a JSON record of the configuration we are building. Since we may have previous attempts at deploying from the same place, we add the option –reset to our first command, thus making sure that we start a new topology, rather than adding to a previous one (which indeed we do when we want to update an existing data service).

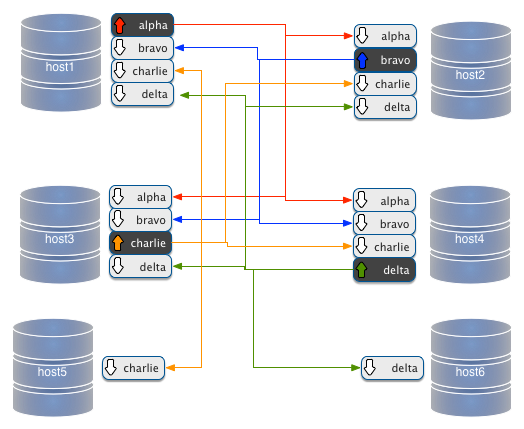
The result is what you get in the following image:

Tpm all masters with slaves
Image 6 - all-masters deployment with additional slaves

A word of caution about the above topology. The slaves in host5 and host6 will only get the changes originated in their respective masters. Therefore, host5 will only get changes that were originated in host4, while host6 will only get changes from host4. If a change comes from host1 or host2, they will be propagated to host1 to host4, because each host has a dedicated communication link to each of the other masters, but the data does not pass through to the single slaves.

Different is the case when we add slave nodes to a star topology, as in the following example.

./tools/tpm configure defaults  \
    --reset \
    --replication-user=tungsten \
    --replication-password=secret \
    --home-directory=/home/tungsten/installs/cookbook \
    --start

./tools/tpm configure constellation  \
    --masters=host1,host2,host3,host4 \
    --master-services=alpha,bravo,delta \
    --hub=host3 \
    --hub-service=charlie \
    --topology=star

./tools/tpm configure charlie \
    --hosts=host3,host5 \
    --slaves=host5 \
    --master=host3

./tools/tpm configure delta \
    --hosts=host4,host6 \
    --slaves=host6 \
    --master=host4

./tools/tpm install
Tpm star with slaves
Image 7 - star deployment with additional slaves

In a star topology, the hub is a pass-through master. Everything that is applied to this node is saved to binary logs, and put back in circulation. In this extended topology, the slave service in host5 is attached to a spoke of the star. Thus, it will get only changes that were created in its master. Instead, the node in host6, which is attached to the hub master, will get all the changes coming from any node.

Extending clusters

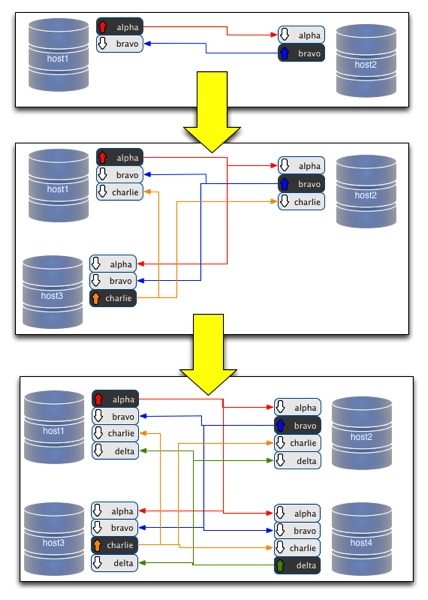
So far, the biggest challenge when working with multi-master topologies has been extending an existing cluster. Starting with two nodes and then expanding it to three is quite a challenging task. (Figure 8)

Using tpm, though, the gask becomes quite easy. Let's revisit the all-masters installation command, similar to what we saw at the start of this article

./tools/tpm install musketeers \
    --reset \
    --topology=all-masters \
    --home-directory=/opt/continuent/replicator \
    --replication-user=tungsten \
    --replication-password=secret \
    --masters=host1,host2,host3 \
    --master-services=athos,porthos,aramis \
    --start

If we want to add a host 'host4', running a service called 'dartagnan', we just have to modify the above command slightly:

./tools/tpm configure musketeers \
    --reset \
    --topology=all-masters \
    --home-directory=/opt/continuent/replicator \
    --replication-user=tungsten \
    --replication-password=secret \
    --masters=host1,host2,host3,host4 \
    --master-services=athos,porthos,aramis,dartagnan \
    --start

./tools/tpm update

That's all it takes. The update command is almost a repetition of the install command, with the additional components. The same command also restarts the replicators, to get the configuration online.

Tpm all masters extend
Image 8 - Extending an all-masters topology

More is coming

The tpm is such a complex tool that exploring it all in one session may be daunting. In addition to installing, you can update the data service, and thanks to its precise syntax, you can deploy the change exactly in the spot where you want it, without moving from the staging directory. We will look at it with more examples soon.

Monday, March 25, 2013

Multi-master data conflicts - Part 1: understanding the problem

What is a conflict?

Readers of this blog know that one of my favorite tools, Tungsten Replicator, can easily create multi-master replication topologies, such as all-masters, star, fan-in. While this is good news for system designers and ambitious DBAs, it also brings some inconvenience. When you allow updates to happen in more than one master, you risk having conflicts. You may have heard this term before. For the sake of clarity, let's define what conflicts are, before analyzing each case in detail.

You have a conflict when several sources (masters) update concurrently the same data in asynchronous replication.

It's important to stress that this happens with asynchronous replication. In a truly synchronous cluster, where all data is kept consistent through 2-phase commit, there is no risk of conflicts.

The above definition is not always correct. You may update data from several sources and end up with something completely legitimate. A better definition should be: a conflict happens after an unexpected concurrent modification of existing data coming from a remote source.

For example:

  • Both servers A and B insert a record with the same primary key;
  • Master A updates record 10 with value 3 while master B updates record 10 with value 4;
  • Master A deletes record 10 while master B updates record 10.

In each of these cases, there is data in one server, which could have been just inserted by a legitimate source, or could have been there for long time. Regardless of the record age, the conflict happen when the data clashes with the latest update. We usually think of conflicts as concurrent events from different sources, because this is the most frequent case of evident conflicts, i.e. conflicts that are detected (and hopefully fixed). But there are hidden conflict that happen (or are discovered) long time after the update.

When we consider the consequences of a conflict, we observe that a conflict creates one or more of the following:

  • Duplicate data (unwanted insert)
  • Data inconsistency (unwanted update)
  • Data loss (unwanted delete)
  • Replication break

Duplicate data

This is the most widely known conflict, because it's often caught immediately after the fact, allowing the DBA to take action. However, it's also one of the less understood cases, as we will see in the next section.

Multi master conflicts 003

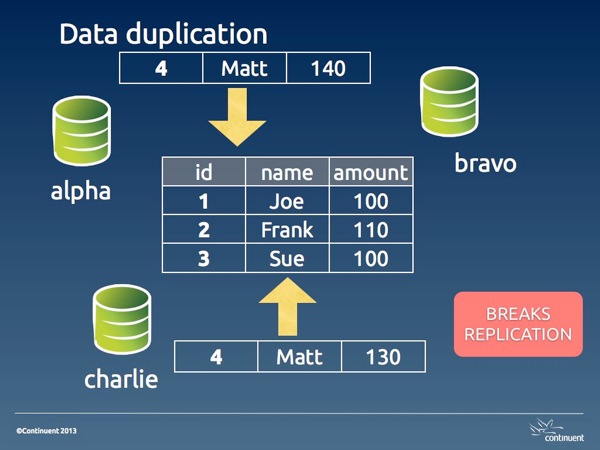
Image #1. Data duplication

In its basic shape, data duplication happens when two masters insert the same data. One of the two transactions will be committed before the other, and the second one will fail with a rightful duplicate key error. The reason for this occurrence is often an application bug, or a design flaw, or sometimes an human error that the application fails to detect properly (a different application bug).

We will see the possible solution in part 2 of this article. For now, it's enough to know that this kind of error is the best kind of conflicts that can happen to you. Since it breaks replication, it has the positive effect of alerting the DBA about an error.

Depending on which event is applied first, you have different situations. If the remote event is applied first, you have a real conflict, where the legitimate event can't get to the database. This state requires a longer set of actions: you need to clean up both the origin and the destination servers. If the legitimate action is applied first, then you don't have a real conflict, as the wrong event was applied only in one server, and you need to clean up only the origin. If you have more than two masters in your topology, you may find that the damage could be a mix of both cases, as the wrong event may arrive to distant servers before or after the right one.

auto_increment_offsets and hidden data duplication

There is a popular belief that conflicts with multi-master topologies can be avoided using auto_increment_increment and auto_increment_offset. The combination of these two variables makes sure that auto_increment values are generated with different intervals for each master. For example, if I have three masters and I am using increment 3, the first master will generate 1,4,7,10, the second one will have 2,5,8,11, and the third one 3,6,9,12.

Where does this paradigm work? When the primary key is the auto generated column, then the conflict is prevented. For example, in a table that records bug reports, the incrementing value for the bug number is a legitimate primary key. If two masters enter a bug simultaneously, the bug numbers will have different values. (there will most likely be gaps in the bug numbers, and this could be a non desirable side effect, bt then, I am not advocating this system, although I made this mistake many years ago.)

However, if the table has a natural primary key that is not an auto-incremented value, conflicts are possible, and likely. In that case, you will have a duplicated key error, as in the case seen before.

Disaster strikes when the table has a poorly chosen auto_increment primary key.

For example, let's consider a departments table with this structure:

CREATE TABLE departments (
    dept_id int not null auto_increment primary key,
    dept_name varchar(30) not null
);

If two masters need to insert a new department named 'special ops', we may end up with this situation:

select * from departments;
+---------+-------------+
| dept_id | dept_name   |
+---------+-------------+
|       2 | special ops |
|       4 | special ops |
+---------+-------------+

Multi master conflicts 005

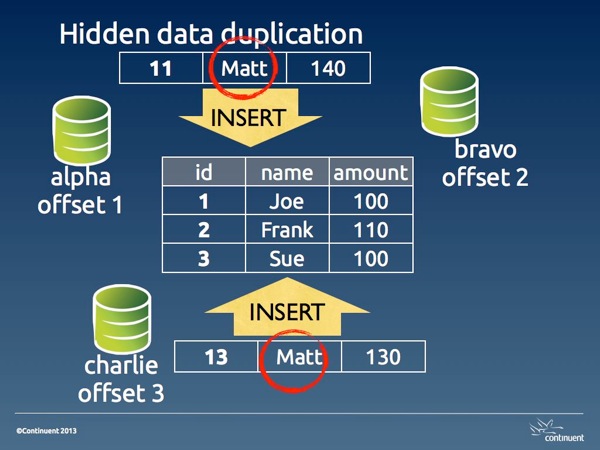
Image #2. Hidden data duplication

This is what I define hidden data duplication, because you have duplicated data, and no errors that may warn you of the problem. Here the issue is aggravated by the fact that 'department' is likely a lookup table. Thus, there will be a table where 'special ops' is referenced using dept_id 2, and another table where it is used with dept_id 4.

The reason for hidden data duplication is poor choice of primary key, and failure to enforce unique values in columns that should be such.

Data inconsistency

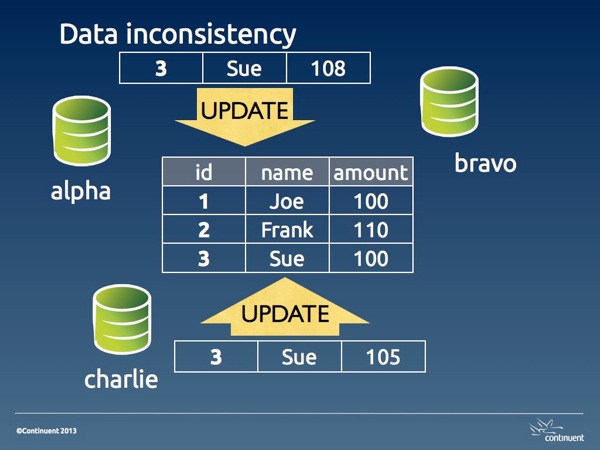
When two UPDATE statements are executed on the same record from different sources, there is the possibility of spoiling the data accuracy in several ways. The amount of damage depend on the type of update (with absolute values or calculated ones) and on whether we are using statement-based or row-based replication.

With absolute values, the last value inserted overwrites the previous one.

Multi master conflicts 006

Image #3. Data inconsistency

With calculated values, the data inconsistency may change with surprising consequences. For example, if we have a table accounts:

select * from accounts;
+----+--------+
| id | amount |
+----+--------+
|  1 |   1000 |
|  2 |   1000 |
|  3 |   1000 |
+----+--------+

If a statement that doubles the account for ID 2 is executed in two masters, then we will have an amount of 4,000 instead of 2,000. Using row-base replication can protect you against this kind of disaster.

Data loss

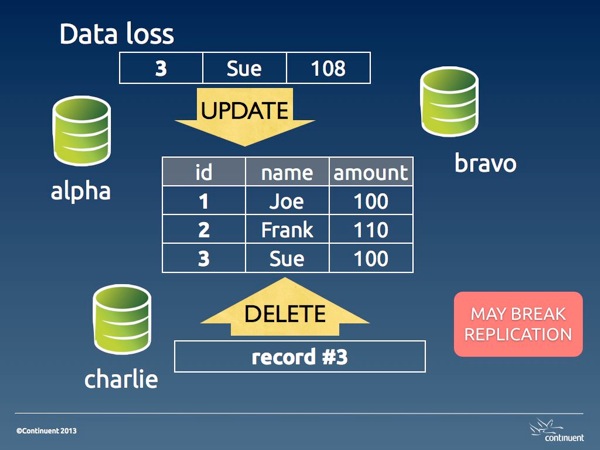
When a DELETE statement is entered for a record that later we want to read, we have lost data. This kind of DELETEs may happen because of bad operations, or more likely because of data inconsistencies that alter the conditions used for deleting.

Multi master conflicts 007

Image #4. Data loss

Unwanted DELETE operations may also break replication when the DELETE happens before an UPDATE on the same record. Either way, a data loss conflict is hard to resolve because the data has gone away. Depending on the amount of the loss, we may need to restore the table completely or partially from a backup.

Why conflicts happen

To understand why conflicts happen, let's first see why they don't happen when we try a conflicting operation in the same server.


SESSION_1 > create table people (id int not null primary key, name varchar(40) not null, amount int);
Query OK, 0 rows affected (0.01 sec)

SESSION_1 > insert into people values (1, 'Joe', 100), (2, 'Frank', 110), (3, 'Sue', 100);
Query OK, 3 rows affected (0.00 sec)
Records: 3  Duplicates: 0  Warnings: 0

SESSION_1 > set autocommit=0;
Query OK, 0 rows affected (0.00 sec)

SESSION_1 > begin;
Query OK, 0 rows affected (0.00 sec)

SESSION_2 > set autocommit=0;
Query OK, 0 rows affected (0.00 sec)

SESSION_2 > select * from people;
+----+-------+--------+
| id | name  | amount |
+----+-------+--------+
|  1 | Joe   |    100 |
|  2 | Frank |    110 |
|  3 | Sue   |    100 |
+----+-------+--------+
3 rows in set (0.00 sec)

SESSION_2 > begin;
Query OK, 0 rows affected (0.00 sec)


SESSION_1 > insert into people values (4,'Matt', 140);
Query OK, 1 row affected (0.00 sec)


SESSION_2 > insert into people values (4,'Matt', 130);
# ... hanging


SESSION_1 > commit;
Query OK, 0 rows affected (0.01 sec)


SESSION_2 > insert into people values (4,'Matt', 130);
# ...
ERROR 1062 (23000): Duplicate entry '4' for key 'PRIMARY'

What happens here is that user in session 1 inserts a record at the same time when user in session 2 inserts the same record. When the record is inserted in session 1, InnoDB creates a lock. If you look at the InnoDB locks before SESSION_1 issues a commit, you will see it:

SESSION_3 > select * from information_schema.innodb_locks\G
*************************** 1. row ***************************
    lock_id: 30B:0:307:5
lock_trx_id: 30B
  lock_mode: S
  lock_type: RECORD
 lock_table: `test`.`people`
 lock_index: `PRIMARY`
 lock_space: 0
  lock_page: 307
   lock_rec: 5
  lock_data: 4
*************************** 2. row ***************************
    lock_id: 30C:0:307:5
lock_trx_id: 30C
  lock_mode: X
  lock_type: RECORD
 lock_table: `test`.`people`
 lock_index: `PRIMARY`
 lock_space: 0
  lock_page: 307
   lock_rec: 5
  lock_data: 4
2 rows in set (0.00 sec)

You can see that there is an exclusive lock on the record.

This lock effectively prevents a duplicate.

Now, if you imagine the two sessions happening on different servers, the two users are in a similar situation, i.e. they don't know that a concurrent update on the same record is being attempted. But the difference is that, in asynchronous replication, there is no lock applied on a remote server. If the two transactions are committed at the same instant, both of them will be stored in their local server, and both of them will fail and break replication on the remote server. If the record in session 1 is applied a few seconds before the other, the user in session 2 will not be able to commit, same as it happened with the concurrent insertion in the single server example above. In this case, the conflict looks exactly as it happened in a single server.

However, if both commits happen at the same time, both users will have a positive feedback, since their transaction will return success, and both are happy, at least temporarily. Unbeknown to both, though, their transaction has failed on the remote server, and replication is broken on both servers, leaving each with a bit of mess to clean up.

These examples show that conflicts are often a matter of chance. Depending on the timing of the operations, we might catch them as they happen and take action before the conflict spreads its side effects, or we only notice later on, when replication fails, and the conflict has already spoiled our data.

Summing up

Conflicts in multi-master topologies are the consequence of unwanted or unexpected operations. The effects of a conflict range from data inconsistency to data loss, and may also cause replication to break.

The most desirable outcome for a conflict is a replication error, because it prevents further spreading of the error and alerts the DBA about a possible issue.

In the second part of this article, we will look at some of the methods to deal with conflicts in various scenarios.

Friday, August 14, 2015

MySQL replication in action - Part 2 - Fan-in topology


Introduction: where we stand

Previous episodes:

In the latest releases of MySQL and MariaDB we have seen several replication improvements. One of the most exciting additions is the ability to enhance basic replication with multiple sources. Those who have used replication for a while should remember that one of the tenets of the “old” replication was that a slave couldn’t have more than one master. This was The Law and there was no escape ... until now. The only way to work around that prohibition was to use circular replication, also known as ring replication, where each node is slave of the previous node and master of the next one.
Circular replication

Wednesday, March 27, 2013

Multi-master data conflicts - Part 2: dealing with conflicts

In the first part of this article we examined the types of conflicts and their causes. In this part, we will analyse some of the methods available to deal with conflicts.

Pessimistic locking (or: conflicts won't happen)

Applicability: synchronous clusters with 2pc

We've covered this topic in the previous article, but it's worth repeating. If you use a synchronous cluster, you don't have conflicts. For example, MySQL Cluster ensures consistent data with updates coming from different nodes. However, MySQL Cluster is not a replacement for a MySQL server, and it has severe limitations.


Optimistic locking

Applicability: synchronous clusters without 2pc (Galera)

Conflicting transactions proceed on different nodes with local locking. The last one then rolls back when it discovers a prior transaction got in first on the same data. For a more detailed analysis of this handling method, see this article by Jay Janssen


Conflict resolution after-the fact

Applicability: EnterpriseDB (none so far for MySQL)

Asynchronous replication is hard for conflicts. A conflict in this state means that the data has been applied to the wrong node or to the wrong object, and something must be done to solve the issue.

Typical remedies offered for conflict resolution are:

  • Earliest or Latest Timestamp: This method says that the oldest or the latest record prevails when a conflict happens. This is hardly a reliable resolution. It's the easiest method to implement, and thus it is offered. But it often results in a hidden data inconsistency problem, where we may find data that we don't expect. The current data was applied simply because it was updated later than the correct record. Also, timestamp calculation requires time synchronization across servers, and possibly across timezones, which calls for extra effort to keep the system functioning.
  • Node Priority: There is a hierarchy of nodes, with different ranks. When a conflict occurs, the node with the highest rank prevails. This method requires the data origin to be stored alongside the contents, and to be easily searchable when conflicts occur. It must also take into account offline nodes, and therefore it should keep the conflict resolution metadata until the offline nodes are back in synch.

Methods that could be implemented in a more advanced technology may include:

  • Origin enforcement: data coming from authorized nodes will be preserved. Data from wrong origin will be dropped, and a consolidation event will be generated and sent to the other nodes. This method would be possible in systems (like Tungsten) that keep track of the event origin.
  • Data merge: If possible and desirable, data from two different sources can be preserved, and merged in the destination table. This rule should also originate a new event to fix the data in the other nodes.

Schema renaming

Applicability: fan-in topologies

Fan in with likely conflicts

Image #1 - Fan-in topology with likely conflicts.

A fan-in topology is easy to implement with Tungsten Replicator, but not easy to maintain. By its nature, fan-in is a conflict waiting to happen. Assuming that all the masters have the same structure, they will replicate multiple changes into the same schema, and it is quite likely that some changes will clash. For this reason, the simple solution often adopted is renaming the schema before the data reaches the slave.

Fan in with schema renaming

Image #2 - Fan-in topology with schema renaming.

I know of at least one user who has successfully applied this technique for a cluster made of 70 masters and one slave.

Conflict prevention: Discipline

Applicability: all topologies

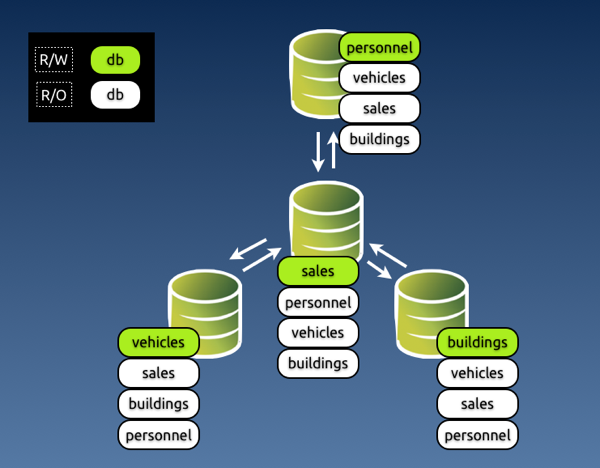
A simple way of preventing conflicts, and one that would make life easier for all is discipline. The organization decides which entry points can update which data, and conflicts are not possible, because the data is inserted or modified only in the places where it is supposed to be.

Multi master r w split

Image #3 - Preventing conflicts with discipline in a star topology.

Conflict prevention: Enforced discipline

Applicability: all topologies

If you have worked in any large organization, either public or private, you know that discipline alone is the worst method you can rely on for something so delicate and valuable as your data. The reasons why this paradigm could fail are many: it could be because some people dislike discipline, or because someone makes a mistake, or because there are too many rules and they don't remember, or because of an application bug that lets you update what you shouldn't.

Either way, you end up with a system that has conflicts and nobody knows what happened and how to fix them. However, there is a way of enforcing this system based on discipline.

This is the "poor-man's" conflict avoidance system. It is based on simple technology, available in most database servers. If you can install a multi-master topology, using either native MySQL (circular) replication or Tungsten Replicator topologies, you can also apply this method.

The key to the system is to grant different privileges for every master. Looking at image #3, you can enforce discipline by granting different privileges to the application user in every master.

In master #1, where we can update personnel, app_user will have SELECT privileges on all databases, and all privileges on personnel.

In master #2, where we can update sales, app_user will have all privileges on sales and read only access to the other databases, and so on.

The key to make this system work well is that you should assign the privileges and not let the GRANT statement being replicated. It should work like this:

# master 1
GRANT SELECT on *.* to app_user identified by 'my password';
# This is good for all masters. Let it replicate

# master 1
SET SQL_LOG_BIN=OFF;
GRANT ALL on personnel.* to app_user;   # This won't replicate


# master 2
SET SQL_LOG_BIN=OFF;
GRANT ALL on sales.* to app_user;

# master 3
SET SQL_LOG_BIN=OFF;
GRANT ALL on vehicles.* to app_user;

# master 4
SET SQL_LOG_BIN=OFF;
GRANT ALL on buildings.* to app_user;

This method works quite well. Since updates for a given schema can be applied only in one master, there is little chance of any mischief happening. Conflicts are not completely removed, though. There are super users and maintenance users who can, consciously or not, introduce errors. For these cases, you may want to look at the next section.

Enforced discipline with certified origin

Applicability: all Tungsten topologies

Discipline based on granted privileges is often robust enough for your needs. However, if you want to keep track of where the data comes from, you should look at a System Of Records technology, where the origin of each piece of data can be traced to its origin.

Tungsten Replicator implements this technology with several topologies. The theory of this matter is beautifully explained by Robert Hodges in an article written some time ago. Here I would like to look at the practical stuff.

To implement a System of Records in Tungsten, you decide where you want to update each schema (which is defined as a shard in our lingo,) assign that schema to a service, and the replicator will enforce your rules.

Once you have defined the shards, you can set the rules. When an event comes to a slave from an UNKNOWN shard, i.e. a shard that was not among the defined rules, you can:

  • Accept the event; (not recommended, really)
  • Drop the event silently
  • Drop the event with a warning in the logs;
  • Generate an error that will break replication (recommended)

You can choose among the above actions when setting a rule for events that come from UNWANTED shards, i.e. a shard that is not the one designated to update that schema.

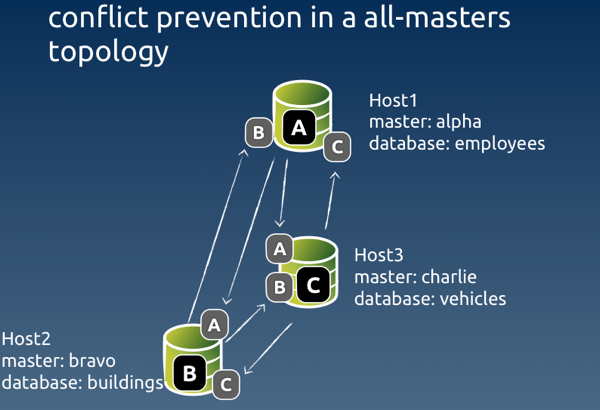
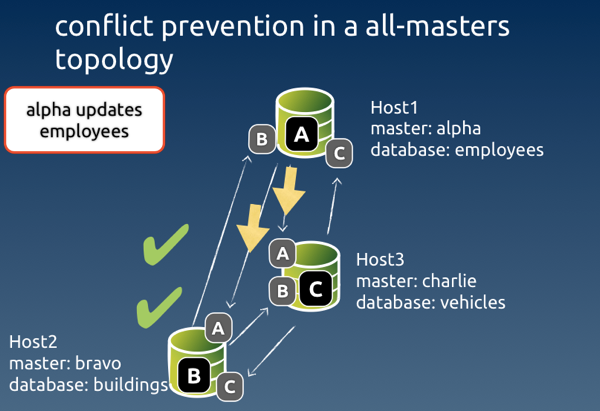
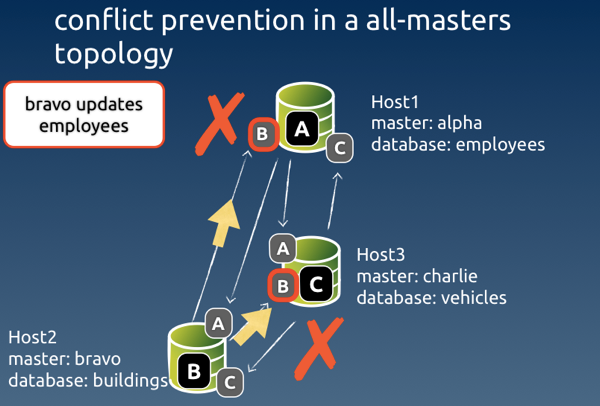
Here's an example of a shard definition based on an all-masters schema with three nodes:

Conflict prevention 0

Image #4 - Sample conflict prevention in an all-masters topology

# Options to add during installation
--svc-extractor-filters=shardfilter

# policy for unknown shards
--property=replicator.filter.shardfilter.unknownShardPolicy=error

# policy for unwanted shards
--property=replicator.filter.shardfilter.unwantedShardPolicy=error

# Whether the policy for unwanted shards is activated or not
--property=replicator.filter.shardfilter.enforceHomes=false

# whether we allow whitelists to be created
--property=replicator.filter.shardfilter.allowWhitelisted=false


# Loading the rules set

$ trepctl -host host1 -service charlie shard -insert < shards.map

$ cat shards.map
shard_id          master      critical
employees         alpha       false
buildings         bravo       false
vehicles          charlie     false
test              whitelisted false

The rules are set by service, rather than host name. The schema 'employees' can be updated by the service named 'alpha', which has its master in host #1. Similarly, 'buildings' can be updated by 'bravo', with a master in host #2, and 'vehicles' is updated by 'charlie' master service in host #3. Remember that in Tungsten each replication stream from one master to many slaves is a separate service. This way we can keep track of the events origin. Even if the event is routed through a hub in a star topology, it retains its origin in the metadata.

The last line of the rules says that the schema 'test' is whitelisted, i.e. it can be freely updated by any master. And this means that conflicts can happen there, so be careful if you use this feature!

Conflict prevention right event1

Image #5 - Example of a legitimate event coming through

When an expected event comes through, all is well. Each node checks that the event was originated by the authorised master, and the event is applied to the slave service.

Conflict prevention wrong event0

Image #6 - Example of an event originated from an unauthorised node

When the event comes from a node that was not authorised, Tungsten looks at the rules for such case. In our setup, the rule says 'error', and therefore replication will break at the receiving end of the service 'bravo' in host #1 and host #3.

mysql #2> create table employees.nicknames( ... )


# Only server #2 creates the table
# slave service 'bravo' in host1 and host3 get an error
# No table is created in hosts #1 and #3

To detect the error, we can ask for the list of services in host #1 and host #3. What we will see is something like this.

#3 $ trepctl services | simple_services 
alpha    [slave]
seqno:          7  - latency:   0.136 - ONLINE

bravo    [slave]
seqno:         -1  - latency:  -1.000 - OFFLINE:ERROR

charlie  [master]
seqno:         66  - latency:   0.440 - ONLINE

This Listing says that replication was stopped with an error in slave service 'bravo'. To determine what happened exactly, we ask for the status of that service:

#3 $  trepctl -service bravo status
NAME                     VALUE
----                     -----
appliedLastEventId     : NONE
appliedLastSeqno       : -1
appliedLatency         : -1.0
(...)
offlineRequests        : NONE
pendingError           : Stage task failed: q-to-dbms
pendingErrorCode       : NONE
pendingErrorEventId    : mysql-bin.000002:0000000000001241;0
pendingErrorSeqno      : 7
pendingExceptionMessage: Rejected event from wrong shard: 
seqno=7 shard ID=employees shard master=alpha service=bravo
(...)

This status gives us quite a lot of useful information:

  • The event with Global transaction ID (GTID) # 7 was rejected;
  • The reason for rejection was because it came from the wrong shard;
  • The expected shard master (i.e. the authorized service) was alpha;
  • The event was instead originated from service bravo.

With the above information, we can take action to fix the event. We know that GTID 7 is wrong, so we can skip it in both servers where the error occurred. To clean up the error, we can simply generate the correct event in the authorized master

#host #1 
$ trepctl -service bravo online -skip-seqno 7

mysql #1> drop table if exists employees.nicknames;
mysql #1> create table if exists employees.nicknames ( ... ) ;

#3 $ trepctl -service bravo online -skip-seqno 7

Statement-based vs row-based replication

As a general note about conflict solving, I need to mention that, in most cases, using row-based replication vs. statement based will help identifying conflicts, making them easier to clean up.

Even when the conflict involves a deleted row, row-based events will contain enough information that will allow us to identifying the critical data needed to recover information.

Be aware that, if you use binlog-row-image=minimal in MySQL 5.6, the binary log entry for a DELETE event will only include the primary key.


More about filters

We have seen at least in two examples (server renaming and conflict prevention) that you can help avoid conflicts with filters. This is a powerful feature that should be taken into account when planning a multi-master topology.

MySQL native replication offers very little in matter of data transformation through filtering. Tungsten Replicator, instead, allows you to define filters at several stages of the replication process: when extracting the data, after transporting it to the slaves, before applying it. You can write your own filters in JavaScript, and do with the data pretty much everything you want. If you have creative ideas about solving conflicts by manipulating data in transit, there is a good chance that you can implement them using filters. This topic deserves more than a paragraph, and probably I will come back to it soon with a full fledged article.


Parting thoughts

Multi master topologies are much coveted features. However, they often introduce the risk of conflicts.

Dealing with conflicts becomes somewhat easier if you understand how they happen and what kind of problems they generate.

There is no silver bullet solution for conflicts, but recent technology and good organization can help you ease the pain.

Thursday, March 31, 2011

MySQL replication for demanding users

I have been working with MySQL replication for quite a while. I have dealt with simple replication setups and I have experimented with complex ones. Five years ago I wrote an article about advanced MySQL replication, which was mostly a dream on what you could do with imagination and skill, but the matter from that article is still not even remotely ready for production. Yet, since that article, I have been approached by dozens of people who wanted to know how to make the multiple master dream become reality. To all of them, I had to say, "sorry, this is just a proof of concept.Come back in a few years, it may become possible". It still isn't.
Despite its latest great technological advance, MySQL native replication is is very poor of topologies. What you can do with MySQL native replication is master-to-slave (which also includes relayed slaves), master-to-master, and circular replication.
replication topologies
Of these, circular replication is the closest thing to multiple masters that you can get with MySQL native replication, without the addition of third party services.
Circular replication is tricky to set up, although not unreasonably so. It works. With some patience and precision, you can build a cluster of a few nodes in circular replication. With luck, you can get them to work properly, without loops and with the data flowing to all the servers. Your luck runs out the moment one of the servers fails, or replication breaks down for whatsoever reason. Then you see that circular replication is actually more complicated than what it looks on the surface, and it is also quite brittle. That doesn't mean that circular replication is not used in production. It is. I have known several people who use it successfully, although nobody is really happy about it.
In addition to its fragility, circular replication is slow. If you insert data into master A, it has to travel across three nodes before reaching master D.
Another topology that seems to be very popular is the multiple source scheme. It is the opposite of master/slave. Instead of having one master that sends data to many slaves, it is many masters that send data to one slave. Despite its popularity, this topology is yet unimplemented with MySQL native replication. The best you can do to simulate the desired outcome is to do round-robin replication with cron.
With this background, it is no surprise that I was thrilled at the idea of working for a company that has made these dreams become reality. Tungsten replicator allows users to have real multiple masters topologies, and even the much coveted multiple source topology is now within the users grasp.
Compared to MySQL replication, the drawback of using Tungsten is that you need to deal with bigger complexity. It's only natural. With so many more features, there come more pieces to take care of.
An interesting point about multiple masters is the matter of conflict resolution. Asynchronous replication convenience and robustness are countered by lack of means to deal with conflicts. This difficulty has been used many times as the reason for not implementing multiple source replication in MySQL. I have my own ideas on this issue. I am aware of the risks, but if I were allowed to do multiple master replication, I would be glad to take charge of the risks. Updating different databases, or different tables in separate masters is one way of defining a conflict-free scenario where multiple masters or multiple sources could be used safely. If only we could ...
My colleague Robert Hodges has posted some interesting aspects in his blog. The bottom line is that we focus on empowering users with advanced replication features. Conflict resolution can wait. I am sure many users would love to have the problem of how to avoid conflicts if the more demanding problem of how to replicate from many places to one cluster could be solved. The good news is that some sort of conflict detection (and possibly resolution) are possible even now, without slowing down the operations and without complicating our lives unnecessarily. For example, a simple conflict that could be avoided using Tungsten filters is the one resulting in a master that is updating tables that it was not supposed to do. In a scenario where multiple source replication works on the assumption that each master updates a given subset of the data, we can easily detect and eventually reject offending updates. It is not much, but in many practical cases it would be the difference between having robust multiple source replication and doing data load and consolidation manually.

Anyway, back to the present day with very much real multi-master replication available for everyone. To alleviate the fear of the unknown, we are organizing webinars on a regular basis, where we cover the theoretical points and give practical demos of how to use the new features.
If you are a demanding user, this upcoming webinar is for you: MySQL Multi-Master and Multi-Source Replication With Tungsten. Tomorrow, March 31st, 2011, at 10am PDT.

Monday, April 22, 2013

Installing and Administering Tungsten Replicator - Part 1 - basics

Intro

Tungsten Replicator is an open source tool that does high performance replication across database servers. It was designed to replace MySQL replication, although it also supports replication from and to Oracle and other systems. In this article, we will only cover MySQL replication, both simple and multi-master.

Preparing for installation

To follow the material in this article, you will need a recent build of Tungsten Replicator. You can get the latest ones from http://bit.ly/tr20_builds. In this article, we are using build 2.0.8-167.

Before starting any installation, you should make sure that you have satisfied all the prerequisites. Don't underestimate the list. Any missing items will likely result in installation errors.

If you are using Amazon EC2 servers, this page provides a script that makes the prerequisites an almost fully automated procedure.

To install any of the topologies supported by Tungsten, you need first to extract the software, define your nodes, and eventually change your default options.

  1. Download the software from http://bit.ly/tr20_builds
  2. Expand the tarball (tar -xzf tungsten-replicator-2.0.8-136.tar.gz)
  3. Change directory to the extracted path (cd tungsten-replicator-2.0.8-167)
  4. Define the VERBOSE user variable (it will show much details in the operations
  5. Edit the configuration files COMMON_NODES.sh and USER_VALUES.sh (The fields in RED are the ones that you should probably change.)
$ tar -xzf tungsten-replicator-2.0.8-167.tar.gz
$ cd tungsten-replicator-2.0.8-167
$ export VERBOSE=1
$ export PATH=$PWD/cookbook:$PATH

$ cat cookbook/COMMON_NODES.sh
#!/bin/bash
# (C) Copyright 2012,2013 Continuent, Inc - Released under the New BSD License
# Version 1.0.5 - 2013-04-03

export NODE1=host1
export NODE2=host2
export NODE3=host3
export NODE4=host4

$ cat cookbook/USER_VALUES.sh
#!/bin/bash
# (C) Copyright 2012,2013 Continuent, Inc - Released under the New BSD License
# Version 1.0.5 - 2013-04-03

# User defined values for the cluster to be installed.

# Where to install Tungsten Replicator
export TUNGSTEN_BASE=$HOME/installs/cookbook

# Directory containing the database binary logs
export BINLOG_DIRECTORY=/var/lib/mysql

# Path to the options file
export MY_CNF=/etc/my.cnf

# Database credentials
export DATABASE_USER=tungsten
export DATABASE_PASSWORD=secret
export DATABASE_PORT=3306

# Name of the service to install
export TUNGSTEN_SERVICE=cookbook

Pay attention to the paths. TUNGSTEN_BASE is where the binaries will be installed. You must make sure that:

  • The path is writable by the current user, in all nodes;
  • There is nothing in that path that may clash with the software to be installed. It should be a dedicated directory. Do NOT use your $HOME for this purpose. Use a subdirectory or a path under /usr/local or /opt/
  • The path must have enough storage to hold Tungsten Transaction History Logs (THL). They will occupy roughly twice as much as your binary logs.

Validating your nodes

You may think that you have followed the instructions for the prerequisites, but sometimes humans make mistakes. To make sure that your cluster can run Tungsten, you can run the script validate_cluster. This is an operation that performs all the installation checks in all nodes, without actually installing anything.

$ cookbook/validate_cluster
# Performing validation check ...
## 1 (host: host4)
./tools/tungsten-installer \
    --master-slave \
    --master-host=host1 \
    --datasource-user=tungsten \
    --datasource-password=secret \
    --datasource-port=3306 \
    --service-name=cookbook \
    --home-directory=/home/tungsten/installs/cookbook \
    --cluster-hosts=host1,host2,host3,host4 \
    --datasource-mysql-conf=/etc/my.cnf \
    --datasource-log-directory=/var/lib/mysql \
    --rmi-port=10000 \
    --thl-port=2112 \
    --validate-only -a \
    --info \
    --start
INFO  >> Start: Check that the master-host is part of the config
INFO  >> Finish: Check that the master-host is part of the config
#####################################################################
# Tungsten Community Configuration Procedure
#####################################################################
NOTE:  To terminate configuration press ^C followed by ENTER
...
...
...
( LOTS OF LINES FOLLOW)

If there is any error in your prerequisites, you will get an error, or possibly more than one. If the messages provided by this command are not enough to understand what it is going on, you can ask for yet more detail, using:

$ VERBOSE=2 ./cookbook/validate_cluster

DRY-RUN installation

Should you need to install in a set of nodes where you can't allow ssh connection across nodes, you may use the DRYRUN variable.

$ export DRYRUN=1

When this variable is set, the installation commands will not install, but only show you all the commands that you should run, with the right sequence.

For example, if you want to validate the cluster without SSH communication between nodes, a DRYRUN command will tell you the list of instructions to run and in which hosts to run them

$ DRYRUN=1 ./cookbook/validate_cluster
# Performing validation check ...
...

Using the instructions so received, you can copy the software to each node, and run the appropriate command in each one.

The same goes for every installation command. Should you need to install a star topology node by node with custom options, just run:

$ DRYRUN=1 ./cookbook/install_star

When you don't need the DRYRUN command anymore, remove the variable:

$ unset DRYRUN

Installing a master-slave topology

After the validation, you can launch your installation. If the topology is master/slave, the defaults are stored in cookbook/NODES_MASTER_SLAVE.sh

$ cat cookbook/NODES_MASTER_SLAVE.sh
#!/bin/bash
# (C) Copyright 2012,2013 Continuent, Inc - Released under the New BSD License
# Version 1.0.5 - 2013-04-03

CURDIR=`dirname $0`
if [ -f $CURDIR/COMMON_NODES.sh ]
then
    . $CURDIR/COMMON_NODES.sh
else
    export NODE1=
    export NODE2=
    export NODE3=
    export NODE4=
fi

export ALL_NODES=($NODE1 $NODE2 $NODE3 $NODE4)
# indicate which servers will be masters, and which ones will have a slave service
# in case of all-masters topologies, these two arrays will be the same as $ALL_NODES
# These values are used for automated testing

#for master/slave replication
export MASTERS=($NODE1)
export SLAVES=($NODE2 $NODE3 $NODE4)

The only variables that should concern you here are MASTERS and SLAVES. They refer to the nodes defined in COMMON_NODES.sh. If your master is NODE1, there is no need to change anything. If your master is, say, NODE2, then change the variables as:

export MASTERS=($NODE2)
export SLAVES=($NODE1 $NODE3 $NODE4)

Make sure that you have adjusted both master and slave definitions.

$ cookbook/install_master_slave
## 1 (host: host4)
./tools/tungsten-installer \
    --master-slave \
    --master-host=host1 \
    --datasource-user=tungsten \
    --datasource-password=secret \
    --datasource-port=3306 \
    --service-name=cookbook \
    --home-directory=/home/tungsten/installs/cookbook \
    --cluster-hosts=host1,host2,host3,host4 \
    --datasource-mysql-conf=/etc/my.cnf \
    --datasource-log-directory=/var/lib/mysql \
    --rmi-port=10000 \
    --thl-port=2112 \
    --start
... # A few minutes later ...
--------------------------------------------------------------------------------------
Topology: 'MASTER_SLAVE'
--------------------------------------------------------------------------------------
# node host1
cookbook  [master]  seqno:          1  - latency:   0.631 - ONLINE

# node host2
cookbook  [slave]   seqno:          1  - latency:   0.607 - ONLINE

# node host3
cookbook  [slave]   seqno:          1  - latency:   0.746 - ONLINE

# node host4
cookbook  [slave]   seqno:          1  - latency:   0.640 - ONLINE

Deployment completed
Topology      :'master_slave'
Tungsten path : /home/tungsten/installs/cookbook
Nodes         : (host1 host2 host3 host4)

After installing all the nodes, the cookbook script displays the cluster status. In this list, 'cookbook' is the name of the replication service, as defined in USER_VALUES.sh. You can change it before installing. Any name will do. Next to it you see the role (master or slave), then the 'seqno', which is the global transaction ID of your database events. Finally, the 'latency' is the difference, in seconds, between the time your transaction was recorded in the master binary logs and the time it was applied to the slave.

You can ask for such a status at any time, by calling:

$ cookbook/show_cluster

Simple replication administration

A cluster status doesn't tell you if replication is working. You may check if this is true by running:

$ cookbook/test_cluster
# --------------------------------------------------------------------------------------
# Testing cluster with installed topology 'MASTER_SLAVE'
# --------------------------------------------------------------------------------------
ok - Master host1 has at least 1 master services
# slave: host2
ok - Tables from master #1
ok - Views from master #1
ok - Records from master #1
ok - Slave host2 has at least 1 services
# slave: host3
ok - Tables from master #1
ok - Views from master #1
ok - Records from master #1
ok - Slave host3 has at least 1 services
# slave: host4
ok - Tables from master #1
ok - Views from master #1
ok - Records from master #1
ok - Slave host4 has at least 1 services
1..13

This command creates a table and a view in each master in your topology (in this case, a master/slave topology has only one master), insert a record using the view, and then check that each slave has replicated what was inserted. The output changes quite a lot when using a multi-master topology.

Astute readers will recognize that the output produced here complies with the Test Anything Protocol (TAP). If you have the 'prove' tool installed in your server, you may try it:

$ prove cookbook/test_cluster
cookbook/test_cluster...ok
All tests successful.
Files=1, Tests=13,  4 wallclock secs ( 3.17 cusr +  0.26 csys =  3.43 CPU)

Replication tools

The cluster status shown above (cookbook/show_cluster) uses the output of the Tungsten built-in tool trepctl to display a simplified status.

The tool is available inside the installation directory. If you have used the defaults, it is $HOME/installs/cookbook. ANd the tools are in $HOME/installs/cookbook/tungsten/tungsten-replicator/bin/.

This is not easy to remember, and even if you can remember it correctly, it requires a lot of typing. The cookbook provides an easy shortcut: cookbook/trepctl. For example:

$ cookbook/trepctl services
Processing services command...
NAME              VALUE
----              -----
appliedLastSeqno: 17
appliedLatency  : 0.773
role            : slave
serviceName     : cookbook
serviceType     : local
started         : true
state           : ONLINE
Finished services command...

Or, if you want the simplified output:

$ cookbook/trepctl services | cookbook/simple_services
cookbook  [slave]   seqno:         17  - latency:   0.773 - ONLINE

To administer the system properly, you need to know the tools, some paths to the logs and the configuration files, which are somehow elusive. Again, the cookbook to the rescue:

$ cookbook/paths
     replicator : /home/tungsten/installs/cookbook/tungsten/tungsten-replicator/bin/replicator
        trepctl : /home/tungsten/installs/cookbook/tungsten/tungsten-replicator/bin/trepctl
            thl : /home/tungsten/installs/cookbook/tungsten/tungsten-replicator/bin/thl
            log : /home/tungsten/installs/cookbook/tungsten/tungsten-replicator/log/trepsvc.log
           conf : /home/tungsten/installs/cookbook/tungsten/tungsten-replicator/conf/
        thl-dir : (service: cookbook) /home/tungsten/installs/cookbook/thl/cookbook
     backup-dir : (service: cookbook) /home/tungsten/installs/cookbook/backups/cookbook
   backup-agent : (service: cookbook) mysqldump

This command tells you the path to the three main tools:

  • trepctl Tungsten Replicator Control
  • thl or the Transaction History Log manager
  • replicator, which is the launcher for the replicator daemon.

You also get the path to the most common places you may need to access during your administrative tasks.

Similarly, there are shortcuts to perform common tasks:

  • cookbook/replicator: Shortcut to the 'replicator' command
  • cookbook/trepctl: Shortcut to the 'trepctl' command
  • cookbook/thl: Shortcut to the 'thl' command
  • cookbook/conf: Shows the configuration files using 'less'
  • cookbook/show_conf: Same as 'conf'
  • cookbook/edit_conf: Edits the configuration files using 'vim'
  • cookbook/vimconf: Same as 'vimconf.sh'
  • cookbook/emacsconf: Edits the configuration files using 'emacs'
  • cookbook/log: Shows the replicator log using 'less'
  • cookbook/show_log: Same as 'log'
  • cookbook/vilog: Edits the replicator log using 'vi'
  • cookbook/vimlog: Edits the replicator log using 'vim'
  • cookbook/emacslog: Edits the replicator log using 'emacs'
  • cookbook/heartbeat: Performs a heartbeat in each master
  • cookbook/paths: Shows the path to all important tools and services
  • cookbook/services: Performs 'trepctl services'
  • cookbook/backups: Shows which backups were taken in all nodes

You can get all the above commands, and all the others included in the cookbook, by calling:

$ cookbook/help

Uninstalling Tungsen

The cookbook makes it easy to install a replication cluster, and makes it easy to remove it as well.

If you look at the end of cookbook/USER_VALUES.sh, you will see these variables:

$ tail -n 12 cookbook/USER_VALUES.sh
##############################################################################
# Variables used when removing the cluster
# Each variable defines an action during the cleanup
##############################################################################
[ -z "$STOP_REPLICATORS" ]            && export STOP_REPLICATORS=1
[ -z "$REMOVE_TUNGSTEN_BASE" ]        && export REMOVE_TUNGSTEN_BASE=1
[ -z "$REMOVE_SERVICE_SCHEMA" ]       && export REMOVE_SERVICE_SCHEMA=1
[ -z "$REMOVE_TEST_SCHEMAS" ]         && export REMOVE_TEST_SCHEMAS=1
[ -z "$REMOVE_DATABASE_CONTENTS" ]    && export REMOVE_DATABASE_CONTENTS=0
[ -z "$CLEAN_NODE_DATABASE_SERVER" ]  && export CLEAN_NODE_DATABASE_SERVER=1
##############################################################################

The names are self-explanatory. These variables are used when you call the clear_cluster command. Then, the meaning becomes even more clear:

$ cookbook/clear_cluster
--------------------------------------------------------------------------------------
Clearing up cluster with installed topology 'MASTER_SLAVE'
--------------------------------------------------------------------------------------
!!! WARNING !!!
--------------------------------------------------------------------------------------
'clear-cluster' is a potentially damaging operation.
This command will do all the following:
* Stop the replication software in all servers. [$STOP_REPLICATORS]
* REMOVE ALL THE CONTENTS from /home/tungsten/installs/cookbook/.[$REMOVE_TUNGSTEN_BASE]
* REMOVE the tungsten_<service_name> schemas in all nodes (host1 host2 host3 host4) [$REMOVE_SERVICE_SCHEMA]
* REMOVE the schemas created for testing (test, evaluator) in all nodes (host1 host2 host3 host4)  [$REMOVE_TEST_SCHEMAS]
* Create the test server anew;                [$CLEAN_NODE_DATABASE_SERVER]
* Unset the read_only variable;               [$CLEAN_NODE_DATABASE_SERVER]
* Set the binlog format to MIXED;             [$CLEAN_NODE_DATABASE_SERVER]
* Reset the master (removes all binary logs); [$CLEAN_NODE_DATABASE_SERVER]
If this is what you want, either set the variable I_WANT_TO_UNINSTALL
or answer 'y' to the question below
You may also set the variables in brackets to fine tune the execution.
Alternatively, have a look at cookbook/clear_cluster and customize it to your needs.
--------------------------------------------------------------------------------------
Do you wish to uninstall this cluster? [y/n]

As you can see, for each action there is a corresponding variable. By default, all variables are active, except 'REMOVE_DATABASE_CONTENTS'. Setting or unsetting these variables will determine how much of your installation you want to undo.

Getting replication status

Once you have replication up and running, you need to know what's going on at a glance. We have seen in the previous sections that we can call trepctl services to get an overview of the replication process. Using the same tool, we can also get more detailed information

$ cookbook/trepctl status | nl
 1 Processing status command...
 2 NAME                     VALUE
 3 ----                     -----
 4 appliedLastEventId     : mysql-bin.000006:0000000000003163;0
 5 appliedLastSeqno       : 17
 6 appliedLatency         : 0.773
 7 channels               : 1
 8 clusterName            : default
 9 currentEventId         : NONE
10 currentTimeMillis      : 1365193975129
11 dataServerHost         : host4
12 extensions             :
13 latestEpochNumber      : 0
14 masterConnectUri       : thl://host1:2112/
15 masterListenUri        : thl://host4:2112/
16 maximumStoredSeqNo     : 17
17 minimumStoredSeqNo     : 0
18 offlineRequests        : NONE
19 pendingError           : NONE
20 pendingErrorCode       : NONE
21 pendingErrorEventId    : NONE
22 pendingErrorSeqno      : -1
23 pendingExceptionMessage: NONE
24 pipelineSource         : thl://host1:2112/
25 relativeLatency        : 22729.129
26 resourcePrecedence     : 99
27 rmiPort                : 10000
28 role                   : slave
29 seqnoType              : java.lang.Long
30 serviceName            : cookbook
31 serviceType            : local
32 simpleServiceName      : cookbook
33 siteName               : default
34 sourceId               : host4
35 state                  : ONLINE
36 timeInStateSeconds     : 23640.125
37 uptimeSeconds          : 23640.723
38 version                : Tungsten Replicator 2.0.8 build 136
39 Finished status command...

With the line number as a reference, we can describe quite a bit of useful information:

  • appliedLastEventId: (4) This is the event as found in the source database master. Since we are replicating from a MySQL server (don't forget that Tungsten can replicate from and to several heterogeneous servers) this ID is made of the binary log file name (mysql-bin.000006) and the binary log position (0000000000003163). Most of the time, you don't really need this information, as everything in Tungsten uses the Global Transaction ID (see next item)
  • appliedLastSeqno: (5) This is the Global Transaction Identifier for the current transaction.
  • appliedLatency: (6) This is the time difference, in seconds, between the moment when the transaction was written to the binary log in the master and the moment when it was applied in the slave. Notice that, if the server system times are not synchronized, you may have greater differences than expected. Also, if you keep a slave offline and re-connect it later, this value will increase accordingly.
  • channels (7) is the number of threads used for replication. By default it is 1. When using parallel replication, it increases.
  • dataServerHost: (11) The server for which we are showing the status.
  • masterConnectUri (14) is the address (hostname or IP + port ) of the current master for this service.
  • masterListenUri (15) is the address that will be used by the current server if it becomes a master.
  • pendingErrorSeqno: (22) When any of the error* lines (19 to 21) are used, this line shows the seqno (Global Transaction ID) of the event that is causing trouble. This piece of information is vital to find what is holding the system. (We will see an example later in this article)
  • role: (28) What is the role of this service. It could be 'master' or 'slave'. More roles are possible if the replicator is embedded in a more complex system.
  • serviceName: (30) The identification of the replication service. Not much important when using a master/slave topology, but vital when deploying multi-master services.
  • state: (35) It's what the replicator is doing. If "ONLINE," all is well. "OFFLINE:NORMAL" means that the service was stopped manually, while "OFFLINE:ERROR" means that something is wrong. If you see "GOING-ONLINE:SYNCHRONIZING," it means that either there is a connection issue between master and slave, or the slave is showing this state if the master is offline.

This command is the first step whenever you are troubleshooting a problem. If something goes wrong, chances are that 'cookbook/trepctl status' will tell you what it is going on. Notice, though, that if you are using a multi-master topology, then you will need to specify a service:

$ cookbook/trepctl -service somename status

It's quite important to understand that trepctl can give you the status of any node in the replication cluster. You don't need to execute the command in another node. All you need to do is indicate to trepctl for which host it should display the status.

$ cookbook/trepctl -host host1 -service somename status

'trepctl' has quite a lot of options, as you may discover if you run 'trepctl help'. We will see some of them in this series of articles.

Logs

The second step of troubleshooting, when 'trepctl status' was not enough to nail the problem, is looking at the logs.

Here, the problem you will face is "where the heck do I find the logs?"

As we have seen above in this article, the cookbook can show you the paths:

$ cookbook/paths
     replicator : /home/tungsten/installs/cookbook/tungsten/tungsten-replicator/bin/replicator
        trepctl : /home/tungsten/installs/cookbook/tungsten/tungsten-replicator/bin/trepctl
            thl : /home/tungsten/installs/cookbook/tungsten/tungsten-replicator/bin/thl
            log : /home/tungsten/installs/cookbook/tungsten/tungsten-replicator/log/trepsvc.log
           conf : /home/tungsten/installs/cookbook/tungsten/tungsten-replicator/conf/
        thl-dir : (service: cookbook) /home/tungsten/installs/cookbook/thl/cookbook
     backup-dir : (service: cookbook) /home/tungsten/installs/cookbook/backups/cookbook
   backup-agent : (service: cookbook) mysqldump

However, there is a simpler way. You can use one of the shortcuts to access the logs. For example, cookbook/log will show the log using 'less,' the well known file viewer. Should you want to use another tool for this task, there is a wide choice:

  • cookbook/show_log: Same as 'log'
  • cookbook/vilog: Edits the replicator log using 'vi'
  • cookbook/vimlog: Edits the replicator log using 'vim'
  • cookbook/emacslog: Edits the replicator log using 'emacs'

Inside the log, when you are troubleshooting, you should first try to find the same message displayed by 'trepctl status.' Around that point, you will find one or more Java stack traces, which contain information useful for the developers (file names and line numbers) and information useful for you (error messages as reported by the database server or the operating system or third party tools, which may help identifying the problem).

Reading events

Most often, when a problem has been identified, you need to know which is the event that is causing the problem. Usually, a look at the SQL, combined with the error message, may give you enough information to fix the problem.

The replication events (or transaction) are stored in several Transaction History Log (THL) files. These files contain the events, as taken from the binary logs, plus some metadata. Unlike the binary logs, though, the THL file names are totally unimportant. Since transactions are identified by number, you don't need to know their location.

To display a THL event, you use a tool named, most aptly, 'thl.' For example, after we run this query:

mysql --host=host1 test -e "insert into v1 values (2,'inserted by node #1')"

We can check the status with

$ cookbook/trepctl services
Processing services command...
NAME              VALUE
----              -----
appliedLastSeqno: 24
appliedLatency  : 0.563
role            : slave
serviceName     : cookbook
serviceType     : local
started         : true
state           : ONLINE
Finished services command...

And then retrieve the event using the thl.

$ cookbook/thl list -seqno 24
SEQ# = 24 / FRAG# = 0 (last frag)
- TIME = 2013-04-05 23:32:18.0
- EPOCH# = 18
- EVENTID = mysql-bin.000006:0000000000004417;0
- SOURCEID = host1
- METADATA = [mysql_server_id=10;dbms_type=mysql;service=cookbook;shard=test]
- TYPE = com.continuent.tungsten.replicator.event.ReplDBMSEvent
- OPTIONS = [##charset = ISO8859_1, autocommit = 1, sql_auto_is_null = 1, foreign_key_checks = 1, unique_checks = 1, sql_mode = '', character_set_client = 8, collation_connection = 8, collation_server = 8]
- SCHEMA = test
- SQL(0) = insert into v1 values (2,'inserted by node #1') /* ___SERVICE___ = [cookbook] */

There is much metadata in this event, most of which is easily recognizable by any seasoned DBA. Some things that may be worth pointing out are:

  • SEQ# The sequence number, or seqno, or Global Transaction ID,
  • EVENTID: We have seen this when we described 'trepctl status';
  • SOURCEID: the server where the event was generated;
  • service: The service where the event was generated. This also tells us that the master role for this service is in host1.
  • shard: it is how Tungsten defines shards for parallel replication and conflict resolution. By default, a shard matches a database schema, although it can be defined otherwise.
  • SQL : this is the statement being executed. When the transaction contains more than one statement, then you will see SQL(1), SQL(2), and so on. If the event was row-based, then you will see a list of column and their contents instead of a SQL statement.
  • ___SERVICE___ = [cookbook] This comment is added by the replicator to make it recognizable even after it goes to the binary log and gets replicated to a further level. This is not the only method used to mark events. The service identification can go in other places, such as the "comment" field of a "CREATE TABLE" statement.

Skipping transactions

One of the most common replication problems is a duplicate key violation, which in turn often occurs when someone erroneously writes to a slave instead of a master. When such error happens, you may find something like this:

$ cookbook/trepctl status
Processing status command...
NAME                     VALUE
----                     -----
appliedLastEventId     : NONE
appliedLastSeqno       : -1
appliedLatency         : -1.0
channels               : -1
clusterName            : default
currentEventId         : NONE
currentTimeMillis      : 1365199283287
dataServerHost         : host4
extensions             :
latestEpochNumber      : -1
masterConnectUri       : thl://host1:2112/
masterListenUri        : thl://host4:2112/
maximumStoredSeqNo     : -1
minimumStoredSeqNo     : -1
offlineRequests        : NONE
pendingError           : Event application failed: seqno=25 fragno=0 message=java.sql.SQLException:
Statement failed on slave but succeeded on master
pendingErrorCode       : NONE
pendingErrorEventId    : mysql-bin.000006:0000000000004622;0
pendingErrorSeqno      : 25
pendingExceptionMessage: java.sql.SQLException: Statement failed on slave but succeeded on master
                         insert into v1 values (3,'inserted by node #1') /* ___SERVICE___ = [cookbook] */
pipelineSource         : UNKNOWN
relativeLatency        : -1.0
resourcePrecedence     : 99
rmiPort                : 10000
role                   : slave
seqnoType              : java.lang.Long
serviceName            : cookbook
serviceType            : unknown
simpleServiceName      : cookbook
siteName               : default
sourceId               : host4
state                  : OFFLINE:ERROR
timeInStateSeconds     : 8.749
uptimeSeconds          : 28948.881
version                : Tungsten Replicator 2.0.8 build 136

Looking at the logs, we may see something like this:

INFO   | jvm 1    | 2013/04/06 00:01:14 | 2013-04-06 00:01:14,529 [cookbook - q-to-dbms-0] ERROR pipeline.SingleThreadStageTask
Event application failed: seqno=25 fragno=0 message=java.sql.SQLException: Statement failed on slave but succeeded on master
INFO   | jvm 1    | 2013/04/06 00:01:14 | com.continuent.tungsten.replicator.applier.ApplierException: java.sql.SQLException: Statement failed on slave but succeeded on master
INFO   | jvm 1    | 2013/04/06 00:01:14 |       at com.continuent.tungsten.replicator.applier.MySQLDrizzleApplier.applyStatementData(MySQLDrizzleApplier.java:183)
INFO   | jvm 1    | 2013/04/06 00:01:14 |       at com.continuent.tungsten.replicator.applier.JdbcApplier.apply(JdbcApplier.java:1321)
INFO   | jvm 1    | 2013/04/06 00:01:14 |       at com.continuent.tungsten.replicator.applier.ApplierWrapper.apply(ApplierWrapper.java:101)
INFO   | jvm 1    | 2013/04/06 00:01:14 |       at com.continuent.tungsten.replicator.pipeline.SingleThreadStageTask.apply(SingleThreadStageTask.java:639)
INFO   | jvm 1    | 2013/04/06 00:01:14 |       at com.continuent.tungsten.replicator.pipeline.SingleThreadStageTask.runTask(SingleThreadStageTask.java:468)
INFO   | jvm 1    | 2013/04/06 00:01:14 |       at com.continuent.tungsten.replicator.pipeline.SingleThreadStageTask.run(SingleThreadStageTask.java:167)
INFO   | jvm 1    | 2013/04/06 00:01:14 |       at java.lang.Thread.run(Unknown Source)
INFO   | jvm 1    | 2013/04/06 00:01:14 | Caused by: java.sql.SQLException: Statement failed on slave but succeeded on master
INFO   | jvm 1    | 2013/04/06 00:01:14 |       at com.continuent.tungsten.replicator.applier.MySQLDrizzleApplier.applyStatementData(MySQLDrizzleApplier.java:140)
INFO   | jvm 1    | 2013/04/06 00:01:14 |       ... 6 more
INFO   | jvm 1    | 2013/04/06 00:01:14 | Caused by: java.sql.SQLIntegrityConstraintViolationException: Duplicate entry '3' for key 'PRIMARY'

After inspecting the tables in all nodes, we find that the host4 already contains a record with Primary Key=3, and that it has the same contents of the record coming from host1. In this case, the easiest way of fixing the error is by telling the replicator to skip this event.

$ cookbook/trepctl online -skip-seqno 25

After this, the replicator goes online, and, provided that there are no other errors after the first one, will continue replicating.

Taking over existing Replication

In the first sections of this article, we saw how to install Tungsten replicator as the primary source of replication. We assumed that the servers had the same contents, and there was no replication already going on. Here we assume, instead, that there was replication already, and we show the steps to reproduce the process.

To simulate the initial status, we're going to clear the cluster installed before, install native MySQL replication instead, and take over from there.

There is a recipe to install standard replication, just for this purpose.

$ cookbook/install_standard_mysql_replication
Starting slave on host2 Master File = mysql-bin.000005, Master Position = 106
Starting slave on host3 Master File = mysql-bin.000005, Master Position = 106
Starting slave on host4 Master File = mysql-bin.000005, Master Position = 106
# master  host1
mysql-bin.000005    554
#slave host2
              Master_Log_File: mysql-bin.000005
          Read_Master_Log_Pos: 554
             Slave_IO_Running: Yes
            Slave_SQL_Running: Yes
          Exec_Master_Log_Pos: 554
replication test: ok

#slave host3
              Master_Log_File: mysql-bin.000005
          Read_Master_Log_Pos: 554
             Slave_IO_Running: Yes
            Slave_SQL_Running: Yes
          Exec_Master_Log_Pos: 554
replication test: ok

#slave host4
              Master_Log_File: mysql-bin.000005
          Read_Master_Log_Pos: 554
             Slave_IO_Running: Yes
            Slave_SQL_Running: Yes
          Exec_Master_Log_Pos: 554
replication test: ok

The installation also provides a simple test that checks if replication is running by creating a table named 't1' and retrieving it in the slaves. As you can see, after the test, the slaves are at position 554 of binary log # 000005. If we create another table, we check that it is replicated and take nota again of the binlog position.

$ mysql -h host1 -e 'create table test.test_standard(i int)'

$ for host in host1 host2 host3 host4; do mysql -h $host -e 'show tables from test' ; done
+----------------+
| Tables_in_test |
+----------------+
| t1             |
| test_standard  |
+----------------+
+----------------+
| Tables_in_test |
+----------------+
| t1             |
| test_standard  |
+----------------+
+----------------+
| Tables_in_test |
+----------------+
| t1             |
| test_standard  |
+----------------+
+----------------+
| Tables_in_test |
+----------------+
| t1             |
| test_standard  |
+----------------+
$ for host in  host2 host3 host4; do mysql -h $host -e 'show slave status\G' | grep 'Master_Log_File\|Read_Master_Log_Pos\|Running' ; done
              Master_Log_File: mysql-bin.000005
          Read_Master_Log_Pos: 651
        Relay_Master_Log_File: mysql-bin.000005
             Slave_IO_Running: Yes
            Slave_SQL_Running: Yes
              Master_Log_File: mysql-bin.000005
          Read_Master_Log_Pos: 651
        Relay_Master_Log_File: mysql-bin.000005
             Slave_IO_Running: Yes
            Slave_SQL_Running: Yes
              Master_Log_File: mysql-bin.000005
          Read_Master_Log_Pos: 651
        Relay_Master_Log_File: mysql-bin.000005
             Slave_IO_Running: Yes
            Slave_SQL_Running: Yes

So, replication is running. We can try our take-over script, which the cookbook provides:

$ cookbook/take-over
./tools/tungsten-installer
    --master-slave
    --master-host=host1
    --datasource-user=tungsten
    --datasource-password=secret
    --datasource-port=3306
    --service-name=cookbook
    --home-directory=/home/tungsten/installs/cookbook
    --cluster-hosts=host1,host2,host3,host4
    --datasource-mysql-conf=/etc/my.cnf
    --datasource-log-directory=/var/lib/mysql
    --rmi-port=10000
    --thl-port=2112 -a
    --auto-enable=false
    --start

$TUNGSTEN_BASE/tungsten/tungsten-replicator/bin/trepctl -port 10000 -host host1 online -from-event mysql-bin.000005:651
$TUNGSTEN_BASE/tungsten/tungsten-replicator/bin/trepctl -port 10000 -host host2 online
$TUNGSTEN_BASE/tungsten/tungsten-replicator/bin/trepctl -port 10000 -host host3 online
$TUNGSTEN_BASE/tungsten/tungsten-replicator/bin/trepctl -port 10000 -host host4 online
--------------------------------------------------------------------------------------
Topology: 'MASTER_SLAVE'
--------------------------------------------------------------------------------------
# node host1
cookbook  [master]  seqno:          5  - latency:   0.556 - ONLINE

# node host2
cookbook  [slave]   seqno:          5  - latency:   0.663 - ONLINE

# node host3
cookbook  [slave]   seqno:          5  - latency:   0.690 - ONLINE

# node host4
cookbook  [slave]   seqno:          5  - latency:   0.595 - ONLINE

What happens here?

The first notable thing is that we install the replicator with the option --auto-enable set to false. With this option, the replicator starts, but stays OFFLINE. After that, the take-over script stops the replication in all servers, retrieves the latest binlog position, and tells the replicator to go ONLINE using the event ID. This is one of the few cases where we can't use a global transaction ID, because it does not exist yet!

Next, all the slaves go online. There is no need to tell them at which event they should start, because they will simply get the events from the master.


Further info:
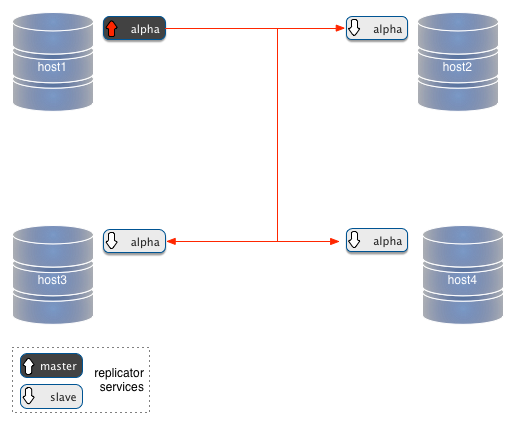
Tuesday, January 07, 2014

Multiple masters : attraction to the stars

In the last 10 years I have worked a lot with replication systems, and I have developed a keen interest in the topic of multiple masters in a single cluster. My interest has a two distinct origins:

  • On one hand, I have interacted countless times with users who want to use a replication system as a drop-in replacement for a single server. In many cases, especially when users are dealing with applications that are not much flexible or modular, this means that the replication system must have several points of data entry, and such points must work independently and in symbiosis with the rest of the nodes.
  • On the other hand, I am a technology lover (look it up in the dictionary: it is spelled geek), and as such I get my curiosity stirred whenever I discover a new possibility of implementing multi-master systems.

The double nature of this professional curiosity makes me sometimes forget that the ultimate goal of technology is to improve the users life. I may fall in love with a cute design or a clever implementation of an idea, but that cleverness must eventually meet with usability, or else it loses its appeal. There are areas where the distinction between usefulness and cleverness is clear cut. And there are others where we really don’t know where we stand because there are so many variables involved.

One of such cases is a star topology, where you have many master nodes, which are connected to each other through a hub. You can consider it a bi-directional master/slave. If you take a master/slave topology, and make every node able to replicate back to the master, then you have almost a star. To make it complete, you also need to add the ability of the master of broadcasting the changes received from the outside nodes, so that every node gets the changes from every other node. Compared to other popular topologies, say point-to-point all-masters, and circular replication, the star topology has the distinct advantage of requiring less connections, and of making it very easy to add a new node.

Star

Figure #1: Star topology

However, anyone can see immediately one disadvantage of the star topology: the hub is the cornerstone of the cluster. It’s a single point of failure (SPOF). If the hub fails, there is no replication anywhere. Period. Therefore, when you are considering a multi-master topology, you have to weigh in the advantages and disadvantages of the star, and usually you consider the SPOF as the most important element to consider.

Depending on which technology you choose, though, there is also another important element to consider, i.e. that data must be replicated twice when you use a star topology. It’s mostly the same thing that happens in a circular replication. If you have nodes A, B, C, and D, and you write data in A, the data is replicated three times before it reaches D (A->B, B->C, and C->D). A star topology is similar. In a system where A, B, and D are terminal nodes, and C is the hub, data needs to travel twice before it reaches D (A->C, C->D). Circular replication

Figure #2: Circular replication

This double transfer is bad for two reasons: it affects performance, and it opens to the risk of unexpected transformations of data. Let’s explore this concept a bit. When we replicate data from a master to a slave, there is little risk of mischief. The data goes from the source to a reproducer. If we use row-based-replication, there is little risk of getting the wrong data in the slave. If we make the slave replicate to a further slave, we need to apply the data, generate a further binary log in the slave host, and replicate data from that second binary log. We can deal with that, but at the price of taking into account more details, like where the data came from, when to stop replicating in a loop, whether the data was created with a given configuration set, and so on. In short, if your slave server has been configured differently from the master, chances are that the data down the line may be different. In a star topology, this translates into the possibility of data in each spoke to be replicated correctly in the hub, but to be possibly different in the other spokes.

Compare this with a point-to-point all-masters. In this topology, there are no SPOFs. You pay for this privilege by having to set a higher number of connections between nodes (every node must connect to every other node), but there is no second hand replication. Before being applied to the slave service, the data is applied only once in the originating master.

Point to point all masters

Figure #2: Point-to-point all-masters topology

Where do I want to go from all the above points? I have reached the conclusion that, much as user like star topologies, because of their simplicity, I find myself often recommending the more complex but more solid point-t-point all-masters setup. Admittedly, the risk of data corruption is minimal. The real spoiler in most scenarios is performance. When users realize that the same load will flow effortlessly in a point-to-point scenario, but cause slave lags in a star topology, then the choice is easy to make. If you use row-based replication, and in a complex topology it is often a necessary requirement, the lag grows to a point where it becomes unbearable.

As I said in the beginning, all depends on the use case: if the data load is not too big, a star topology will run just as fine as point-to-point, and if the data flow is well designed, the risk of bad data transformation becomes negligible. Yet, the full extent of star topologies weaknesses must be taken into account when designing a new system. Sometimes, investing some effort into deploying a point-to-point all-masters topology pays off in the medium to long term. Of course, you can prove that only if you deploy a star and try it out with the same load. If you deploy it on a staging environment, no harm is done. If you deploy in production, then you may regret. In the end, it all boils down to my mantra: don’t trust the theory, but test, test, test.