Data seem sometimes to have their own life and will, and they refuse to behave as we wish.
Then, you need a firm hand to tame the wild data and turn them into quiet and obeying pets.
MySQL, the original brand, the one developed by the MySQL team at Oracle, is steadily evolving. You can feel it if you try every new release that comes out of the milestone release cycle. Or even if you don’t try all of them, just testing a release once in a while gives you something to think about.
The engineers at Oracle are trying hard to improve the defaults. If you are the out-of-the-box type, and just install the new version on top of the previous one, leaving the same setup in place, you may be up for a for a few surprises. It’s the marketing, see? They tell you that just by replacing your old MySQL (5.1 or 5.5) with MySQL 5.6 you get 30% to 70% performance improvement. Which happens to be true, not only because the server is better, but also because they have changed the defaults. However, this change in defaults may come with some serious consequences for the ones who skip the release notes.
An annoying consequence of the MySQL team focusing on security is that in MySQL 5.6 you get a mandatory warning if you use a password in the command line. On one hand, it’s a good thing, because they force you to use better security practices. On the other hand, it’s a royal PITA, because many applications are broken because of this warning, just by replacing MySQL 5.1 or 5.5 with 5.6.
There are solutions. For example, you can adopt the new mysql_config_editor to handle your password, but that would break compatibility with previous MySQL versions. Rewriting complex procedures to use configuration files instead of username and passwords is tricky, especially if you are testing exactly the behavior of using a password on the command line to override the contents of an options file.
INTERMISSION: this is a point of contention with the MySQL team. They have started a trend of introducing features that will prevent working smoothly with previous versions of MySQL. Up to MySQL 5.5, installing a server and staring using it was a set of steps that would work in the same way regardless of the version. With MySQL 5.6, all bets are over. When you install a new server, you get a long list of unwanted messages to the error output (which is fortunately fixed in MySQL 5.7), and then you get the warning if you use a password on the command line.
For me, and for many developers who build software related to MySQL, the ability of writing a piece of software that works well with any version is paramount. The MySQL team seems to think that users will be happy to throw everything to the wind and start writing new code for MySQL 5.6 only instead of reusing what was working until the month before. And let’s be clear: I fully understand the need of moving forward, but I don’t understand the need of trapping users in the new behavior without remedy.
Back to the defaults. What else is new? One good improvement in MySQL 5.6 is a change in the default value for SQL_MODE. Up to MySQL 5.5, it was an empty string. In MySQL 5.6.6 and later it is ‘NO_ENGINE_SUBSTITUTION.’ Can this change have side effects? Yes. Code that worked before may break. IMO, it’s a good thing, because getting an error when trying to create a table of a non-existing engine is better than having the table created silently with the default engine. I can, however, think of at least one case where a silent substitution is desirable, as I have seen in action at a customer’s deployment. That aside, one wonders why they did not go the extra mile and add STRICT_TRANS_TABLES (or even STRICT_ALL_TABLES) to the default. It turned out that they did it… and didn’t. When you install a new data directory using mysql_install_db, the procedure creates a my.cnf file in the $BASEDIR (the place where your mysql tarball was expanded), containing the line
However, if you have skipped the release notes, you will be left wondering where does this additional directive come from, since the manual mentions only one of them, and SHOW VARIABLES tells you that SQL_MODE contains two values.
MySQL 5.7 has also changed something. There is a lot of cleanup going on. Options and variables that were deprecated long ago suddenly disappear. Did you ever use ‘key-buffer’ as a short for ‘key-buffer-size’? If you did, that directive in the my.cnf won’t work anymore. (I could not find it in the release notes, but the test suite for MySQL Sandbox suddenly stopped working when I tried MySQL 5.7 and then I realized what was happening.)
More to the point, though, is the installation procedure. In MySQL 5.6 there is a –random-passwords option that generates a random password for the server, and you can’t do anything with root until you use such random password to access the server and change the password to something else. This is an improvement over the old and despicable root without password, which has been the default since the very beginning of MySQL, and it’s been the source of many security nightmares and interesting bugs.
In MySQL 5.7.4, this behavior, i.e. the generation of a random password during the installation, is now the default.
It is good news, because the old behavior was a disaster, but if you have an automated way of dealing with installation, there will be more hard work in front of you to handle the changes. The implementation is not script friendly, and definitely nightmarish if you want to install several instances of the server in the same host. What happens when you install MySQL 5.7.4? The installation software generates a random password, and writes it to a file named .mysql_secret in your $HOME directory. A sample file that was created by the installer would be:
# The random password set for the root user at Mon Mar 31 10:16:54 2014 (local time):
2X7,S4PGkIg=H(lJ


EOF
If you wanted a script to read the password generated by this procedure, it would be a mistake to look for the second line. In fact, if you repeat the installation on the same host, you get something like this:
# The random password set for the root user at Mon Mar 31 10:16:54 2014 (local time):
2X7,S4PGkIg=H(lJ


# The random password set for the root user at Tue Apr 29 09:35:07 2014 (local time):
_S07zDt7dQ=,sxw9


# The random password set for the root user at Tue Apr 29 09:42:19 2014 (local time):
r[yn4ND$-5p,4q}5


EOF
Then the correct approach would be looking for the last non empty line in the file. However, if you were installing several instances in the same host (such as MySQL Sandbox does) you wouldn’t be able to find which password belongs to which server. Admittedly, multiple instances of the same server is not what most users do, but since it breaks MySQL Sandbox, which is used by many, I mention it here.
BTW, MySQL Sandbox 3.0.44 has a temporary fix for this behavior. If you install MySQL 5.7.4 or later, it will include –skip-random-passwords, and defaults to the old password-less installation. There is a hackish workaround for the above uncompromising design and I will add it to MySQL Sandbox unless the next MySQL version introduces an optional path for the .mysql_secret file.
Summing up, there are mostly good improvements from the MySQL team, although the attention to usability is still low. They are whipping users into better security. A gentler approach would be appreciated. Sometimes I see a post from the community team asking for feedback on some feature being deprecated or modified. I would welcome such requests on matters that affect the default behavior of everyday tools.
It has been a few busy months until now. I have moved from Italy to Thailand, and the move has been my first priority, keeping me from attending FOSDEM and interacting with social media.
Now I start catching my breath, and looking around for new events to attend. But before I get into this, let’s make a few things clear:
I am still working for Continuent. Actually, it’s because of my company flexibility that I could move to a different country (a different continent, 6 time zones away) without much trouble. Thanks, Continuent! (BTW: Continuent is hiring! )
I am still involved with MySQL activities, events, and community matters. I just happen to be in a different time zone, where direct talk with people in Europe and US need to happen on a different schedule.
But in the meantime, Colin encouraged me to submit talk proposals at FOSSAsia, and both my submissions were accepted.
So, at the end of February I will be talking about some of my favorite topics:
Easy MySQL multi master replication with Tungsten
Data in the cloud: mastering the ephemeral
The exact schedule will be announced shortly. I am eager to attend an open source event in Asia. It’s been a long time since I went to a similar event in Malaysia, which was much pleasant.
After a few months of submissions and reviews, the program for PerconaLive MySQL Conference and Expo 2014 is published. The conference will be held in Santa Clara, from April 1 to 4, 2014.
Registration with early bird discount is available until February 2nd. If you plan to attend, this is probably the best time to act.
Multi-master made easy: complex topologies with Tungsten Replicator it’s a 50-minutes session that explains how to create multi-master topologies, beyond the usual paradigms. In addition to all-masters, star, fan-in, I will show how to mix cases from these topologies to make multi-master usage powerful and easy.
Notice that the Call for Participation is still open for lightning talks and BoF. You can submit a talk until the end of January.
In the last 10 years I have worked a lot with replication systems, and I have developed a keen interest in the topic of multiple masters in a single cluster. My interest has a two distinct origins:
On one hand, I have interacted countless times with users who want to use a replication system as a drop-in replacement for a single server. In many cases, especially when users are dealing with applications that are not much flexible or modular, this means that the replication system must have several points of data entry, and such points must work independently and in symbiosis with the rest of the nodes.
On the other hand, I am a technology lover (look it up in the dictionary: it is spelled geek), and as such I get my curiosity stirred whenever I discover a new possibility of implementing multi-master systems.
The double nature of this professional curiosity makes me sometimes forget that the ultimate goal of technology is to improve the users life. I may fall in love with a cute design or a clever implementation of an idea, but that cleverness must eventually meet with usability, or else it loses its appeal. There are areas where the distinction between usefulness and cleverness is clear cut. And there are others where we really don’t know where we stand because there are so many variables involved.
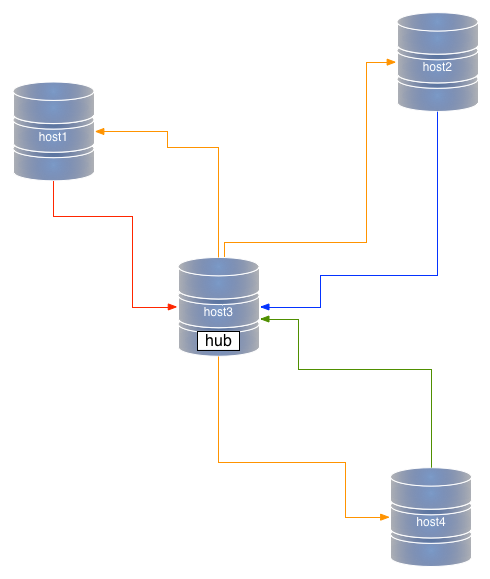
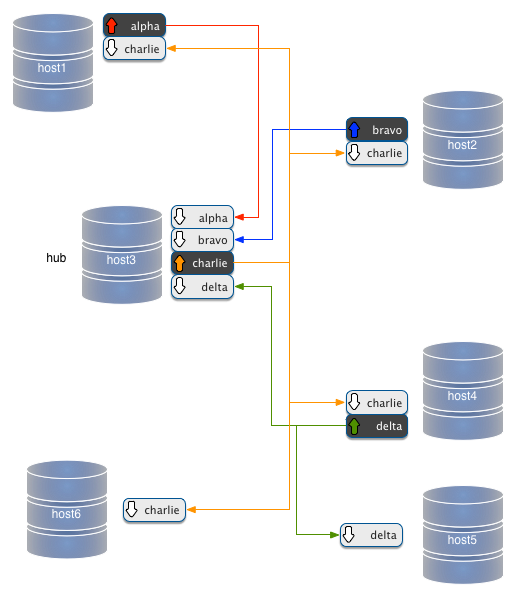
One of such cases is a star topology, where you have many master nodes, which are connected to each other through a hub. You can consider it a bi-directional master/slave. If you take a master/slave topology, and make every node able to replicate back to the master, then you have almost a star. To make it complete, you also need to add the ability of the master of broadcasting the changes received from the outside nodes, so that every node gets the changes from every other node. Compared to other popular topologies, say point-to-point all-masters, and circular replication, the star topology has the distinct advantage of requiring less connections, and of making it very easy to add a new node.
Figure #1: Star topology
However, anyone can see immediately one disadvantage of the star topology: the hub is the cornerstone of the cluster. It’s a single point of failure (SPOF). If the hub fails, there is no replication anywhere. Period. Therefore, when you are considering a multi-master topology, you have to weigh in the advantages and disadvantages of the star, and usually you consider the SPOF as the most important element to consider.
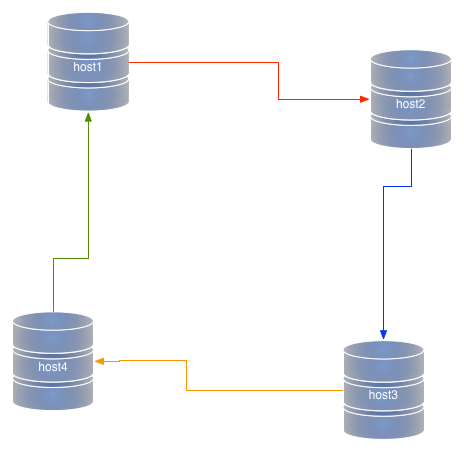
Depending on which technology you choose, though, there is also another important element to consider, i.e. that data must be replicated twice when you use a star topology. It’s mostly the same thing that happens in a circular replication. If you have nodes A, B, C, and D, and you write data in A, the data is replicated three times before it reaches D (A->B, B->C, and C->D). A star topology is similar. In a system where A, B, and D are terminal nodes, and C is the hub, data needs to travel twice before it reaches D (A->C, C->D).
Figure #2: Circular replication
This double transfer is bad for two reasons: it affects performance, and it opens to the risk of unexpected transformations of data. Let’s explore this concept a bit. When we replicate data from a master to a slave, there is little risk of mischief. The data goes from the source to a reproducer. If we use row-based-replication, there is little risk of getting the wrong data in the slave. If we make the slave replicate to a further slave, we need to apply the data, generate a further binary log in the slave host, and replicate data from that second binary log. We can deal with that, but at the price of taking into account more details, like where the data came from, when to stop replicating in a loop, whether the data was created with a given configuration set, and so on. In short, if your slave server has been configured differently from the master, chances are that the data down the line may be different. In a star topology, this translates into the possibility of data in each spoke to be replicated correctly in the hub, but to be possibly different in the other spokes.
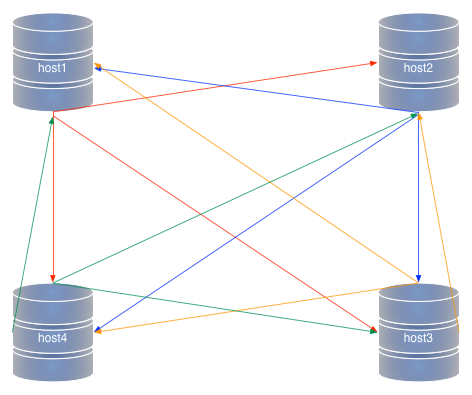
Compare this with a point-to-point all-masters. In this topology, there are no SPOFs. You pay for this privilege by having to set a higher number of connections between nodes (every node must connect to every other node), but there is no second hand replication. Before being applied to the slave service, the data is applied only once in the originating master.
Figure #2: Point-to-point all-masters topology
Where do I want to go from all the above points? I have reached the conclusion that, much as user like star topologies, because of their simplicity, I find myself often recommending the more complex but more solid point-t-point all-masters setup. Admittedly, the risk of data corruption is minimal. The real spoiler in most scenarios is performance. When users realize that the same load will flow effortlessly in a point-to-point scenario, but cause slave lags in a star topology, then the choice is easy to make. If you use row-based replication, and in a complex topology it is often a necessary requirement, the lag grows to a point where it becomes unbearable.
As I said in the beginning, all depends on the use case: if the data load is not too big, a star topology will run just as fine as point-to-point, and if the data flow is well designed, the risk of bad data transformation becomes negligible. Yet, the full extent of star topologies weaknesses must be taken into account when designing a new system. Sometimes, investing some effort into deploying a point-to-point all-masters topology pays off in the medium to long term. Of course, you can prove that only if you deploy a star and try it out with the same load. If you deploy it on a staging environment, no harm is done. If you deploy in production, then you may regret. In the end, it all boils down to my mantra: don’t trust the theory, but test, test, test.
Let’s say that you want to measure something in your database, and for that you need several operations to happen in parallel. If you have a capable programming language at your disposal (Perl, Python, Ruby, PHP, or Java would fit the bill) you can code a test that sends several transactions in parallel.
But if all you have is the shell and the mysql client, things can be trickier. Today I needed such a parallel result, and I only had mysql and bash to accomplish the task.
In the shell, it’s easy to run a loop:
for N in $(seq 1 10)
do
    mysql -h host1 -e "insert into sometable values($N)"
done
But this does run queries sequentially, and each session will open and close before the next one starts. Therefore there is no concurrency at all.
Then I thought that the method for parallel execution in the shell is to run things in the background, and then collect the results. I just needed to find a way of keeping the first session open while the others are being started.
Here’s what I did: I ran a loop with a countdown, using the seq command, and I included a sleep statement in each query, waiting for a decreasing amount of seconds. If I start with 10 seconds, the first query will sleep for 10 seconds, the second one for 9 seconds, and so on. I will run each command in the background, so they will eat up the time independently.
#!/bin/bash
mysql -h host1 test -e 'drop table if exists t1'
mysql -h host1 test -e 'create table t1 (i int not null primary key, ts timestamp)'

for N in $(seq 10 -1 1)
do
    query1="set autocommit=0"
    query2="insert into test.t1 (i) values($N)"
    query3="select sleep($N) into @a; commit"
    mysql -h host1 -e "$query1;$query2;$query3" &
done

wait

mysql -h host1 test -e 'select * from t1'
The effect of this small script is that the commit for these 10 commands come at the same time, as you can see from the resulting table:
This is a very good result, but what happens if I need to run 500 queries simultaneously, instead of 10? I don’t want to wait 500 seconds (8+ minutes). So I made an improvement:
for N in $(seq 5000 -10 1)
do
    echo $N
    query1="set autocommit=0"
    query2="insert into test.t1 (i) values($N)"
    query3="select sleep(concat('0.', lpad($N,4,'0'))) into @a; commit"
    mysql -h host1 -e "$query1;$query2;$query3" &
done
Now each SLEEP command is called with a fractional argument, starting at “0.5000”, and continuing with “0.4999,” and so on. You can try it. All 500 rows are committed at the same time.
However, the same time is a bit fuzzy. When we use timestamps with second granularity, it’s quite easy to show the same time. But with microseconds it’s a different story. Here’s what happens if I use MySQL 5.6 with timestamp columns using microseconds (TIMESTAMP(3)):
I was pleased to see Morgan’s announcement about a fix to an old problem of mine. In March 2012 I complained about MySQL verbosity during installation.
In MySQL 5.7.3, this behavior was changed. While the default is still as loud as it can, you can now add an option (log_error_verbosity) to send only errors to STDERR, which allows you to hide the output of mysql_install_db, and still get the errors, if they occur.
Well done!
However, the same obnoxious verbosity is also in MariaDB 10.0.x. Since I discussed this specific bug with a few MariaDB developers early in 2012, I was disappointed to see this same output when running mysql_install_db with MariaDB. Here’s the same appeal: MariaDB developers, please fix this usability issue!
And now, for the laughing notes. All versions of MySQL available now, from Oracle, Percona, MariaDB, list this line when installing with mysql_install_db:
Please report any problems with the './scripts/mysqlbug' script!
There is Bug#29716 that was reported in 2008, about mysqlbug being unnecessary (by then, it had been obsolete for 2 or 3 years already), with a patch submitted but not committed. So, in 2013, we still see a reference to a tool that has ceased working for at least 8 years. It should not take much to remove this line and replace it with an appropriate link to the bugs system.
The call for participation at Percona Live MySQL Conference and Expo 2014 is now closed. There have been more than 320 submissions, and this will keep the review committee busy for a while.
One important point for everyone who has submitted: if you have submitted a proposal but haven’t included a bio in your account, do it now. If you don’t, your chances of being taken seriously are greatly reduced. To add a bio, go to your account page and fill in the Biography field. Including a picture is not mandatory, but it will be definitely appreciated.
Although the CfP is closed for tutorials and regular sessions, your chances of becoming a celebrity are not over yet. The CfP is still open for Lightning talks and Bird of a Feather sessions.
If you want to submit a lightning talk, you still have time until the end of January. Don’t forget to read the instructions and remember that lightning talks don’t give you a free pass, but a healthy 20% discount.
So far, I have received 16 proposals. Of these, 6 have been rated highly enough to guarantee acceptance (including mine, for which I have not voted.) We still have 6 spots to fill (12 spots in total, 5 minutes each,) and I’d rather fill them with talks that appeal to everyone in the committee, than scrap the barrel of the mediocre ones. My unofficial goal is to have so many good submissions that I will have to withdraw my own talk. Thus, the potential number of available spots is 7. Please kick my talk off stage, by submitting outstanding proposals!
One of the most common errors in development is where a loop or a retrieval by index falls short or long by one unit, usually because of an oversight or a logic in coding.
Of the following snippets, which one will run 10 times?
/* #1 */    for (N = 0 ; N < 10; N++) printf("%d\n", N);

/* #2 */    for (N = 0 ; N <= 10; N++) printf("%d\n", N);

/* #3 */    for (N = 1 ; N <= 10; N++) printf("%d\n", N);

/* #4 */    for (N = 1 ; N < 10; N++) printf("%d\n", N);
The question is deceptive, as there are two snippets that will run 10 times (1 and 3). But they will print different numbers. If you ware aiming for numbers from 1 to 10, only #3 is good.
After many years of programming, off-by-one errors are rare in my code, and I have been able to spot them or prevent them at first sight. That’s why I feel uneasy when I look at the way parallel replication is enabled in MySQL 5.6,5.7 and MariaDB 10.0.5. In both cases, there is a variable that sets the number of replication threads:
set global slave_parallel_workers=5 in MySQL set global slave_parallel_threads=5 in mariadb
Yet, for both implementations, you can set the number of threads to 1, and it is not the same as disabling parallel replication.
set global slave_parallel_workers=1 in MySQL set global slave_parallel_threads=1 in mariadb
It will run parallel replication with one thread, meaning that you will have all the overhead of parallel replication with none of the benefits. Not only that, but replication actually slows down. The extra channel reduces performance by 7% in MariaDB and 10% in MySQL.
Now for the punch line. In Tungsten-Replicator, to disable parallel replication you set the number of channels to 1 (the intuitive value). If you set it to 0, the setup fails, as it should, since there would be no replication without channels. The reason for the fit is that in Tungsten, parallel replication was designed around the core functionality, while in MySQl and MariaDB it is an added feature that struggles to be integrated.
The call for participation for Percona Live MySQL Conference 2014 is still open. As part of the review committee, I will be looking at the proposals, and I hope to see many interesting ones.
There is a novelty in the submission form. In addition to tutorials and regular sessions, now you can submit proposals for lightning talks, to which I am particularly interested, as I have organized the lightning talks in the past two editions, and I am in charge to continue the tradition for the next one.
If you want to be a speaker at the conference, here are some tips to get your proposal accepted:
Propose a topic that you know well;
Take some time to write a well thought and meaningful proposal: nothing gets me faster to the rejection button than statements like “I want to talk about X, I will think of something to say”;
Write your proposal with the attendees in mind, i.e. giving information that will make them want to see your presentation;
But also write with the committee in mind. There is a space for private messages to the reviewers. Use it wisely if there is something that we need to know.
Mind your buzzwords. I am not easily impressed by fashionable topics. Back your proposal with sound reasoning. Don’t assume that I, or anyone in the committee, see things your way, or the way they are reported in the press.
Check your spelling. Another way of getting rejected quickly is when you misspell the topic you claim to be an expert of.
And check your spelling again. If you miss the difference between “know its shit” and “know it’s shit,” I am less inclined to approve.
Write a sensible bio. We need to know who are you and what you do, to see if your story is compatible with your proposal.
Write enough to make your proposal clear. A proposal that is shorter than your bio will raise a red flag. But do not write too much. You are writing a proposal, not an article on the matter. If you have written an interesting article on the topic, give us an URL.
Regarding the lightning talks, I have some more recommendations.
A lightning talk last 5 minutes maximum. Don’t propose a topic that cannot be exhausted in that timeframe.
An accepted lightning talk does not give you a free pass (unless you are also accepted as speaker for a regular talk). You will be given a code to register at a 15% discount.
You should propose something that it is either highly interesting, or surprising, or entertaining, or all the above: the lightning talks are a show.
Be daring in your proposals. While a regular talk might be refused if you propose to sing the InnoDB settings, a LT on this topic could be seen as legitimate (but you must demonstrate that you can do it!)
Convince me (specifically, as I will be choosing the talks accepted by the committee) that you want to be on stage and have the abilities for the show.
Be prepared to show your slides earlier than usual. As the organizer, I need to make sure that you have something meaningful to show before sending you on stage.
Be aware of the rules:
All slides will be loaded into a single computer, to minimize delays between talks;
Someone (probably me) will nag the speakers until they either surrender their slides or escape to Mexico;
All speakers will meet 15 minutes before the start, and be given the presentation order. Missing speakers will be replaced by reserve speakers;
The speaker will have 5 minutes to deliver the talk.
When one minute is left, there will be a light sound to remind of the remaining time.
When 10 seconds are left, most likely the audience will start chanting the countdown.
When the time is finished, the speaker must leave the podium to the next one.
UPDATE: This post is obsolete, for most of the URLs referenced here have been removed by the contents owner.
Since I joined the company in late 2010, I have known that one of the strong points of Tungsten Replicator is its ability of setting filters. The amazing capabilities offered by Tungsten filters cannot be fully grasped unless we explain how stage replication works.
There are several default stages in the replication stream. Every stage has an extraction task and an apply task. The extraction task will get data from the previous step repository and the apply task will save the data to the next repository, which can be either a temporary storage (memory queue, THL file) or the final destination (slave database server). Consider that the architecture allows developers to add stages, and you will appreciate its full power. For every stage, we can insert one or more filter between the two tasks. This architecture gives us ample freedom to design our pipelines.
What’s more interesting, filters in Tungsten can be of two types:
built-in filters, written in Java, which require users to compile and build the software before the filter is available;
Javascript filters, which can do almost everything the built-in scripts can do, but don’t require recompiling. All you need is deploy the filter in the appropriate folder, and run a tpm command to install or update the replicator.
The Tungsten team has developed a large number of filters, either to achieve general purpose pipeline control (such as renaming objects, excluding or including schemas and tables from replication) or filters providing very specific tasks that were needed to meet customer requirements or to help implementing heterogeneous pipelines (such as converting ENUM and SET columns to strings, dropping UPDATE and DELETE events, normalize DDL, etc). There are 23 built-in and 18 Javascript filters available. They were largely undocumented, or sparsely documented in the code. Now, thanks to my colleague MC Brown, Continuent director of documentation, the treasure is there for the taking.
Tungsten filters are a beautiful feature to explore, but also a powerful tool for users with special needs who want to create their own customized pipeline. A word of warning, though. Filters are powerful and sometimes fun to implement and use, but they don’t come free. There are two main things to keep in mind:
Using more than one filter for the same stage may result in performance loss. The amount of performance loss depends on the stage and on your systems resources. For example if your replication weakest point is data transfer across the network, adding two or three filters to this stage (remote-to-thl) will make things worse. If you can apply the filter to the previous or next stages, you may achieve your purpose without many side effects. As always, the advice is: “test, benchmark, repeat.”
Filters that alter data (such as exclude schemas or table, drop events) will make the slave unsuitable for promotion. You should always ask yourself if the filter may make the slave a lousy master, and if it does, make sure you have at least another slave that is replicating without filters.
As a final parting thought, be aware that yours truly and the above-mentioned MC Brown will be speaking at Percona Live London 2013, with a full, take-no-prisoners, 6 hours long complete Tungsten Replicator tutorial, where we will cover filters and give some explosive and sensational examples.
I have two talks: one on my pet project MySQL Sandbox and one on replication between MySQL and MongoDB (using another project dear to me, Tungsten Replicator.
It’s my first visit to Argentina and I will try to look around a bit before the conference. And I look forward to see many ex colleagues and well known speakers at the conference. The lineup includes speakers from Percona, EffectiveMySQL, PalominoDB, MariaDB, SkySQL, Tokutek, and OpenStack.
I am looking forward to this trip. My presentation on MongoDB replication is a first for me, and I am always pleased when I can break new ground. I have the feeling that the networking is going to be more exciting than the sessions.
If you are in Buenos Aires, come to the conference and say hi!
Fact: MySQL 5.6 was released as GA in February 2013
Fact: MySQL 5.6 has been available with its complete set of features since September 2012
Fact: On September 21st, Oracle has released MySQL 5.7.2, which is the de facto major release after MySQL 5.6 (5.7.1 was just a token “we’re-still-in-business” release).
Fact: As of today, there is no GA-ready fork of MySQL 5.6.
Percona Server is still in RC state, while MariaDB, with its runaway version 10, is still in alpha state. Of these releases, Percona Server seems the one in the better shape. Their problem was to adapt Percona Server to the enhanced codebase for 5.6, and the merging problems were bigger than the ones encountered in 5.1 and 5.5. Percona Server is a business oriented fork. It includes specific features for performance and manageability, things that users are asking for, and things that make Percona professional services easier to carry out.
Much different is the case of MariaDB. Their feature set is wider and hard to categorize globally. It includes some features that enhance performance (block commit, subquery optimization) but also plenty of features that are included only because nobody else wanted to touch them. In my experience, adding features to a project does not make it more stable, as the MySQL team knows well, with its disastrous experience with version 6.0, which was aborted after two years of alpha. MariaDB is in a state where they are adding lots of stuff to their code base, while merging selected pieces from MySQL 5.6. It could be a recipe for success or disaster. User experience will tell.
Up to MySQL 5.5, MariaDB has kept itself completely compatible with MySQL, with the goal of being a drop-in replacement. With the capriciously numbered version 10, that promise of compatibility has been broken. Most of the features introduced in MySQL 5.6 have not been included in MariaDB 10. Some of them have been rewritten with a completely different approach. As a result, MariaDb 10 lacks some of MySQL 5.6 features (parallel replication, for example) while showing some that are not in the upstream project (multi-source replication). The design of GTID has been started from scratch, and surely will make interoperability really hard (if not downright impossible) between the two projects.
Looking at the status of the projects, it seems that the MySQL team at Oracle has produced so many changes, that keeping up with it, even in terms of simple patch merging, is a heavy task. Where does it leave us, the community users? We have the choice between using the latest and greatest from Oracle, or waiting for the next latest and greatest from one of the forks. Percona Server seems to be on the final path of a less-than-easy catch-up, but MariaDB is farther away. And even if it releases a GA soon, it will find itself in a situation where merging changes from Oracle is going to be tougher and tougher. It may mean that performance enhancements from mainstream MySQL will take months (or years) to reach MariaDB. Users willing to benefit from the latest improvements will choose between Oracle MySQL and (with some delay) Percona Server. MariaDB will need to either do some sort of cherry-picking from Oracle releases or implement its own improvements. Can they compete with the 200 strong engineering team at Oracle? It’s going to be a tough proposition.
Given the above facts, how is it that we hear of big players like Red Hat and Google announcing that they will adopt MariaDB instead of Oracle’s MySQL? Since I could not find a sensible technical reason, I am forced to conclude that the choice has been political. Both Red Hat and Google have been entangled in commercial competition, and sometimes in court. Yet, choosing software for non-technical reason looks foolish to me.
Summing up: Oracle is releasing a steady stream of improvement for MySQL. This shows a high level of commitment that does not play well with what the doomsayers have been announcing for the past 4 years. So far, facts are contradicting that FUD. Forks are lagging behind. Some more than others.
Disclaimer: The above thoughts are my own, and don’t reflect the opinions of my employer or other companies.
On September 21st, during the opening keynote at MySQL Connect 2013, Tomas Ulin disclosed the release of MySQL 5.7.2. This is a milestone release that includes several new features. Unlike the Previous one, which was just a point of pride, where Oracle was stating its continuous commitment to releasing new versions of MySQL.
In MySQL 5.7.2, we see several new features:
First and foremost, performance. The announcement slides say MySQL 5.7.2 is 95% faster than MySQL 5.6 and 172% faster than MySQL 5.5. I don’t know yet in which circumstances these numbers hold true, but I am sure someone at Percona will soon prove or disprove the claim.
Replication tables. You can have all the information that you get from SHOW SLAVE STATUS, and then some more, in nicely organized tables. Regrettably, there is no corresponding table or tables for SHOW MASTER STATUS. This is a feature that I did ask for long time ago (7 1/2 years, to be precise) and I had great expectations. Now the feature comes, sort of crippled. Without a table for the contents of SHOW MASTER STATUS, there is no good monitoring system that can be implemented.
There is now a different method for parallel replication. Instead of splitting the threads by schema, the parallelization can be defined by using a logical clock, which uses information stored by the master, telling the slaves when it is safe to run threads in parallel.
You can now have more than one trigger per table per each action. The CREATE TRIGGER syntax now include a “trigger_order” clause that allows you to define in which sequence your triggers will run;
EXPLAIN FOR CONNECTION will let you run an explain statement for an already running query.
There are other news and improvements, and they are all listed in the Release notes, and What’s new in MySQL 5.7.
Two minor changes that did not make the news, and yet, they mean a lot for end user experience:
The Verbosity of the bootstrap which filled the screen (and the error log) with useless trivia that made the users lose track of the real errors, has been greatly reduced. Now you only see warnings and errors. Thank you, MySQL team!
The test suite now uses InnoDB as default storage engine. This means that a lot of possible errors that could have been overlooked will now be caught by the test suite. Next step will be to use InnoDB for the grant tables, but there does not seem to be a set goal for this.
What else is there? The MySQL Labs now list several experimental features for MySQL 5.7.2. These are features that did not make the cut for the milestone, and are still in a less reliable state. Most notable among them is a build that offers multi source replication. I need to test it more before I can hazard some deeper judgment. For now, I am impressed by the amount of work produced.
Some disappointment comes from the realization that many of the shortcomings found in MySQL 5.6 are still there. SOme of them have been reduced of eliminated by the new performance schema tables, but the bulk of what I noticed in MySQL 5.6 is still there with the same limitations. I will come back to this topic with a deeper analysis of the new features.
What happened? In a surfeit of overconfidence, we released Tungsten 2.1.1, with faith on the test suite and its result. The faith was justified, as the test suite was able to catch any known problem and regression. The overconfidence was unjustified, because, due to a series of unfortunate events, some sections of the test suite were accidentally disabled, and the regression that was lurking in the dark was not caught.
Therefore, instead of having a quiet post-release week-end, the whole team has worked round the clock to plug the holes. There were two bugs that actually broke the tests (when we put the suite in good order, that is):
We came out of the exercise with the embarrassing bugs fixed, a few more found in the process, and a much improved test suite, which now checks itself to make sure that nothing is missing, and everything that should be tested was actually tested. While the bugs were fixed over the week-end, we spent three more days just testing the release with all the firepower we could muster.
The test suite has grown quite a while during the past years. The first version of the suite, 2+ years ago, ran in about 15 minutes. We have been adding steadily to the tests, and now the full set of tests (when none of it gets accidentally switched off, that is) requires about 12 hours. Now we feel much better about the release. All I wrote about Tungsten Replicator 2.1.1 is also good for Tungsten 2.1.2, so I encourage all to give it a try.
As a further lesson learned, from now on we’re going to publish a release candidate a few weeks before blessing a build as GA. The labels in the downloads page tell which stage of readiness each build is.
UPDATE 2013-08-23: We have found a few problems that happen when replicating with RBR and temporal columns. We will have to publish an updated bugfix release quite soon.
A better installer, of which we have already given a preview in tpm, the multi-master composer. The new installer allows faster and more powerful deployments of both single and multiple masters topologies. And it also allows the next feature:
Secured communication layer. Now the replicator data and administrative messages can be encrypted with SSL across nodes. The security layer, once installed, is transparent. All replication features will keep working as before, and the encryption is independent from the database. In fact, heterogeneous replication (e.g. MySQL to MongoDB, Oracle to MySQL, etc) can use it just as easily as MySQL to MySQL replication.
Full support for MySQL 5.6 binary log improvements. Now you can have the best of two worlds, running MySQL 5.6 enhanced performance, and Tungsten advanced replication features, without compromises. Due to this improvement, we also have the first change in our transport layer (the Transaction History Logs, or THL) since we released parallel replication. This means that a full cluster upgrade is needed (first slaves, and then masters) if you want to use the new release.
For more information on Tungsten Replicator 2.1.1, see the Release notes.
What does this mean for the common user? Let’s see what you can experience, when installing Tungsten Replicator 2.1.1
$ tar -xzf tungsten-replicator-2.1.1-230.tar.gz
$ cd tungsten-replicator-2.1.1-230
$ export VERBOSE=1
$ ./cookbook/install_master_slave
## -------------------------------------------------------------------------------------
## Installation with deprecated method will resume in 30 seconds - Hit CTRL+C now to abort
## -------------------------------------------------------------------------------------
## WARNING: INSTALLATION WITH tungsten-installer and configure-service IS DEPRECATED
## Future versions of Tungsten Cookbook will only support tpm-based installations
## To install with tpm, please set the variable 'USE_TPM' and start again
## -------------------------------------------------------------------------------------
....5....^C
Installation with tungsten-installer, which has been used until now, is still available, but it is deprecated. We want to encourage everyone to use tpm, as we will stop supporting tungsten-installer from the next release (2.1.2).
The main reason for using tpm instead of tungsten-installer, is that you can now install with security. The Tungsten manual has an extensive section on how to create security certificates. If you are not used to this kind of tasks, you may get discouraged from the very beginning, as you will need to create two key stores, one encrypted password store, and one file with JMX access rules. Tungsten Cookbook to the rescue! It will be enough to state our intention to install using tpm, with security enabled, and the cookbook script will generate the needed files for you.
$ export USE_TPM=1
$ export WITH_SECURITY=1
$ ./cookbook/install_master_slave
Certificate stored in file </home/tungsten/tinstall/tungsten-replicator-2.1.1-230/cookbook/client.cer>
Certificate was added to keystore
[Storing /home/tungsten/tinstall/tungsten-replicator-2.1.1-230/cookbook/truststore.ts]
Using parameters:
-----------------
password_file.location   = /home/tungsten/tinstall/tungsten-replicator-2.1.1-230/cookbook/passwords.store
encrypted.password   = true
truststore.location      = /home/tungsten/tinstall/tungsten-replicator-2.1.1-230/cookbook/truststore.ts
truststore.password      = cookbookpass
-----------------
Creating non existing file: /home/tungsten/tinstall/tungsten-replicator-2.1.1-230/cookbook/passwords.store
User created successfuly: cookbook
Using parameters:
-----------------
password_file.location   = /home/tungsten/tinstall/tungsten-replicator-2.1.1-230/cookbook/passwords.store
encrypted.password   = true
truststore.location      = /home/tungsten/tinstall/tungsten-replicator-2.1.1-230/cookbook/truststore.ts
truststore.password      = cookbookpass
-----------------
User created successfuly: cookbook
# ---------------------------------------------------------------------
# Options for tpm
\
--thl-ssl=true \
--rmi-ssl=true \
--rmi-authentication=true \
--rmi-user=cookbook \
--java-keystore-password=cookbookpass \
--java-truststore-password=cookbookpass \
--java-truststore-path=/home/tungsten/tinstall/tungsten-replicator-2.1.1-230/cookbook/truststore.ts \
--java-keystore-path=/home/tungsten/tinstall/tungsten-replicator-2.1.1-230/cookbook/keystore.jks \
--java-jmxremote-access-path=/home/tungsten/tinstall/tungsten-replicator-2.1.1-230/cookbook/jmxremote.access \
--java-passwordstore-path=/home/tungsten/tinstall/tungsten-replicator-2.1.1-230/cookbook/passwords.store
# ---------------------------------------------------------------------
Next, you will see the complete installation command using tpm, and the cluster will be built as smoothly as it would be without the security additions.
Notice that the paths that you see on the screen are created dynamically. Once installed, the security files will be deployed in a standard location, which will be easily picked up when you need to upgrade.
The difference that you will notice about the secure deployment is only in a few small differences. When using the cookbook tools, you will see a ssl label next to each secured node:
Instead of thl:// you see thls://. That’s the indication that the replicators are communicating using a SSL channel.
The same procedure works for multi-master and heterogeneous topologies. In fact, the very same mechanism is used in our commercial product, Continuent Tungsten, where it is installed using the same tools and the same tpm options.
Time zones are a tricky feature. You live in a given time zone, and most of the time you won’t think about that at all. You may live in a place where you are conscious of time zones, such as the United States, if your business spans across the country, where you know that New York is three hours ahead of San Francisco or Chicago and Dallas share the same time zone. Time Zone support in MySQL is a complicate business in itself. Once you have updated your time zone tables, you can set your time zone in an human readable format:
set global time_zone="America/Los_Angeles";
This is nice and well. It tells you which time zone your server is working with. However, things get a bit hairy when you need to do practical things with this information. Suppose you are looking at a server that displays unfamiliar time zones:
When you run select now() in this environment, you get the time in “Asia/Singapore” time zone, although the operating system is running in Dubai time zone.
mysql> select now();
+---------------------+
| now()               |
+---------------------+
| 2013-08-14 12:00:18 |
+---------------------+
1 row in set (0.00 sec)
A look at your watch can tell you what’s the difference. But if you need to put that information into a calculation, then you need a way of converting that string “Asia/Singapore” into a number:
This is the time zone offset in this server, as referred to Greenwich Mean Time (GMT) or UTC. It means that Singapore is 8 hours ahead of GMT. You could get the same result by asking
Tungsten Replicator is a powerful replication engine that, in addition to providing the same features as MySQL Replication, can also create several topologies, such as
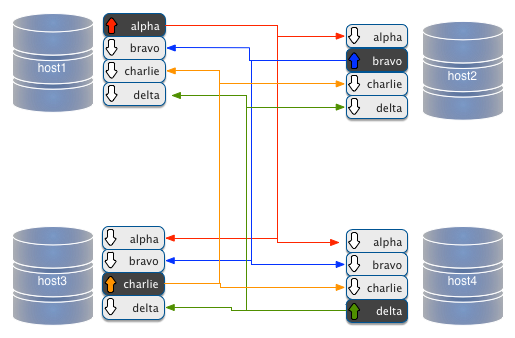
all-masters: every master in the deployment is a master, and all nodes are connected point-to-point, so that there is no single point of failure (SPOF).
fan-in: Several masters can replicate into a single slave;
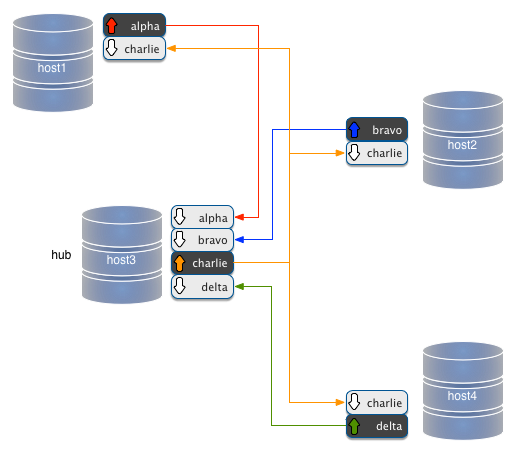
star: It’s an all-masters topology, where one node acts as hub which simplifies the deployment at the price of creating a SPOF.
The real weakness of these topologies is that they don’t come together easily. Installation requires several commands, and running them unassisted is a daunting task. Some time ago, we introduced a set of scripts (the Tungsten Cookbook) that allow you to install multi-master topologies with a single command. Of course, the single command is just a shell script that creates and runs all the commands needed for the deployment. The real downer is the installation time. For an all-masters topology with 4 nodes, you need 17 operations, which require a total of about 8 minutes. Until today, we have complex operations, and quite slow.
Meet The TPM
Notice: these examples require a recent night build of Tungsten Replicator (e.g. 2.1.1-120), which you can download from http://bit.ly/tr_21_builds
But technology advances. The current tungsten-installer, the tool that installs Tungsten-Replicator instances, has evolved into a tool that has been used for long time to install our flagship product, Continuent Tungsten (formerly known as ‘Tungsten Enterprise’). The ‘tpm’ (Tungsten Package Manager) has outsmarted its name, as it does way more than managing packages, and actually provides a first class installation experience. Among other things, it provides hundreds of validation checks, to make sure that the operating system, the network, and the database servers are fit for the installation. Not only that, but it installs all components, in all servers in parallel.
So users of our commercial solution have been enjoying this more advanced installation method for quite a long time, and the tpm itself has improved its features, becoming able to install single Tungsten Replicator instances, in addition to the more complex HA clusters. Looking at the tool a few weeks ago, we realized that tpm is so advanced that it could easily support Tungsten Replicator topologies with minimal additions. And eventually, we have it!
The latest nightly builds of Tungsten Replicator include the ability of installing multi-master topologies using tpm. Now, not only you can perform these installation tasks using the cookbook recipes, but the commands are so easy that you can actually run them without help from shell scripts.
Let’s start with the plain master/slave installation (Listing 1). The command looks similar to the one using tungsten-installer. The syntax has been simplified a bit. We say members instead of cluster-hosts, master instead of master-host, replication-user and replication-password instead of datasource-user and datasource-password. And looking at this command, it does not seem worth the effort to use a new syntax just to save a few keystrokes.
However, the real bargain starts appearing when we compare the installation time. Even for this fairly simple installation, which ran in less than 2 minutes with tungsten-installer, we get a significant gain. The installation now runs in about 30 seconds.
Image 1 - Master/slave deployment
Where we see the most important advantages, though, is when we want to run multiple masters deployments. The all-masters installation command, lasting 8 minutes, which I mentioned a few paragraphs above? Using tpm, now runs in 45 seconds, and it is one command only. Let’s have a look
It’s worth observing this new compact command line by line:
./tools/tpm install four_musketeers: This command calls tpm with the ‘install’ mode, to the entity ‘four_musketeers’. This thing is a data service, which users of other Tungsten products and readers of Robert Hodges blog will recognize as a more precise definition of what we commonly refer to as ‘a cluster.’ Anyway, this data service appears in the installation and, so far, does not have much to say within the replicator usage. So just acknowledge that you can name this entity as you wish, and it does not affect much of the following tasks.
–topology=all-masters: Some of the inner working of the installer depend on this directive, which tells the tpm what kind of topology to expect. If you remember what we needed to do with tungsten-installer + configure-service, you will have some ideas of what this directive tells tpm to do and what you are spared now.
–home-directory=/opt/continuent/replicator: Nothing fancy here. This is the place where we want to install Tungsten.
–replication-user=tungsten: It’s the database user that will take care of the replication.
–replication-password=secret: The password for the above user;
–masters=host1,host2,host3,host4: This is the list of nodes where a master is deployed. In the case of an all-masters topology, there is no need of listing the slaves: by definition, every host will have a slave service for the remaining masters.
–master-services=alpha,bravo,charlie,delta: This is the list of service names that we will use for our topology. We can use any names we want, including the host names or the names of your favorite superheroes.
–start: with this, the replicator will start running immediately after the deployment.
This command produces, in 45 seconds, the same deployment that you get with tungsten-installer in about 8 minutes.
Image 2 - all-masters deployment
The command is so simple that you could use it without assistance. However, if you like the idea of Tungsten Cookbook assembling your commands and running them, giving you access to several commodity utilities in the process, you can do it right now. Besides, if you need to customize your installation with ports, custom paths and management tools, you will appreciate the help provided by Tungsten Cookbook.
Listing 3: invoking tpm installation for all-masters using a cookbook recipe.
When you define USE_TPM, the installation recipe will use tpm instead of tungsten-installer. Regardless of the verbosity that you have chosen, you realize that you are using the tpm because the installation is over very soon.
The above command (either the one done manually or the built-in recipe) will produce a data service with four nodes, all of which are masters, and you can visualize them as:
Listing 4: The cluster overview after an all-masters installation.
More topologies: fan-in
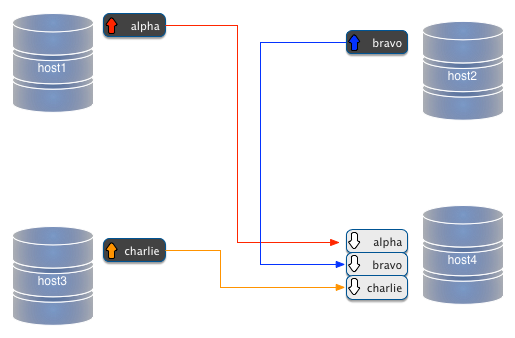
Here is the command that installs three masters in host1,host2, and host3, all fanning in to host4, which will only have 3 slave services, and no master.
You will notice that it’s quite similar to the installation of all-masters. The most notable difference is that, in addition to the list of msters, the list of masters, there is also a list of slaves.
    --masters=host1,host2,host3 \
    --slaves=host4 \
Listing 6: How a fan-in topology is defined.
We have three masters, and one slave listed. We could modify the installation command this way, and we would have two fan-in slaves getting data from two masters.
    --masters=host1,host2 \
    --slaves=host3,host4 \
    #
    # The same as:
    #
    --masters=host1,host2 \
    --members=host1,host2,host3,host4 \
Listing 7: Reducing the number of masters increases the slaves in a fan-in topology.
Now we will have two masters in host1 and host2, and two fan-in slaves in host3 and host4.
Image 4 - Fan-in deployment with two slaves
If we remove another master from the list, we will end up with a simple master/slave topology.
And a star
The most difficult topology is the star, where all nodes are masters and a node acts as a hub between each endpoint and the others.
Now the only complication about this topology is that it requires two more parameters than all-masters or fan-in. We need to define which node is the hub, and how to name the hub service. But this topology has the same features of the one that you could get by running 11 commands with tungsten-installer + configure-service.
More TPM: building complex clusters
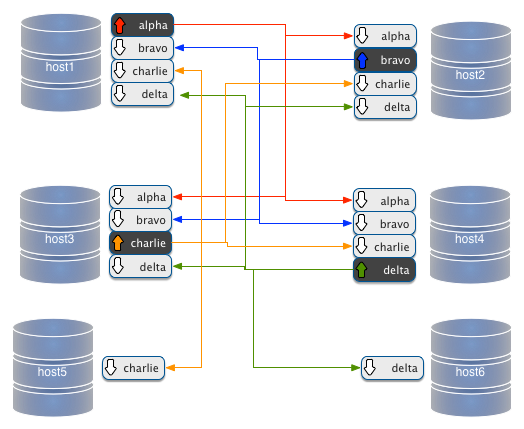
The one-command installation is just one of tpm many features. Its real power resides in its ability of composing more complex topologies. The ones shown above are complex, and since they are common there are one-command recipes that simplify their deployment. But there are cases when we want to deploy beyond these well known topologies, and compose our own cluster. For example, we want an all-masters topology with two additional simple slaves attached to two of the masters. To compose a custom topology, we can use tpm in stages. We configure the options that are common to the whole deployment, and then we shape up each component of the cluster.
In Listing 9, we have 5 tpm commands, all of which constitute a composite deployment order. In segment #1, we tell tpm the options that apply to all the next commands, so we won’t have to repeat them. In segment #2, we define the same 4 masters topology that we did in Listing 2. Segments #3 and #4 will create a slave service each on hosts host5 and host6, with the respective masters being in host3 and host4. The final segment #5 tells tpm to take all the information created with the previous command, and finally run the installation. You may be wondering how the tpm will keep track of all the commands, and recognize that they belong to the same deployment. What happens after every command is that the tpm adds information to a file named deploy.cfg, containing a JSON record of the configuration we are building. Since we may have previous attempts at deploying from the same place, we add the option –reset to our first command, thus making sure that we start a new topology, rather than adding to a previous one (which indeed we do when we want to update an existing data service).
The result is what you get in the following image:
Image 6 - all-masters deployment with additional slaves
A word of caution about the above topology. The slaves in host5 and host6 will only get the changes originated in their respective masters. Therefore, host5 will only get changes that were originated in host4, while host6 will only get changes from host4. If a change comes from host1 or host2, they will be propagated to host1 to host4, because each host has a dedicated communication link to each of the other masters, but the data does not pass through to the single slaves.
Different is the case when we add slave nodes to a star topology, as in the following example.
In a star topology, the hub is a pass-through master. Everything that is applied to this node is saved to binary logs, and put back in circulation. In this extended topology, the slave service in host5 is attached to a spoke of the star. Thus, it will get only changes that were created in its master. Instead, the node in host6, which is attached to the hub master, will get all the changes coming from any node.
Extending clusters
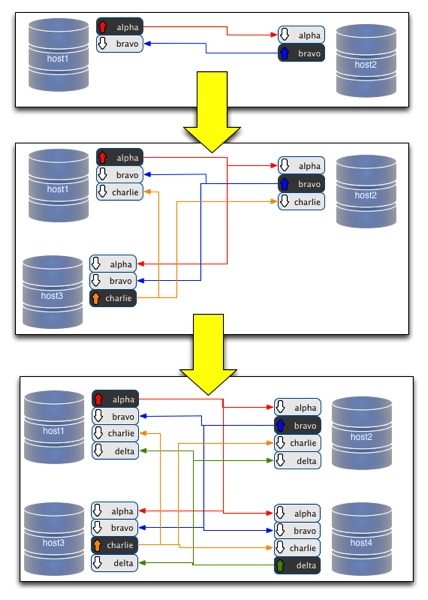
So far, the biggest challenge when working with multi-master topologies has been extending an existing cluster. Starting with two nodes and then expanding it to three is quite a challenging task. (Figure 8)
Using tpm, though, the gask becomes quite easy. Let's revisit the all-masters installation command, similar to what we saw at the start of this article
That's all it takes. The update command is almost a repetition of the install command, with the additional components. The same command also restarts the replicators, to get the configuration online.
Image 8 - Extending an all-masters topology
More is coming
The tpm is such a complex tool that exploring it all in one session may be daunting. In addition to installing, you can update the data service, and thanks to its precise syntax, you can deploy the change exactly in the spot where you want it, without moving from the staging directory. We will look at it with more examples soon.
As part of the Forge dismissal operations, I got a backup of my snippets from the MySQL community team, and I have been lazily looking around for an alternative place where to put them.
Gist is a simple way to share snippets and pastes with others. All gists are git repositories, so they are automatically versioned, forkable and usable as a git repository.
Out of my 25 snippets, these are the ones that still look useful (at least, people have been asking me about those).
The MySQL Sandbox project has been around for 8 years, and it has gained considerable attention from the community. I have seen it mentioned in books and articles, used in other projects, and widely adopted by testers and bug reporters.
I have used it for more than testing, and it has saved me many hours of labor by allowing me to create database servers in a few seconds.
Yet, I have gathered a long list of grievance about it, both from my own experience and from other users feedback. Here goes.
MySQL Sandbox is not easy to install. For people used to install Perl modules, it feels natural. For experienced Perl users, installing it in user space without root access is feasible and even easy. But for the vast majority of users, it is often a nightmare. Even when the method is well understood, there are issues that baffle even the experts. Let’s see them:
You can have several Perl versions in your system. How do you get them? By just following the instructions to install some other project, which will silently install a competing Perl interpreter in your laptop.
Your operating system can upgrade Perl and mix up the paths where the module is installed.
In both the above cases, you may end up with MySQL Sandbox not being the latest version or the help not being available.
MySQL Sandbox is not intuitive to use. This is a consequence of the project being extended and stretched over the previous releases, where it was really arcane and difficult to start. As a result, I made the call to the sandboxing tools brief, but not really easy. It’s a defect that often happens when the designer and the developer are the same person. Now I know better, but there is more.
MySQL Sandbox is not easy to extend. And also this is a consequence of the project being evolved from its initial roots. The first version of the application was a Swiss Army knife with many sharp blades and a tiny handle. With the latest releases I created an easy wrapper around the initial tool (which is now labeled as low-level-make-sandbox) at the price of using a awkward syntax. I made common operations really easy to use, and uncommon ones unnecessarily hard. But the worst consequence is that the features I wanted to develop are still in my wish list, because the code underneath is not flexible.
My wish list
Having used the project for most everything that came to my path during my job, I came to appreciate its versatility, but at the same time I wished I could do more to make the tool meet my needs. In the past years I have extended MySQL Sandbox with many tiny new improvements, but the core remains the same. Here’s what I would like to do:
Deploy for production, which includes the ability of deploying safely with root access. You can do that now with MySQL Sandbox, but since it was designed on purpose for deployment in user space. If you want to create production ready deployments and make them maintainable, there are many tasks that you should manage, which are taken care of when you use .rpm or .deb based deployments, but that are not that easy with a custom deployment.
Deploy remotely, which you can do now, using a shell script that I have added to the build, but it is kind of a hack: a wrapper on top of other wrappers. While it makes the deployment really easy, it has not enough checking to guarantee it will work well in most cases.
A GUI. I know MySQL Sandbox intimately. Yet, when I need to do something unusual, I need to look at the help, and sometimes at the docs to remind me of what needs to be done. A web-based (or even a text-based) menu would make the application more friendly. The main obstacle to this is that the internal build-up of the work flow has not been designed for interactivity.
Easy installation. This includes the ability of being installed through a package manager (apt-get, yum) or a language specific manager (Perl CPAN, Ruby Gems, Python PYPI), but also a simple way of using it out of the box without installing at all. This feature (or lack thereof) is what makes current remote deployment so fragile.
Deploy on Windows. I don’t like Windows, and I don’t want to have anything to do with it, but I realize that for many users it is the only operating system available. So I would make the next application modular, in such a way that someone else can just create descending classes from my abstract ones, and implement sandboxes in a different setup.
Make sandboxes for more than MySQL. Databases are all different. People have asked me to create sandboxes for Postgres, Drizzle, and Oracle, and I have declined to even try. But if the framework is abstract enough, it could allow subclasses that handle different operating systems and different database servers.
Create an API that can be used from a programming language instead of using the tools directly. This requires some clever redesign but it is feasible.
Meet DBdeployer
The next incarnation of MySQL Sandbox is named DBdeployer. Its features so far include a development plan on GitHub and a dedicated domain dbdeployer.org (with a twin .com) that so far redirects to MySQL Sandbox site.
As you can see from the development plan, there is quite a lot to do.
Why GitHub?
During the lifetime of MySQL Sandbox I have changed from Savannah to SourceForge to the current Launchpad.
For the work at my company, I have also used extensively Google code. In each place I found good and bad parts, and I kept looking around for alternatives. The fastest growing project hosting that I have noticed is GitHub, where I find all the main features I need. What I loved in launchpad was the ability of writing blueprints with their dependencies. What I have realized later is that I can write a development plan using Test Driven (TDD) and/or Behavior Driven Development (BDD) for my working documents. If you look at the MySQL sandbox code, you will see that the largest piece of the code base is made of tests, and yet I wrote most of those tests after writing the features, just because of how the application was designed. Given my love for testing, it makes sense that in my next project I privilege testing by embracing a development method that combines tests, design, and development in one harmonious loop. What has this to do with GitHub? It’s because it has all except a blueprint designer graphical interface, and since the design is going to be done with the BDD tests, GitHub, with its vibrant community and the tools that make production easy, is the tool that I have chosen. I should also mention that I have grown tired of Bazaar that comes with Launchpad. While I like its principles, it is really not as widespread and maintained as git. When git was a Linux-only application, it was not a good choice, but now, not only it is universal, but it comes pre-installed in every major operating system (no, Windows is not one of them, but despite having mentioned it in my wish list, I still don’t care).
Why not Perl?
Going with GitHub is a hint that I won’t be using Perl for my next project. A few years ago I stated my intention of using Python for a new MySQL Sandbox, but then I changed job and I focused on other priorities. While I kept up to date with Python, I also rediscovered an old love: Ruby.
Ruby is everything that Perl wanted to be but could not. It has taken from Perl most of its core principles and made them extensible with true object oriented implementation, and in the latest release of Ruby the language has improved its stability and expressiveness that strikes a chord with my love for technology. Not only that, but there are testing techniques that the Ruby community has embraced and enhanced more than other languages, and since I am a QA developer at heart, it sounds like a logical choice.
I could still use Perl, and GitHub, and BDD together. But let’s be frank: Perl object oriented abilities are poor. While it has finally come up with a new OOP framework, it is still an addition that feels foreign to the language. Compared to Ruby terse oop implementation (I love the everything is an object paradigm) Perl feels old and awkward when I try to do some innovative design.
What, you may ask, is this fixation with OOP? It's an early infatuation of mine. I started using OOP in the early 1990s, with C++, before it became as useful as it is nowadays thanks to the Standard Template Library. And since C++ compilers were not widely available, I implemented my own OOP flavor using standard C, which allowed me to develop a whole database engine interpreter and to expand with new features quite easily. Since then, I have always liked OOP. With Perl, I had to bargain. On one side, it allows me to save thousands of lines of code, compared to C, but it does not encourage using OOP. As a result, I wrote code faster, but not the kind of reusable code that with hindsight I would have liked to have produced.
So, where is the code?
Here’s the thing: there is no code yet. Although my fingers are itching to get started, I want to avoid getting stuck with a prototype that grows into a non-scalable application, and so I will put together as many BDD tests as I can before writing any code.
The first step was writing the development plan, which is more a wishlist than a proper plan. On the same vein, there is a possible description of the application at Introducing DBdeployer, from which I excerpt a dummy tentative interface.
$ dbdeployer
NAME
dbdeployer - installs single and composite MySQL instances

SYNOPSIS
dbdeployer [global options] command [command options] [arguments...]

VERSION
0.0.1

GLOBAL OPTIONS
--help                - Show this message
--hosts=hostname list - Install on one or more remote hosts (default: localhost)
-s, --[no-]sandbox    - Creates a sandboxed instead of a production-ready instance
--version             - Display the program version

COMMANDS
single      - Deploys a single instance
replication - Deploys a composite instance in replication
multiple    - Deploys a composite instance of isolated servers
check       - Checks if an instance is working correctly
clone       - Clone an instance
move        - Move an instance
remove      - Remove an instance
help        - Shows a list of commands or help for one command
Next: requesting comments
The next step is collecting advice, comments, and wishes from users and see where it goes.
I have a wish of getting a version 0.1 ready for MySQL Connect 2013, where I have a talk about running MySQL in your laptop (obviously it covers MySQL Sandbox). If the design goes well, I should be able to get a working application by mid September. Probably it won’t include all the features, but if I have an extensinble framework and the implementation of the most basic features in place, I would feel satisfied.
If you are interested in the future of MySQL Sandbox, read the development plan, and comment to this article with advice or wishes.
Acknowledgements
Thanks to my current company: Continuent, Inc (and the previous one: MySQL AB) for allowing me to keep maintaining MySQL Sandbox and its next revolutionary evolution. And thanks to all the people who have contributed with bug reports, advice, features, comments, reviews, and of course by using it and spreading it around.
Systems analyst and database designer with 20+ years of IT experience. Deals with data analysis and migration, performance optimization, general wizardry.