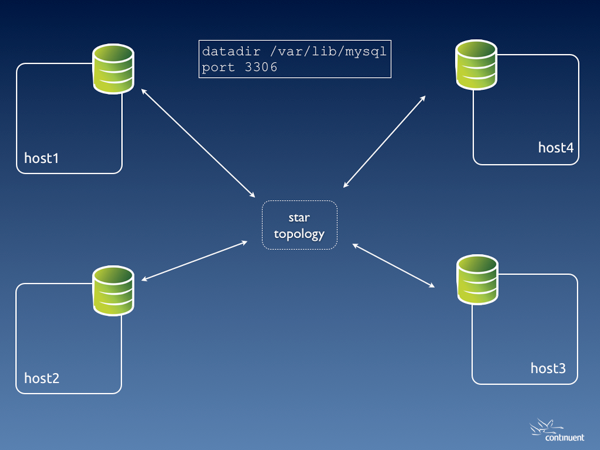
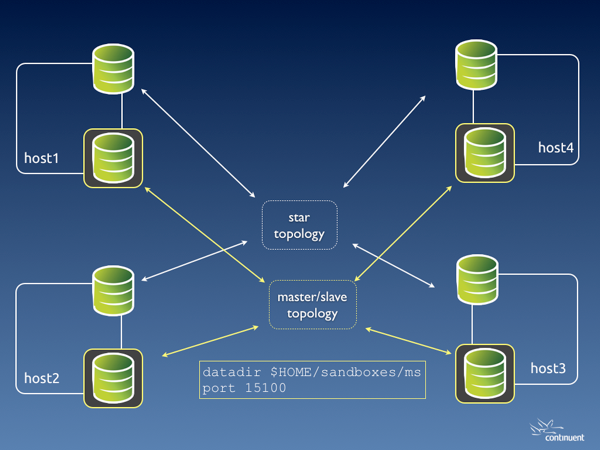
Monday, March 25, 2013

Multi-master data conflicts - Part 1: understanding the problem

What is a conflict?

Readers of this blog know that one of my favorite tools, Tungsten Replicator, can easily create multi-master replication topologies, such as all-masters, star, fan-in. While this is good news for system designers and ambitious DBAs, it also brings some inconvenience. When you allow updates to happen in more than one master, you risk having conflicts. You may have heard this term before. For the sake of clarity, let's define what conflicts are, before analyzing each case in detail.

You have a conflict when several sources (masters) update concurrently the same data in asynchronous replication.

It's important to stress that this happens with asynchronous replication. In a truly synchronous cluster, where all data is kept consistent through 2-phase commit, there is no risk of conflicts.

The above definition is not always correct. You may update data from several sources and end up with something completely legitimate. A better definition should be: a conflict happens after an unexpected concurrent modification of existing data coming from a remote source.

For example:

  • Both servers A and B insert a record with the same primary key;
  • Master A updates record 10 with value 3 while master B updates record 10 with value 4;
  • Master A deletes record 10 while master B updates record 10.

In each of these cases, there is data in one server, which could have been just inserted by a legitimate source, or could have been there for long time. Regardless of the record age, the conflict happen when the data clashes with the latest update. We usually think of conflicts as concurrent events from different sources, because this is the most frequent case of evident conflicts, i.e. conflicts that are detected (and hopefully fixed). But there are hidden conflict that happen (or are discovered) long time after the update.

When we consider the consequences of a conflict, we observe that a conflict creates one or more of the following:

  • Duplicate data (unwanted insert)
  • Data inconsistency (unwanted update)
  • Data loss (unwanted delete)
  • Replication break

Duplicate data

This is the most widely known conflict, because it's often caught immediately after the fact, allowing the DBA to take action. However, it's also one of the less understood cases, as we will see in the next section.
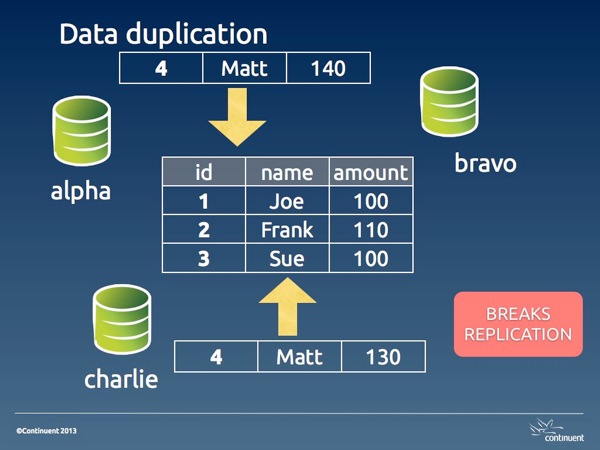
Multi master conflicts 003

Image #1. Data duplication

In its basic shape, data duplication happens when two masters insert the same data. One of the two transactions will be committed before the other, and the second one will fail with a rightful duplicate key error. The reason for this occurrence is often an application bug, or a design flaw, or sometimes an human error that the application fails to detect properly (a different application bug).

We will see the possible solution in part 2 of this article. For now, it's enough to know that this kind of error is the best kind of conflicts that can happen to you. Since it breaks replication, it has the positive effect of alerting the DBA about an error.

Depending on which event is applied first, you have different situations. If the remote event is applied first, you have a real conflict, where the legitimate event can't get to the database. This state requires a longer set of actions: you need to clean up both the origin and the destination servers. If the legitimate action is applied first, then you don't have a real conflict, as the wrong event was applied only in one server, and you need to clean up only the origin. If you have more than two masters in your topology, you may find that the damage could be a mix of both cases, as the wrong event may arrive to distant servers before or after the right one.

auto_increment_offsets and hidden data duplication

There is a popular belief that conflicts with multi-master topologies can be avoided using auto_increment_increment and auto_increment_offset. The combination of these two variables makes sure that auto_increment values are generated with different intervals for each master. For example, if I have three masters and I am using increment 3, the first master will generate 1,4,7,10, the second one will have 2,5,8,11, and the third one 3,6,9,12.

Where does this paradigm work? When the primary key is the auto generated column, then the conflict is prevented. For example, in a table that records bug reports, the incrementing value for the bug number is a legitimate primary key. If two masters enter a bug simultaneously, the bug numbers will have different values. (there will most likely be gaps in the bug numbers, and this could be a non desirable side effect, bt then, I am not advocating this system, although I made this mistake many years ago.)

However, if the table has a natural primary key that is not an auto-incremented value, conflicts are possible, and likely. In that case, you will have a duplicated key error, as in the case seen before.

Disaster strikes when the table has a poorly chosen auto_increment primary key.

For example, let's consider a departments table with this structure:

CREATE TABLE departments (
    dept_id int not null auto_increment primary key,
    dept_name varchar(30) not null
);

If two masters need to insert a new department named 'special ops', we may end up with this situation:

select * from departments;
+---------+-------------+
| dept_id | dept_name   |
+---------+-------------+
|       2 | special ops |
|       4 | special ops |
+---------+-------------+
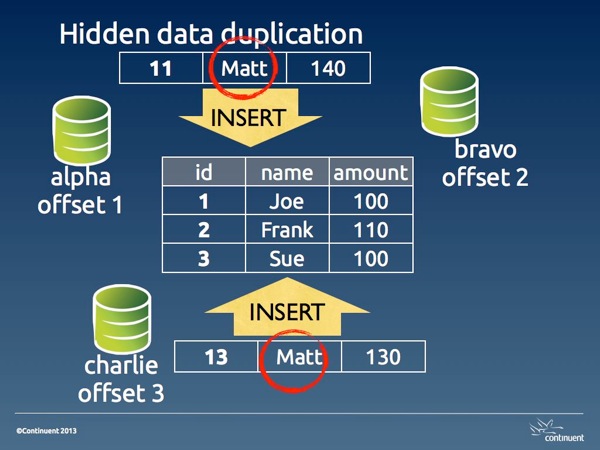
Multi master conflicts 005

Image #2. Hidden data duplication

This is what I define hidden data duplication, because you have duplicated data, and no errors that may warn you of the problem. Here the issue is aggravated by the fact that 'department' is likely a lookup table. Thus, there will be a table where 'special ops' is referenced using dept_id 2, and another table where it is used with dept_id 4.

The reason for hidden data duplication is poor choice of primary key, and failure to enforce unique values in columns that should be such.

Data inconsistency

When two UPDATE statements are executed on the same record from different sources, there is the possibility of spoiling the data accuracy in several ways. The amount of damage depend on the type of update (with absolute values or calculated ones) and on whether we are using statement-based or row-based replication.

With absolute values, the last value inserted overwrites the previous one.
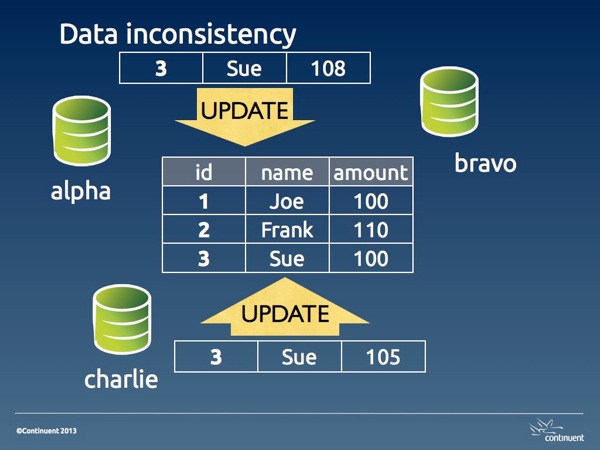
Multi master conflicts 006

Image #3. Data inconsistency

With calculated values, the data inconsistency may change with surprising consequences. For example, if we have a table accounts:

select * from accounts;
+----+--------+
| id | amount |
+----+--------+
|  1 |   1000 |
|  2 |   1000 |
|  3 |   1000 |
+----+--------+

If a statement that doubles the account for ID 2 is executed in two masters, then we will have an amount of 4,000 instead of 2,000. Using row-base replication can protect you against this kind of disaster.

Data loss

When a DELETE statement is entered for a record that later we want to read, we have lost data. This kind of DELETEs may happen because of bad operations, or more likely because of data inconsistencies that alter the conditions used for deleting.
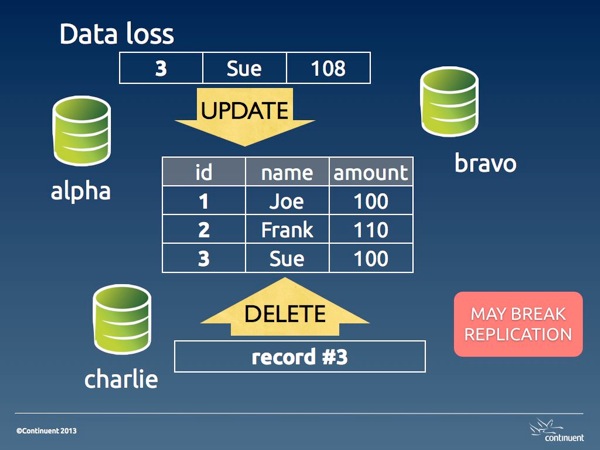
Multi master conflicts 007

Image #4. Data loss

Unwanted DELETE operations may also break replication when the DELETE happens before an UPDATE on the same record. Either way, a data loss conflict is hard to resolve because the data has gone away. Depending on the amount of the loss, we may need to restore the table completely or partially from a backup.

Why conflicts happen

To understand why conflicts happen, let's first see why they don't happen when we try a conflicting operation in the same server.


SESSION_1 > create table people (id int not null primary key, name varchar(40) not null, amount int);
Query OK, 0 rows affected (0.01 sec)

SESSION_1 > insert into people values (1, 'Joe', 100), (2, 'Frank', 110), (3, 'Sue', 100);
Query OK, 3 rows affected (0.00 sec)
Records: 3  Duplicates: 0  Warnings: 0

SESSION_1 > set autocommit=0;
Query OK, 0 rows affected (0.00 sec)

SESSION_1 > begin;
Query OK, 0 rows affected (0.00 sec)

SESSION_2 > set autocommit=0;
Query OK, 0 rows affected (0.00 sec)

SESSION_2 > select * from people;
+----+-------+--------+
| id | name  | amount |
+----+-------+--------+
|  1 | Joe   |    100 |
|  2 | Frank |    110 |
|  3 | Sue   |    100 |
+----+-------+--------+
3 rows in set (0.00 sec)

SESSION_2 > begin;
Query OK, 0 rows affected (0.00 sec)


SESSION_1 > insert into people values (4,'Matt', 140);
Query OK, 1 row affected (0.00 sec)


SESSION_2 > insert into people values (4,'Matt', 130);
# ... hanging


SESSION_1 > commit;
Query OK, 0 rows affected (0.01 sec)


SESSION_2 > insert into people values (4,'Matt', 130);
# ...
ERROR 1062 (23000): Duplicate entry '4' for key 'PRIMARY'

What happens here is that user in session 1 inserts a record at the same time when user in session 2 inserts the same record. When the record is inserted in session 1, InnoDB creates a lock. If you look at the InnoDB locks before SESSION_1 issues a commit, you will see it:

SESSION_3 > select * from information_schema.innodb_locks\G
*************************** 1. row ***************************
    lock_id: 30B:0:307:5
lock_trx_id: 30B
  lock_mode: S
  lock_type: RECORD
 lock_table: `test`.`people`
 lock_index: `PRIMARY`
 lock_space: 0
  lock_page: 307
   lock_rec: 5
  lock_data: 4
*************************** 2. row ***************************
    lock_id: 30C:0:307:5
lock_trx_id: 30C
  lock_mode: X
  lock_type: RECORD
 lock_table: `test`.`people`
 lock_index: `PRIMARY`
 lock_space: 0
  lock_page: 307
   lock_rec: 5
  lock_data: 4
2 rows in set (0.00 sec)

You can see that there is an exclusive lock on the record.

This lock effectively prevents a duplicate.

Now, if you imagine the two sessions happening on different servers, the two users are in a similar situation, i.e. they don't know that a concurrent update on the same record is being attempted. But the difference is that, in asynchronous replication, there is no lock applied on a remote server. If the two transactions are committed at the same instant, both of them will be stored in their local server, and both of them will fail and break replication on the remote server. If the record in session 1 is applied a few seconds before the other, the user in session 2 will not be able to commit, same as it happened with the concurrent insertion in the single server example above. In this case, the conflict looks exactly as it happened in a single server.

However, if both commits happen at the same time, both users will have a positive feedback, since their transaction will return success, and both are happy, at least temporarily. Unbeknown to both, though, their transaction has failed on the remote server, and replication is broken on both servers, leaving each with a bit of mess to clean up.

These examples show that conflicts are often a matter of chance. Depending on the timing of the operations, we might catch them as they happen and take action before the conflict spreads its side effects, or we only notice later on, when replication fails, and the conflict has already spoiled our data.

Summing up

Conflicts in multi-master topologies are the consequence of unwanted or unexpected operations. The effects of a conflict range from data inconsistency to data loss, and may also cause replication to break.

The most desirable outcome for a conflict is a replication error, because it prevents further spreading of the error and alerts the DBA about a possible issue.

In the second part of this article, we will look at some of the methods to deal with conflicts in various scenarios.

Tuesday, March 12, 2013

Sessions at Percona Live MySQL Conference 2013: fun, competition, novelties, and a free pass

Percona Live MySQL Conference and Expo, April 22-25, 2013

The Percona Live MySQL Conference and Expo 2013 is almost 1 month away. It's time to start planning, set the expectations, and decide what to attend. This post will give a roundup of some of the sessions that I recommend attending and I look forward to.

First, the unexpected!

After much talk and disbelief, here they come! Oracle engineers will participate to the Percona Live conference. This is wonderful! Their participation was requested by the organizers, by the attendees, and by community advocates, who all told the Oracle management how important it is to be in this conference. Finally, they have agreed to come along, and here they are, with one keynote and three general sessions.

My talks

I will be a speaker at the conference, and thus it's no surprise that I will recommend my talks.

My company's talks

Continuent is very active at many conferences, and at this one we are participating massively. I know I look partial in this matter, but I am really proud of the products that we create and maintain at my company. That's why I highly recommend these talks.

Competing with whom?

MySQL is a standard, and widely popular. Yet, it has shortcomings and weak points, which allow for alternative solutions to flourish. There are many sessions that offer alternatives to the vanilla software.

  • [Tue 1:20pm] MariaDB Cassandra Interoperability. MariaDB is a magnetic fork of MySQL. It's magnetic in the sense that it attract most of the features or enhancements that nobody else wanted to accept. While some of its features may look like a whim (and some of them have been discontinued already), there are some that look more interesting than others. This integration with Cassandra deserves some exploration.
  • [Tue 3:50pm] MySQL Cluster - When to use it and when not to. The classic MySQL Cluster. Some believe that it's a drop-in replacement for a single server. It's not. It's a powerful solution, but it is not fit for all.
  • [Wed 11:10am] Fine Tuning Percona XtraBackup to your workload. This tool has become a de-facto standard. It is available everywhere, easy to use, and powerful. A great tale of an alternative tool that became the standard.
  • [Thu 9:00am] MySQL, YourSQL, NoSQL, NewSQL - the state of the MySQL ecosystem While all the keynotes are worth attending, this one is special. If you want to understand the MySQL world, Matt Aslett can draw a quite useful map for you.

New and renewed technologies

There are many interesting talks about new things, or old technologies with a new twist.

Tales from the trenches

Win a free pass

Percona is offering free passes for community participation. One of them is available to readers of this blog and I will be the judge.

To get a free pass, do the following:

  1. Blog, tweet, or post on another public media about this conference;
  2. Leave a comment here, with a link to your post;
  3. The free pass will be given to the most useful or pleasant post;
  4. Make sure there is a way to reach you by email or twitter;
Please notice:
  • I will award the free pass to the post that I like most. The adjudication will be entirely subjective.
  • Deadline: March 20th, 2013.

Monday, March 11, 2013

Deploying remote MySQL sandboxes

Stating the problem.

In my job, I do a lot of testing. And no matter how much organized we try to be, we end up with fewer machines than we would need to run all the tests that we want.

For some tasks, we can run MySQL Sandbox, and get the job done. But sometimes we need to make sure that applications and systems work well across the network, and we need to install and run systems on separate servers.

However, when you test replication systems, and every cluster takes three or four servers, you run our of available hosts very quickly. So you decide to use the clusters that are dedicated to automated testing to also run your own manual tests. Soon you realize that the tests that you are running manually are clashing with the automated ones, or with the ones that your colleagues are running.

A simple solution is installing additional sandboxes for the MySQL server in each host, and then run our operations against the new server. If we need more than one database server, MySQL Sandbox allows us to deploy them at will.

There are a few obstacles to overcome, for this approach to be useful:

  • Installing sandboxes in remote servers is time consuming and not automated. When we need to do automated tests, this is a serious issue.
  • By default, MySQL Sandbox works on the local host only. It can be installed to listen to remote clients, using an appropriate option.
  • Sandboxes for testing replication need to be configured on the fly. It can be done manually, but also this issue can be solved by using advanced installation options.
  • Installing via SSH can be challenging, when we need to provide several options on the command line, there are only two kinds of quotes available, and they can get messed up when we pass options across servers.

Remote sandboxes 001 001

Default deployment - with one MySQL server installed through rpm or deb

Remote sandboxes 002 001

Deployment with one additional sandbox per host

Remote sandboxes 003 001

Deployment with two additional sandbox per host

Remote sandboxes 004 001

Deployment with three additional sandbox per host

I faced this problem several times, and each time I was writing a quick shell script that would deploy the sandboxes in my servers. My O.S. user has access to all nodes in the cluster using SSH, and this makes the remote installation easier.

Remote deployment scripts

No manual installation is required. Following my experience with many different deployment in my clusters, I came up with a solid model that allows me to deploy remote sandboxes automatically. Initially, I had several sandboxes.sh scripts scattered around my code version control system. Then I implemented a general purpose script inside the Tungsten Toolbox. And finally I made an even more general script in the latest release of MySQL-Sandbox (3.0.31).

Remote database connection

This problem is easy to solve. By default, sandbox users are created as

msandbox@'127.%'
There is an option that installs the sandbox users with access from anywhere in the network (--remote_access='%'). We just need to pass this option correctly to the deployer. (See below)

Sandbox configuration

MySQL Sandboxes can be configured exactly as you need them. During the installation, you can pass options that change the configuration file according to your need. The syntax is :

make_sandbox tarball_name.tar.gz -- -c option=value -c another_option=value
The options passed with '-c' will be written to the configuration file, and used since the first start.

Passing complex options across servers

This is probably the most annoying problem. If you run

ssh myhost  "some_command --option='value' "
and there are quotes inside 'value', you may get an error, and a difficult one to debug.

The solution to this problem is to split the process into three phases:

  1. Create a deployment shell script, generated dynamically inside the remote_sandboxes script. This script will have all the needed quotes in the right places. There won't be any need of further quoting.
  2. Send the script to the remote host. Note that we generate a different script for every host.
  3. ssh to the remote host, and execute the deployment script remotely. The script will run all the commands you have prepared, without risk of contaminating the command line with unwanted quotes.

An additional advantage of this approach is that you can include some checks inside the dynamically generated script. Things that could not be easily done with an SSH call.

Try it out

The new script is installed along the rest of MySQL Sandbox executable, and it is called deploy_to_remote_sanboxes.sh. For example:

deploy_to_remote_sanboxes.sh -l host1,host2,host3 -P 19000 -d myGA -t ~/downloads/mysql-5.6.10-linux-blah-blah.tar.gz

This command will install a sandbox called 'myGA' with MySQL 5.6.10, using port 19000 and the given tarball.

Assumptions:

  • You must have ssh access between your current O.S. user and a corresponding user in the remote hosts. It is recommended that the user access through a SSH key.
  • MySQL Sandbox should be installed in all remote hosts.
  • The port that you have chosen for the sandboxed database server must be open (and not already used) in all hosts
  • If you have an existing sandbox with the same name it will be overwritten.

Sunday, March 10, 2013

North East Linux Fest and Open Database Camp - Boston, March 16-17 2013

On Thursday, I will travel to Boston, MA, to attend the Northeast LinuxFest, which includes also an edition of the Open Database Camp. The events will be at one of my favorite places on earth: The Massachusetts Institute of Technology, a.k.a. the MIT. Every time I speak at an event there, I feel at home, and I look forward to be there once more.

The Open Database Camp is organized, as usual, with the formula of an un-conference, where the schedule is finalized on the spot.

There are a few ideas for sessions. I have proposed two of the topics I am most familiar with:

In addition so seeing the MIT again, I will be also pleased to meet colleagues and friends from all over the place. If you happen to be nearby, let's get together!

Wednesday, February 20, 2013

Parallel replication and GTID - A tale of two implementations

MySQL 5.6 is probably the version of MySQL with the biggest bundle of new features. You may want to try it soon, since it's now released as GA, and I would like to offer some practical experience on how to use some of the advanced features.

Since replication is my main interest, I will focus on some of the new features in this field, and I will compare what's available in MySQL 5.6 with Tungsten Replicator.

The focus of the comparison is usability, manageability, and some hidden functionality. Parallel replication has been available with Tungsten Replicator for almost two years, and Global Transaction Identifiers for much longer than that. With MySQL 5.6, it seems that the MySQL team wants to close the gap. While the main feature (parallel execution threads) is available and performing well, there are some shocking differences in terms of ease of use, administration handles, and capabilities, that suggest at least poor integration into the server.

To test replication, I have enabled parallel workers and GTID in the slaves, and I ran 5 quick processes on separated databases. I repeated the operation with MySQL 5.6 and Tungsten Replicator. Let's see what I have found.

Monitoring

First of all, there is "SHOW SLAVE STATUS," which has been enhanced to include the GTID. Trouble is, this command was designed for a single replication channel, and when the GTID from several parallel threads are listed, the result is puzzling.

show slave status\G
*************************** 1. row ***************************
               Slave_IO_State: Waiting for master to send event
                  Master_Host: 127.0.0.1
                  Master_User: rsandbox
                  Master_Port: 18675
                Connect_Retry: 60
              Master_Log_File: mysql-bin.000002
          Read_Master_Log_Pos: 386003338
               Relay_Log_File: mysql_sandbox18676-relay-bin.000006
                Relay_Log_Pos: 315698722
        Relay_Master_Log_File: mysql-bin.000002
             Slave_IO_Running: Yes
            Slave_SQL_Running: Yes
              Replicate_Do_DB: 
          Replicate_Ignore_DB: 
           Replicate_Do_Table: 
       Replicate_Ignore_Table: 
      Replicate_Wild_Do_Table: 
  Replicate_Wild_Ignore_Table: 
                   Last_Errno: 0
                   Last_Error: 
                 Skip_Counter: 0
          Exec_Master_Log_Pos: 315698559
              Relay_Log_Space: 386003928
              Until_Condition: None
               Until_Log_File: 
                Until_Log_Pos: 0
           Master_SSL_Allowed: No
           Master_SSL_CA_File: 
           Master_SSL_CA_Path: 
              Master_SSL_Cert: 
            Master_SSL_Cipher: 
               Master_SSL_Key: 
        Seconds_Behind_Master: 646
Master_SSL_Verify_Server_Cert: No
                Last_IO_Errno: 0
                Last_IO_Error: 
               Last_SQL_Errno: 0
               Last_SQL_Error: 
  Replicate_Ignore_Server_Ids: 
             Master_Server_Id: 1
                  Master_UUID: f6ea8d94-7147-11e2-a036-6c626da07446
             Master_Info_File: mysql.slave_master_info
                    SQL_Delay: 0
          SQL_Remaining_Delay: NULL
      Slave_SQL_Running_State: Reading event from the relay log
           Master_Retry_Count: 86400
                  Master_Bind: 
      Last_IO_Error_Timestamp: 
     Last_SQL_Error_Timestamp: 
               Master_SSL_Crl: 
           Master_SSL_Crlpath: 
           Retrieved_Gtid_Set: f6ea8d94-7147-11e2-a036-6c626da07446:1-1089548
            Executed_Gtid_Set: f6ea8d94-7147-11e2-
a036-6c626da07446:1-891950:891952-891953:891955-891963:891965-891969:891971-891973:891976-891992:891994-8919
95:891997:891999:892001-892002:892005-892016:892019-892023:892025-892026:892028:892030-892032:892034-892039:
892041-892044:892046:892048-892051:892053-892054:892056-892063:892065-892072:892074-892084:892086-892089:892
091:892094:892096-892111:892113-892122:892124-892137:892139-892142:892144-892146:892148-892150:892152:892154
-892159:892161-892171:892173-892182:892184-892185:892187:892189-892193:892196-892198:892200-892206:892208:89
2210-892211:892213-892216:892218-892219:892222:892224-892226:892228:892230-892249:892251:892255:892257:89225
9-892260:892262-892263:892265:892268:892270-892288:892290:892292:892295-892298:892300-892307:892309:892312:8
92314-892317:892319-892320:892324-892328:892332-892336:892342:892344-892349:892352-892355:892359-892360:8923
62-892363:892369-892372:892376:892378-892384:892387:892390:892392:892394:892396-892397:892399:892401-892403:
892405-892407:892409:892413-892415:892417:892421:892423-892426:892429-892431:892433:892435:892437-892439:892
442:892445:892448
                Auto_Position: 0

After this abundant display of GTID (alas, without any reference to the transactions being processed), I was expecting something from the tables dedicated to replication monitoring. However, what is missing in these tables is any reference to GTIDs, and any context about the transactions. There is no indication of which schema the changes are happening, how well or bad distributed they are, whether there was the need for serialization, or other info.

select * from mysql.slave_worker_info\G
*************************** 1. row ***************************
                        Id: 1
            Relay_log_name: ./mysql_sandbox18676-relay-bin.000006
             Relay_log_pos: 91550519
           Master_log_name: mysql-bin.000002
            Master_log_pos: 91550356
 Checkpoint_relay_log_name: ./mysql_sandbox18676-relay-bin.000006
  Checkpoint_relay_log_pos: 91371802
Checkpoint_master_log_name: mysql-bin.000002
 Checkpoint_master_log_pos: 91371639
          Checkpoint_seqno: 508
     Checkpoint_group_size: 64
   Checkpoint_group_bitmap: #####(unprintable characters replaced)#####
*************************** 2. row ***************************
                        Id: 2
            Relay_log_name: ./mysql_sandbox18676-relay-bin.000006
             Relay_log_pos: 91497101
           Master_log_name: mysql-bin.000002
            Master_log_pos: 91496938
 Checkpoint_relay_log_name: ./mysql_sandbox18676-relay-bin.000006
  Checkpoint_relay_log_pos: 91319665
Checkpoint_master_log_name: mysql-bin.000002
 Checkpoint_master_log_pos: 91319502
          Checkpoint_seqno: 501
     Checkpoint_group_size: 64
  ?! ?AA@oint_group_bitmap:  #####(unprintable characters replaced)#####
*************************** 3. row ***************************
                        Id: 3
            Relay_log_name: ./mysql_sandbox18676-relay-bin.000006
             Relay_log_pos: 91540831
           Master_log_name: mysql-bin.000002
            Master_log_pos: 91540668
 Checkpoint_relay_log_name: ./mysql_sandbox18676-relay-bin.000006
  Checkpoint_relay_log_pos: 91360379
Checkpoint_master_log_name: mysql-bin.000002
 Checkpoint_master_log_pos: 91360216
          Checkpoint_seqno: 511
     Checkpoint_group_size: 64
   Checkpoint_group_bitmap: #####(unprintable characters replaced)#####
*************************** 4. row ***************************
                        Id: 4
            Relay_log_name: ./mysql_sandbox18676-relay-bin.000006
             Relay_log_pos: 91461999
           Master_log_name: mysql-bin.000002
            Master_log_pos: 91461836
 Checkpoint_relay_log_name: ./mysql_sandbox18676-relay-bin.000006
  Checkpoint_relay_log_pos: 91281068
Checkpoint_master_log_name: mysql-bin.000002
 Checkpoint_master_log_pos: 91280905
          Checkpoint_seqno: 510
     Checkpoint_group_size: 64
   Checkpoint_group_bitmap: #####(unprintable characters replaced)#####
*************************** 5. row ***************************
                        Id: 5
            Relay_log_name: ./mysql_sandbox18676-relay-bin.000006
             Relay_log_pos: 91373959
           Master_log_name: mysql-bin.000002
            Master_log_pos: 91373796
 Checkpoint_relay_log_name: ./mysql_sandbox18676-relay-bin.000006
  Checkpoint_relay_log_pos: 91192982
Checkpoint_master_log_name: mysql-bin.000002
 Checkpoint_master_log_pos: 91192819
          Checkpoint_seqno: 508
     Checkpoint_group_size: 64
   Checkpoint_group_bitmap: #####(unprintable characters replaced)#####

The table dedicated to parallel replication doesn't give us any information about GTID. And it doesn't say in which schema the transaction is happening. This lack of information, for a feature that is based on schema isolation, is quite startling.

So, we have a look at the crash-safe slave tables.

select * from mysql.slave_master_info\G
*************************** 1. row ***************************
       Number_of_lines: 23
       Master_log_name: mysql-bin.000002
        Master_log_pos: 385282815
                  Host: 127.0.0.1
             User_name: rsandbox
         User_password: rsandbox
                  Port: 18675
         Connect_retry: 60
           Enabled_ssl: 0
                Ssl_ca: 
            Ssl_capath: 
              Ssl_cert: 
            Ssl_cipher: 
               Ssl_key: 
Ssl_verify_server_cert: 0
             Heartbeat: 1800
                  Bind: 
    Ignored_server_ids: 0
                  Uuid: f6ea8d94-7147-11e2-a036-6c626da07446
           Retry_count: 86400
               Ssl_crl: 
           Ssl_crlpath: 
 Enabled_auto_position: 0

select * from mysql.slave_relay_log_info\G
*************************** 1. row ***************************
  Number_of_lines: 7
   Relay_log_name: ./mysql_sandbox18676-relay-bin.000006
    Relay_log_pos: 235324325
  Master_log_name: mysql-bin.000002
   Master_log_pos: 235324162
        Sql_delay: 0
Number_of_workers: 5
               Id: 1

What's wrong with this picture? Two main things:

  • There is no mention of GTID in these tables either. So, if you are using GTID, your only option is to look at the binary logs, and see if you get any solace when a failover occurs. But the server itself does not offer any help.
  • There is only one row available for the master and relay log info. When you are using parallel replication, this means that either every commit must lock the same row, or these tables are useless for keeping the slave crash safe. If the information used for crash safe comes from the parallel workers table, then the crash safe tables are redundant. But as you can see on your own, the parallel workers table has less information than master_info and relay_log_info.

Thus, we have a look at how GTID and parallel threads are implemented in Tungsten.

Even limiting the information to the tables found in the server, we find several differences:

  • The GTID is displayed in every row. (It's the column named seqno). The original binlog name and position are also preserved and associated with the GTID (in the column named eventid.)
  • Every row displays in which schema it is being processed. (It's the column named shard_id)
  • There is no separated table for crash-safe info and parallel threads. When Tungsten uses a single thread, the table has only one row. When it is using parallel appliers, then there are multiple rows, one for each applier. This way, there is no possibility of deadlock, as every thread locks only one row.

select * from tungsten_tsandbox.trep_commit_seqno
+---------+---------+--------+-----------+-----------+--------------+-------------------------------------+-----------------+---------------------+------------+---------------------+
| task_id | seqno   | fragno | last_frag | source_id | epoch_number | eventid                             | applied_latency | update_timestamp    | shard_id   | extract_timestamp   |
+---------+---------+--------+-----------+-----------+--------------+-------------------------------------+-----------------+---------------------+------------+---------------------+
|       0 | 2218566 |      0 | 1         | 127.0.0.1 |            0 | mysql-bin.000002:0000000330476211;0 |               1 | 2013-02-07 23:12:07 | evaluator1 | 2013-02-07 23:12:06 |
|       1 | 2218521 |      0 | 1         | 127.0.0.1 |            0 | mysql-bin.000002:0000000330469587;0 |               1 | 2013-02-07 23:12:07 | evaluator2 | 2013-02-07 23:12:06 |
|       2 | 2220380 |      0 | 1         | 127.0.0.1 |            0 | mysql-bin.000002:0000000330747639;0 |               1 | 2013-02-07 23:12:07 | evaluator3 | 2013-02-07 23:12:06 |
|       3 | 2219360 |      0 | 1         | 127.0.0.1 |            0 | mysql-bin.000002:0000000330594617;0 |               1 | 2013-02-07 23:12:07 | evaluator4 | 2013-02-07 23:12:06 |
|       4 | 2221220 |      0 | 1         | 127.0.0.1 |            0 | mysql-bin.000002:0000000330873205;0 |               0 | 2013-02-07 23:12:07 | evaluator5 | 2013-02-07 23:12:07 |
+---------+---------+--------+-----------+-----------+--------------+-------------------------------------+-----------------+---------------------+------------+---------------------+

You can see the same information in vertical output, to appreciate the level of detail.

select * from tungsten_tsandbox.trep_commit_seqno\G
*************************** 1. row ***************************
          task_id: 0
            seqno: 2257934
           fragno: 0
        last_frag: 1
        source_id: 127.0.0.1
     epoch_number: 0
          eventid: mysql-bin.000002:0000000336350320;0
  applied_latency: 9
 update_timestamp: 2013-02-07 23:12:26
         shard_id: evaluator1
extract_timestamp: 2013-02-07 23:12:17
*************************** 2. row ***************************
          task_id: 1
            seqno: 2257938
           fragno: 0
        last_frag: 1
        source_id: 127.0.0.1
     epoch_number: 0
          eventid: mysql-bin.000002:0000000336350875;0
  applied_latency: 9
 update_timestamp: 2013-02-07 23:12:26
         shard_id: evaluator2
extract_timestamp: 2013-02-07 23:12:17
*************************** 3. row ***************************
          task_id: 2
            seqno: 2257936
           fragno: 0
        last_frag: 1
        source_id: 127.0.0.1
     epoch_number: 0
          eventid: mysql-bin.000002:0000000336350648;0
  applied_latency: 9
 update_timestamp: 2013-02-07 23:12:26
         shard_id: evaluator3
extract_timestamp: 2013-02-07 23:12:17
*************************** 4. row ***************************
          task_id: 3
            seqno: 2257916
           fragno: 0
        last_frag: 1
        source_id: 127.0.0.1
     epoch_number: 0
          eventid: mysql-bin.000002:0000000336347768;0
  applied_latency: 9
 update_timestamp: 2013-02-07 23:12:26
         shard_id: evaluator4
extract_timestamp: 2013-02-07 23:12:17
*************************** 5. row ***************************
          task_id: 4
            seqno: 2257933
           fragno: 0
        last_frag: 1
        source_id: 127.0.0.1
     epoch_number: 0
          eventid: mysql-bin.000002:0000000336350156;0
  applied_latency: 9
 update_timestamp: 2013-02-07 23:12:26
         shard_id: evaluator5
extract_timestamp: 2013-02-07 23:12:17

In addition to the information that you can get from the database server, Tungsten has its own tools that provide information about the process. For example, trepctl status -name stores provides, among other things, detailed information about how many transactions were processed, accepted, and rejected by each channel, and if there was any collision that caused serialization.

trepctl status -name stores
Processing status command (stores)...
NAME                      VALUE
----                      -----
activeSeqno             : 2267132
doChecksum              : false
flushIntervalMillis     : 0
fsyncOnFlush            : false
logConnectionTimeout    : 28800
logDir                  : /home/tungsten/tsb2/db3/tlogs/tsandbox
logFileRetainMillis     : 604800000
logFileSize             : 100000000
maximumStoredSeqNo      : 2267230
minimumStoredSeqNo      : 0
name                    : thl
readOnly                : false
storeClass              : com.continuent.tungsten.replicator.thl.THL
timeoutMillis           : 2147483647
NAME                      VALUE
----                      -----
criticalPartition       : -1
discardCount            : 0
estimatedOfflineInterval: 0.0
eventCount              : 2267140
headSeqno               : 2267140
maxOfflineInterval      : 5
maxSize                 : 10
name                    : parallel-queue
queues                  : 5
serializationCount      : 0
serialized              : false
stopRequested           : false
store.0                 : THLParallelReadTask task_id=0 thread_name=store-thl-0 hi_seqno=2267140 lo_seqno=1 read=2267140 accepted=460813 discarded=1806327 events=0
store.1                 : THLParallelReadTask task_id=1 thread_name=store-thl-1 hi_seqno=2267140 lo_seqno=1 read=2267140 accepted=452812 discarded=1814328 events=0
store.2                 : THLParallelReadTask task_id=2 thread_name=store-thl-2 hi_seqno=2267140 lo_seqno=1 read=2267140 accepted=450812 discarded=1816328 events=0
store.3                 : THLParallelReadTask task_id=3 thread_name=store-thl-3 hi_seqno=2267140 lo_seqno=1 read=2267140 accepted=450397 discarded=1816743 events=0
store.4                 : THLParallelReadTask task_id=4 thread_name=store-thl-4 hi_seqno=2267140 lo_seqno=1 read=2267141 accepted=452306 discarded=1814834 events=0
storeClass              : com.continuent.tungsten.replicator.thl.THLParallelQueue
syncInterval            : 10000
Finished status command (stores)...

The same tool can show what is happening for each shard. When you are dealing with many channels, you need to know who is doing what, and sometime with a high level of detail. This is especially useful when things go wrong. Knowing what has happened to your transaction, and at which stage it stopped working could be a great help to fix problems. You can follow every transaction using either the GTID (appliedLastSeqno), or the binlog+position (appliedLastEventId), combined with the schema where it is happening (shardId.)

trepctl status -name shards
Processing status command (shards)...
NAME                VALUE
----                -----
appliedLastEventId: mysql-bin.000002:0000000338943258;0
appliedLastSeqno  : 2275303
appliedLatency    : 18.942
eventCount        : 243189
shardId           : evaluator1
stage             : q-to-dbms
NAME                VALUE
----                -----
appliedLastEventId: mysql-bin.000002:0000000338940934;0
appliedLastSeqno  : 2275288
appliedLatency    : 18.935
eventCount        : 231993
shardId           : evaluator10
stage             : q-to-dbms
NAME                VALUE
----                -----
appliedLastEventId: mysql-bin.000002:0000000338939386;0
appliedLastSeqno  : 2275277
appliedLatency    : 18.931
eventCount        : 234687
shardId           : evaluator2
stage             : q-to-dbms
NAME                VALUE
----                -----
appliedLastEventId: mysql-bin.000002:0000000338938221;0
appliedLastSeqno  : 2275269
appliedLatency    : 18.928
eventCount        : 231045
shardId           : evaluator3
stage             : q-to-dbms
NAME                VALUE
----                -----
appliedLastEventId: mysql-bin.000002:0000000338942040;0
appliedLastSeqno  : 2275295
appliedLatency    : 18.933
eventCount        : 225755
shardId           : evaluator4
stage             : q-to-dbms
NAME                VALUE
----                -----
appliedLastEventId: mysql-bin.000002:0000000338942486;0
appliedLastSeqno  : 2275298
appliedLatency    : 18.937
eventCount        : 221864
shardId           : evaluator5
stage             : q-to-dbms
NAME                VALUE
----                -----
appliedLastEventId: mysql-bin.000002:0000000338942930;0
appliedLastSeqno  : 2275301
appliedLatency    : 18.94
eventCount        : 219574
shardId           : evaluator6
stage             : q-to-dbms
NAME                VALUE
----                -----
appliedLastEventId: mysql-bin.000002:0000000338943372;0
appliedLastSeqno  : 2275304
appliedLatency    : 18.931
eventCount        : 220078
shardId           : evaluator7
stage             : q-to-dbms
NAME                VALUE
----                -----
appliedLastEventId: mysql-bin.000002:0000000338942600;0
appliedLastSeqno  : 2275299
appliedLatency    : 18.929
eventCount        : 221647
shardId           : evaluator8
stage             : q-to-dbms
NAME                VALUE
----                -----
appliedLastEventId: mysql-bin.000002:0000000338940109;0
appliedLastSeqno  : 2275282
appliedLatency    : 18.931
eventCount        : 226607
shardId           : evaluator9
stage             : q-to-dbms
Finished status command (shards)...

And if the info by shard is not enough, we can also see the functioning of replication in terms of tasks. For the current transactions, we can check what is happening at every stage, with a level of detail that the MySQL server cannot provide.

trepctl status -name tasks
Processing status command (tasks)...
NAME                VALUE
----                -----
appliedLastEventId: mysql-bin.000002:0000000339749071;0
appliedLastSeqno  : 2280695
appliedLatency    : 22.267
applyTime         : 53.543
averageBlockSize  : 1.000     
cancelled         : false
currentLastEventId: mysql-bin.000002:0000000339749071;0
currentLastFragno : 0
currentLastSeqno  : 2280695
eventCount        : 2280695
extractTime       : 3053.902
filterTime        : 0.194
otherTime         : 2.864
stage             : remote-to-thl
state             : extract
taskId            : 0
NAME                VALUE
----                -----
appliedLastEventId: mysql-bin.000002:0000000339747579;0
appliedLastSeqno  : 2280685
appliedLatency    : 22.233
applyTime         : 135.079
averageBlockSize  : 9.983     
cancelled         : false
currentLastEventId: mysql-bin.000002:0000000339747579;0
currentLastFragno : 0
currentLastSeqno  : 2280685
eventCount        : 2280685
extractTime       : 2972.509
filterTime        : 0.167
otherTime         : 2.714
stage             : thl-to-q
state             : extract
taskId            : 0
NAME                VALUE
----                -----
appliedLastEventId: mysql-bin.000002:0000000339747579;0
appliedLastSeqno  : 2280685
appliedLatency    : 22.243
applyTime         : 174.149
averageBlockSize  : 9.813     
cancelled         : false
currentLastEventId: mysql-bin.000002:0000000339747579;0
currentLastFragno : 0
currentLastSeqno  : 2280685
eventCount        : 463769
extractTime       : 2930.461
filterTime        : 4.553
otherTime         : 1.317
stage             : q-to-dbms
state             : extract
taskId            : 0
NAME                VALUE
----                -----
appliedLastEventId: mysql-bin.000002:0000000339746639;0
appliedLastSeqno  : 2280679
appliedLatency    : 22.247
applyTime         : 173.182
averageBlockSize  : 9.790     
cancelled         : false
currentLastEventId: mysql-bin.000002:0000000339746639;0
currentLastFragno : 0
currentLastSeqno  : 2280679
eventCount        : 455841
extractTime       : 2931.707
filterTime        : 4.374
otherTime         : 1.219
stage             : q-to-dbms
state             : extract
taskId            : 1
NAME                VALUE
----                -----
appliedLastEventId: mysql-bin.000002:0000000339747249;0
appliedLastSeqno  : 2280683
appliedLatency    : 22.246
applyTime         : 171.505
averageBlockSize  : 9.819     
cancelled         : false
currentLastEventId: mysql-bin.000002:0000000339747249;0
currentLastFragno : 0
currentLastSeqno  : 2280683
eventCount        : 453846
extractTime       : 2933.467
filterTime        : 4.28
otherTime         : 1.23
stage             : q-to-dbms
state             : extract
taskId            : 2
NAME                VALUE
----                -----
appliedLastEventId: mysql-bin.000002:0000000339747415;0
appliedLastSeqno  : 2280684
appliedLatency    : 22.252
applyTime         : 168.773
averageBlockSize  : 9.792     
cancelled         : false
currentLastEventId: mysql-bin.000002:0000000339747415;0
currentLastFragno : 0
currentLastSeqno  : 2280684
eventCount        : 453447
extractTime       : 2936.219
filterTime        : 4.283
otherTime         : 1.213
stage             : q-to-dbms
state             : extract
taskId            : 3
NAME                VALUE
----                -----
appliedLastEventId: mysql-bin.000002:0000000339746311;0
appliedLastSeqno  : 2280677
appliedLatency    : 22.25
applyTime         : 167.426
averageBlockSize  : 9.804     
cancelled         : false
currentLastEventId: mysql-bin.000002:0000000339746311;0
currentLastFragno : 0
currentLastSeqno  : 2280677
eventCount        : 454922
extractTime       : 2937.622
filterTime        : 4.188
otherTime         : 1.25
stage             : q-to-dbms
state             : extract
taskId            : 4
Finished status command (tasks)...

Fixing an error

Let's try to see what happens with a simple, classic replication error. We will enter a record in the slave, and then do the same in the master. We will assume full knowledge of the facts, and try to repair the damage.

In MySQL 5.6, when the slave stops replication because of the duplicate key error, we get this:

show slave status\G
*************************** 1. row ***************************
               Slave_IO_State: Waiting for master to send event
                  Master_Host: 127.0.0.1
                  Master_User: rsandbox
                  Master_Port: 18675
                Connect_Retry: 60
              Master_Log_File: mysql-bin.000002
          Read_Master_Log_Pos: 136120191
               Relay_Log_File: mysql_sandbox18676-relay-bin.000006
                Relay_Log_Pos: 136120097
        Relay_Master_Log_File: mysql-bin.000002
             Slave_IO_Running: Yes
            Slave_SQL_Running: No
              Replicate_Do_DB: 
          Replicate_Ignore_DB: 
           Replicate_Do_Table: 
       Replicate_Ignore_Table: 
      Replicate_Wild_Do_Table: 
  Replicate_Wild_Ignore_Table: 
                   Last_Errno: 1062
                   Last_Error: Error 'Duplicate entry '1' for key 'PRIMARY'' on query. Default database: 'test'. Query: 'insert into t1 values (1)'
                 Skip_Counter: 0
          Exec_Master_Log_Pos: 136119934
              Relay_Log_Space: 136120781
              Until_Condition: None
               Until_Log_File: 
                Until_Log_Pos: 0
           Master_SSL_Allowed: No
           Master_SSL_CA_File: 
           Master_SSL_CA_Path: 
              Master_SSL_Cert: 
            Master_SSL_Cipher: 
               Master_SSL_Key: 
        Seconds_Behind_Master: NULL
Master_SSL_Verify_Server_Cert: No
                Last_IO_Errno: 0
                Last_IO_Error: 
               Last_SQL_Errno: 1062
               Last_SQL_Error: Error 'Duplicate entry '1' for key 'PRIMARY'' on query. Default database: 'test'. Query: 'insert into t1 values (1)'
  Replicate_Ignore_Server_Ids: 
             Master_Server_Id: 1
                  Master_UUID: c3054160-7b4a-11e2-a17e-6c626da07446
             Master_Info_File: mysql.slave_master_info
                    SQL_Delay: 0
          SQL_Remaining_Delay: NULL
      Slave_SQL_Running_State: 
           Master_Retry_Count: 86400
                  Master_Bind: 
      Last_IO_Error_Timestamp: 
     Last_SQL_Error_Timestamp: 130220 11:49:56
               Master_SSL_Crl: 
           Master_SSL_Crlpath: 
           Retrieved_Gtid_Set: c3054160-7b4a-11e2-a17e-6c626da07446:1-386581
            Executed_Gtid_Set: c3054160-7b4a-11e2-a17e-6c626da07446:1-386580,
c90226d2-7b4a-11e2-a17e-6c626da07446:1
                Auto_Position: 0

In this situation, we try the old remedy of skipping a transaction.

set global sql_slave_skip_counter=1;
ERROR 1858 (HY000): sql_slave_skip_counter can not be set when the server is running with GTID_MODE = ON. Instead, for each transaction that you want to skip, generate an empty transaction with the same GTID as the transaction

Oops! Now I have two problems:

  • How do I generate an empty transaction with a given GTID?
  • Which is the given GTID? I get several ones:
    show global variables like '%gtid_executed%'\G
    *************************** 1. row ***************************
    Variable_name: gtid_executed
            Value: c3054160-7b4a-11e2-a17e-6c626da07446:1-386580,
    c90226d2-7b4a-11e2-a17e-6c626da07446:1

I found this manual page about skipping transactions, but I don't get where I should run these instructions. I tried running them in the slave, but the replication error remains in place. I guess we need a clearer example that explains how to fix the error, because this surely does not look like a solution.

Let's try the same issue with Tungsten.

$ trepctl status
Processing status command...
NAME                     VALUE
----                     -----
appliedLastEventId     : NONE
appliedLastSeqno       : -1
appliedLatency         : -1.0
channels               : -1
clusterName            : default
currentEventId         : NONE
currentTimeMillis      : 1361356976587
dataServerHost         : 127.0.0.1
extensions             : 
latestEpochNumber      : -1
masterConnectUri       : thl://127.0.0.1:12110/
masterListenUri        : thl://127.0.0.1:12111/
maximumStoredSeqNo     : -1
minimumStoredSeqNo     : -1
offlineRequests        : NONE
pendingError           : Event application failed: seqno=444898 fragno=0 message=java.sql.SQLException: Statement failed on slave but succeeded on master
pendingErrorCode       : NONE
pendingErrorEventId    : mysql-bin.000002:0000000116727315;0
pendingErrorSeqno      : 444898
pendingExceptionMessage: java.sql.SQLException: Statement failed on slave but succeeded on master
                         insert into t1 values (1) /* ___SERVICE___ = [tsandbox] */
pipelineSource         : UNKNOWN
relativeLatency        : -1.0
resourcePrecedence     : 99
rmiPort                : 10102
role                   : slave
seqnoType              : java.lang.Long
serviceName            : tsandbox
serviceType            : unknown
simpleServiceName      : tsandbox
siteName               : default
sourceId               : 127.0.0.1
state                  : OFFLINE:ERROR
timeInStateSeconds     : 18.747
uptimeSeconds          : 923.323
version                : Tungsten Replicator 2.0.7 build 278
Finished status command...

The error tells me that GTID 444898 is at fault. The remedy that I would apply in this case is the same that I would do anyway, regardless of parallel replication.

$ trepctl online -skip-seqno 444898

$ trepctl status
Processing status command...
NAME                     VALUE
----                     -----
appliedLastEventId     : mysql-bin.000002:0000000116726621;0
appliedLastSeqno       : 444893
appliedLatency         : 0.0
channels               : 5
clusterName            : default
currentEventId         : NONE
currentTimeMillis      : 1361358074668
dataServerHost         : 127.0.0.1
extensions             : 
latestEpochNumber      : 0
masterConnectUri       : thl://127.0.0.1:12110/
masterListenUri        : thl://127.0.0.1:12111/
maximumStoredSeqNo     : 444898
minimumStoredSeqNo     : 0
offlineRequests        : NONE
pendingError           : NONE
pendingErrorCode       : NONE
pendingErrorEventId    : NONE
pendingErrorSeqno      : -1
pendingExceptionMessage: NONE
pipelineSource         : thl://127.0.0.1:12110/
relativeLatency        : 1599.668
resourcePrecedence     : 99
rmiPort                : 10102
role                   : slave
seqnoType              : java.lang.Long
serviceName            : tsandbox
serviceType            : local
simpleServiceName      : tsandbox
siteName               : default
sourceId               : 127.0.0.1
state                  : ONLINE
timeInStateSeconds     : 2.076
uptimeSeconds          : 2021.404
version                : Tungsten Replicator 2.0.7 build 278
Finished status command...

And we are back in business. Since GTID in Tungsten are well integrated in every aspect of the operations, I can use them to fix problems.

More loose ends

What we've seen above shows that the integration between existing replication features and the new ones is less than desirable. There are more issues that may come to the user's attention. One that struck me as very odd is Replicate_Ignore_Server_Ids

This value is found in 'SHOW SLAVE STATUS', and it designates the list of servers that were excluded from replication. This value is associated to the option 'IGNORE_SERVER_IDS' that you can give in CHANGE MASTER TO. What's odd with this value? It is that it only accepts server-IDs, not server-UUIDs. If you try to use a server-UUID in CHANGE MASTER TO, you get an error.

However, the reason for mentioning this variable is that, just by chance, I was able to "fix" the above problem, instead of using an empty transaction. I did the following:

stop slave;
change master to ignore_server_ids=(1);
start slave;
show slave status\G
# no errors
stop slave;
change master to ignore_server_ids=();
start slave;

And we have skipped a transaction in an undocumented way. Bug or feature?

Tuesday, February 19, 2013

Tungsten Replicator 2.0.7 is released

Tungsten Replicator 2.0.7 was released today. In addition to a large number of bug fixes, this release adds several improvements for multi-master management, and support for Amazon RDS (as a slave).

While the Release Notes show a long list of improvements, I would like to focus on some of them that improve the handling of multi-master deployments.

When we released version 2.0.6, we added the first revision of the cookbook recipes in the build. That was still a green addition, which caused several bug reports. But since then, we have integrated the cookbook in our internal testing, making these recipes more robust and reliable. We are also planning to improve them and eventually integrate all of them into the main installer. Probably in the next release. In the meantime, I would like to point out the main additions:

  • The clear_* scripts now ask for confirmation, or use an environment variable, if set. This reduce the risk of accidental data loss.
  • The bootstrap.sh script makes a better job of setting the environment;
  • You have scripts that add nodes to an existing master/slave or star topology;
  • There are scripts to install native MySQL replication and show how to take over with Tungsten;
  • There are scripts that perform a switch between master and slaves in master/slave topology;
  • There is also a script that installs all topologies, one by one, and tests that they replicate correctly;
  • Finally, there is a script that collect logs from all servers into a single bundle. This is useful when you want to diagnose a problem.
  • Tungsten Replicator can now work with MySQL 5.6. There are cases where you would need to re-start the MySQL server with a new option (native CRC conflicts with current understanding of the binlog by Tungsten), but it can be installed. Also Tungsten Sandbox can get around that limitation on its own.

Another useful addition is a feature that I have recently presented at FOSDEM 2013. It's an enhancement of Tungsten ability of preventing conflicts in multiple masters deployments. It is now possible to whitelist sources, so that they will be updated by every master, and it is possible to define in greater detail which schemas can be updated by which sources.

Finally, we have made some great advancements in the way Tungsten can replicate from MySQL to Oracle servers. It is now possible to bypass some previously heavy manual operations, when we needed to recreate DDL statements manually on the Oracle side. Now there is a tool that can automate most of the DDL creation. My colleague Linas will explain that in his blog soon.

There are many reasons for trying out the new version. You can download it from Tungsten site.

Thursday, February 14, 2013

Provisioning an Oracle slave using Tungsten and MySQL Sandbox

A few years ago, I used MySQL Sandbox to filter binary logs. While that one was a theoretical case, recently I came across a very practical case where we needed to provision an Oracle database, which is the designated slave of a MySQL master.

In this particular case, we needed to provision the Oracle slave with some auditing features in place. Therefore, mass load functions were not considered. What we needed was the contents of the MySQL database as binary rows i.e. the same format used for row-based replication.

To achieve the purpose as quickly and as painlessly as we could, I thought to employ the services of a MySQL Sandbox. The flow of information would be like this:

  1. Install a sandbox, using the same version and character set of the master;
  2. Set the sandbox default binary log format as ROW;
  3. take a backup with mysqldump (with no data)
  4. filter the CREATE TABLE statements, replacing INNODB with BlackHole. This pass is important to speed up insert operations and to minimise storage needs. Using this trick, we only needed storage for the binary logs, not the data itself.
  5. Load the altered schema into the sandbox
  6. Take a full data dump without creation info
  7. Load the data into the sandbox
  8. Start replicating from the sandbox to the Oracle slave (using Tungsten Replicator)
  9. When the provisioning is over, point the replicator to the original master, to the point where we finished dumping data;
  10. Start replicating live from MySQL to Oracle.

Despite the many steps, the plan worked quite smoothly. We managed to extract data from three databases (and about 600 tables) for a total of 0.5 TB, in about 7 hours. The task was completed using a tool developed by my colleague Linas, which does an automated DDL translation from MySQL to Oracle. Probably this tool deserves an article of its own.

Tuesday, February 12, 2013

MySQL Sandbox as a riddle

Puzzle head

Shlomi Noach is the next chairman of the Percona Live 2013. As such, he has opened the preview of the conference by posting some talks of interests, which includes a riddle to win a free pass.

The riddle went unanswered, and Shlomi submitted it also to members of the review committee, getting only blank stares, including mine.

Who will open your present,
Make you play pleasant,
Tidy your mess,
Do the same for all else?

Wanting to give away the pass at all costs, Shlomi then published a new post, including subtle and less subtle hints.

Looking at the hints, it became clear that the object of the riddle, which I could not recognize, was my own MySQL Sandbox. Shame on me for not recognizing it? I don't know. I would never have guessed that a tarball is "your present". Perhaps I have too much a practical mind!

Anyway, thanks Shlomi for this bit of entertainment!

Thursday, February 07, 2013

MySQL Sandbox 3.0.30 - now adapted to work with 5.5.30 and 5.6.10

The latest releases of MySQL Sandbox, in addition to deal with minor bugs, have mostly been necessary because of compatibility issues in MySQL, both 5.5 and 5.6.

When I found that MySQL 5.6 has some InnoDB tables inside the 'mysql' schema, I had to change the way that the sandbox used to remove all contents (the ./clear command.)

To achieve a smooth clean up, MySQL Sandbox now performs a dump of the mysql schema, and uses that saved data to restore the schema after a complete wipeout.

Unfortunately, when 5.5.30 was released, this operation resulted in a warning, due to a behavioral change.

After a careful change, and about 1200 unit tests, the latest version of MySQL Sandbox should work well with every MySQL release from 5.0 to 5.6.

Wednesday, February 06, 2013

MySQL and warnings - Yet another compatibility break

The MySQL team seems to have a very peculiar idea about defaults and compatibility. Recently, I wrote about an annoying warning that cannot be removed. And previously, I noticed that MySQL 5.6 mixes warnings, info lines and errors in the same bunch of excessive chattiness.

With MySQL 5.5.30 came another headache. When I run a mysqldump of the 'mysql' schema, I get this warning:

$. mysqldump mysql > m.sql
-- Warning: Skipping the data of table mysql.event. Specify the --events option explicitly.

OK. No big deal. What if I tell the little troublemaker that I DON'T WANT the events table?

$ mysqldump --skip-events mysql > m.sql
-- Warning: Skipping the data of table mysql.event. Specify the --events option explicitly.

It seems that we have different ideas about when the warning should be given. If I skipped the events, I should not get the warning. Anyway, maybe it was the wrong option. Looking at the Release notes for MySQL 5.5.30, I see this:

For dumps of the mysql database, mysqldump skipped the event table unless the --events option was given. To skip this table if that is desired, use the --ignore-table option instead (Bug #55587, Bug #11762933)

Aha! Let's try with --ignore-table

mysqldump --ignore-table=mysql.events mysql > m.sql
-- Warning: Skipping the data of table mysql.event. Specify the --events option explicitly.

WTF? The only way of removing the warning is by running mysqldump with --events. But in that case I will get what I wanted to avoid. Otherwise I pollute the output with a warning that should not be there. Perhaps this warning could be removed when an explicit option tells mysqldump that this behavior is intentional?

Strangely enough, in the latest MySQL 5.6 GA this warning does not show up.

Monday, January 21, 2013

Lightning talks at Percona Live MySQL Conference and Expo 2013

It happened last year at the previous Conference, and it's going to happen this year as well.

There will be a session of lightning talks during the conference, for the joy of both the audience and the speakers.

Lightning talks are fun and instructional micro events. Their official purpose is to give the audience a chance to learn something in a very limited amount of time. The real purpose is for the speaker to be as entertaining and memorable as possible within the allocated time.

The call for participation is open from now until February 10th. If you have something that you want to say in not more than 5 minutes, you can SUBMIT A PROPOSAL.

In addition to propose a compelling description that will make us choose your proposal, be aware of the lightning talks rules:
  • All slides will be loaded into a single computer, to minimize delays between talks;
  • Someone (probably me) will nag the speakers until they either surrender their slides or escape to Mexico;
  • All speakers will meet 15 minutes before the start, and be given the presentation order. Missing speakers will be replaced by reserve speakers;
  • The speaker will have 5 minutes to deliver the talk.
  • When one minute is left, there will be a light sound to remind of the remaining time.
  • When 10 seconds are left, most likely the audience will start chanting the countdown.
  • When the time is finished, the speaker must leave the place to the next one.

BTW, if lightning talks are not for you, you may try Birds of a feather (BoF) sessions instead. Also for BoFs, the deadline is February 10th.

Monday, January 07, 2013

Easily testing MySQL 5.6 GTID in a sandbox

MySQL 5.6 seems to be ready for GA. I have no inside information about it, but from some clues collected in various places I feel that the release should not be far away. Thus, it's time for some serious testing, and for that purpose I have worked at updating MySQL Sandbox with some urgent features.

I have just released MySQL Sandbox 3.0.28, with more support for MySQL 5.6. Notably in this release, there is suppression of MySQL 5.6 annoying verbosity, additional suppression of more annoying warnings ( actually a bug) when using empty passwords on the command line.

There is also an enhancement to the 'clear' command. In previous versions of MySQL, this command removed everything from the data directory, leaving the server ready for a clean start. In MySQL 5.6, this is not feasible, because there are innodb tables in the mysql schema. Therefore, what happens now is that, immediately after creating the sandbox users, the installation program stores a dump of the 'mysql' schema. The 'clear' command will remove the innodb tables from mysql, and the 'start' command will notice that and reload the schema from the dump.

More interesting, though, the replication installer creates a file (only if the MySQL server is 5.6.9 or higher) called 'enable_gtid' which restarts the replication cluster with Global Transaction Identifiers enabled.

Let's see an example session:
$ make_replication_sandbox 5.6.9
installing and starting master
installing slave 1
installing slave 2
starting slave 1
... sandbox server started
starting slave 2
... sandbox server started
initializing slave 1
initializing slave 2
replication directory installed in $HOME/sandboxes/rsandbox_5_6_9

$ cd $HOME/sandboxes/rsandbox_5_6_9

$ ./check_slaves 
slave # 1
              Master_Log_File: mysql-bin.000001
          Read_Master_Log_Pos: 2590
             Slave_IO_Running: Yes
            Slave_SQL_Running: Yes
          Exec_Master_Log_Pos: 2590
slave # 2
              Master_Log_File: mysql-bin.000001
          Read_Master_Log_Pos: 2590
             Slave_IO_Running: Yes
            Slave_SQL_Running: Yes
          Exec_Master_Log_Pos: 2590

Now we use the 'enable_gtid' command. It will simply restart the cluster with the appropriate options.

$ ./enable_gtid 
executing "stop" on slave 1
executing "stop" on slave 2
executing "stop" on master
executing "start" on master
. sandbox server started
executing "start" on slave 1
. sandbox server started
executing "start" on slave 2
. sandbox server started

$ ./check_slaves 
slave # 1
              Master_Log_File: mysql-bin.000002
          Read_Master_Log_Pos: 151
             Slave_IO_Running: Yes
            Slave_SQL_Running: Yes
          Exec_Master_Log_Pos: 151
slave # 2
              Master_Log_File: mysql-bin.000002
          Read_Master_Log_Pos: 151
             Slave_IO_Running: Yes
            Slave_SQL_Running: Yes
          Exec_Master_Log_Pos: 151

Now, let's see if Global Transaction IDs are enabled.

$ ./m -e 'create table test.t1(i int not null primary key)'
$ ./m -e 'insert into test.t1 values (1)'
$ ./m -e 'insert into test.t1 values (2)'
$ ./m -e 'show master status\G'
*************************** 1. row ***************************
             File: mysql-bin.000002
         Position: 825
     Binlog_Do_DB: 
 Binlog_Ignore_DB: 
Executed_Gtid_Set: C0DF6B8A-5823-11E2-BC44-3970854BE7A5:1-3

$ ./m -e 'show binlog events in "mysql-bin.000002"'
+------------------+-----+----------------+-----------+-------------+-------------------------------------------------------------------+
| Log_name         | Pos | Event_type     | Server_id | End_log_pos | Info                                                              |
+------------------+-----+----------------+-----------+-------------+-------------------------------------------------------------------+
| mysql-bin.000002 |   4 | Format_desc    |         1 |         120 | Server ver: 5.6.9-rc-log, Binlog ver: 4                           |
| mysql-bin.000002 | 120 | Previous_gtids |         1 |         151 |                                                                   |
| mysql-bin.000002 | 151 | Gtid           |         1 |         199 | SET @@SESSION.GTID_NEXT= 'C0DF6B8A-5823-11E2-BC44-3970854BE7A5:1' |
| mysql-bin.000002 | 199 | Query          |         1 |         317 | create table test.t1(i int not null primary key)                  |
| mysql-bin.000002 | 317 | Gtid           |         1 |         365 | SET @@SESSION.GTID_NEXT= 'C0DF6B8A-5823-11E2-BC44-3970854BE7A5:2' |
| mysql-bin.000002 | 365 | Query          |         1 |         440 | BEGIN                                                             |
| mysql-bin.000002 | 440 | Query          |         1 |         540 | insert into test.t1 values (1)                                    |
| mysql-bin.000002 | 540 | Xid            |         1 |         571 | COMMIT /* xid=26 */                                               |
| mysql-bin.000002 | 571 | Gtid           |         1 |         619 | SET @@SESSION.GTID_NEXT= 'C0DF6B8A-5823-11E2-BC44-3970854BE7A5:3' |
| mysql-bin.000002 | 619 | Query          |         1 |         694 | BEGIN                                                             |
| mysql-bin.000002 | 694 | Query          |         1 |         794 | insert into test.t1 values (2)                                    |
| mysql-bin.000002 | 794 | Xid            |         1 |         825 | COMMIT /* xid=29 */                                               |
+------------------+-----+----------------+-----------+-------------+-------------------------------------------------------------------+

Good. The master has stored the GTID in the binary logs. What about the slaves?

$ ./s1 -e 'show slave status\G' |grep 'Running:\|Gtid'
             Slave_IO_Running: Yes
            Slave_SQL_Running: Yes
           Retrieved_Gtid_Set: C0DF6B8A-5823-11E2-BC44-3970854BE7A5:1-3
            Executed_Gtid_Set: C0DF6B8A-5823-11E2-BC44-3970854BE7A5:1-3

$ ./s2 -e 'show slave status\G' |grep 'Running:\|Gtid'
             Slave_IO_Running: Yes
            Slave_SQL_Running: Yes
           Retrieved_Gtid_Set: C0DF6B8A-5823-11E2-BC44-3970854BE7A5:1-3
            Executed_Gtid_Set: C0DF6B8A-5823-11E2-BC44-3970854BE7A5:1-3

Also the slaves are collecting GTIDs. All is well.

Notice that this method is only safe because we are using a system with no traffic at all. If your replication is under load, then you need to follow the method described in the MySQL 5.6 user manual.

Sunday, January 06, 2013

Fun with MySQL options

While testing MySQL 5.6, I came across some curious values for the new values used to set the crash-safe slave tables. To get safety, we need to set relay_log_info_repository and master_info_repository to 'TABLE'. That way, the replication information, instead of going to a file, will be saved to two tables in the mysql schema (mysql.slave_relay_log_info and mysql.slave_master_info).

So I was setting these values back and forth between 'FILE' and 'TABLE', until I made a "mistake." Instead of typing

set global relay_log_info_repository='table';

I wrote

set global relay_log_info_repository=1;
To my surprise, it did what I wanted!
show variables like '%repository%';
+---------------------------+-------+
| Variable_name             | Value |
+---------------------------+-------+
| master_info_repository    | FILE  |
| relay_log_info_repository | TABLE |
+---------------------------+-------+

It seems that the server accepts 1 for 'TABLE' and 0 for 'FILE'. But this is not a firm rule. I tried the same thing with another variable that supports 'FILE' and 'TABLE':

set global log_output=0; show variables like 'log_output';
ERROR 1231 (42000): Variable 'log_output' can't be set to the value of '0'
+---------------+-------+
| Variable_name | Value |
+---------------+-------+
| log_output    | FILE  |
+---------------+-------+
1 row in set (0.00 sec)

set global log_output=1; show variables like 'log_output';
Query OK, 0 rows affected (0.00 sec)

+---------------+-------+
| Variable_name | Value |
+---------------+-------+
| log_output    | NONE  |
+---------------+-------+
1 row in set (0.00 sec)

 set global log_output=2; show variables like 'log_output';
Query OK, 0 rows affected (0.00 sec)

+---------------+-------+
| Variable_name | Value |
+---------------+-------+
| log_output    | FILE  |
+---------------+-------+
1 row in set (0.00 sec)

set global log_output=3; show variables like 'log_output';
Query OK, 0 rows affected (0.00 sec)

+---------------+-----------+
| Variable_name | Value     |
+---------------+-----------+
| log_output    | NONE,FILE |
+---------------+-----------+
1 row in set (0.00 sec)

set global log_output=4; show variables like 'log_output';
Query OK, 0 rows affected (0.00 sec)

+---------------+-------+
| Variable_name | Value |
+---------------+-------+
| log_output    | TABLE |
+---------------+-------+
1 row in set (0.00 sec)
set global log_output=5; show variables like 'log_output';
Query OK, 0 rows affected (0.00 sec)

+---------------+------------+
| Variable_name | Value      |
+---------------+------------+
| log_output    | NONE,TABLE |
+---------------+------------+
1 row in set (0.00 sec)

set global log_output=6; show variables like 'log_output';
Query OK, 0 rows affected (0.00 sec)

+---------------+------------+
| Variable_name | Value      |
+---------------+------------+
| log_output    | FILE,TABLE |
+---------------+------------+
1 row in set (0.00 sec)

set global log_output=7; show variables like 'log_output';
Query OK, 0 rows affected (0.00 sec)

+---------------+-----------------+
| Variable_name | Value           |
+---------------+-----------------+
| log_output    | NONE,FILE,TABLE |
+---------------+-----------------+
1 row in set (0.00 sec)

The manual does not mention multiple values for this variable. The fact that the server accepts such value is strange enough. What is more strange is that in one case, option 1 resolves to 'TABLE' (but not the quoted '1', which is rejected), while in the other case, 'TABLE' is number 4.

I don't think this is intentional. But surely it's confusing.

Saturday, January 05, 2013

Using a password is insecure, but no password is OK?

I have been preaching since 2003 that the default deployment of MySQL (where root can access without password) should be changed to something more sicure.

Yet, MySQL 5.6 still uses the same defaults.

$ mysql --no-defaults -u root --port=5000 -h 127.0.0.1
Welcome to the MySQL monitor.  Commands end with ; or \g.
Your MySQL connection id is 1
Server version: 5.6.9-rc MySQL Community Server (GPL)

Copyright (c) 2000, 2012, Oracle and/or its affiliates. All rights reserved.

Oracle is a registered trademark of Oracle Corporation and/or its
affiliates. Other names may be trademarks of their respective
owners.

Type 'help;' or '\h' for help. Type '\c' to clear the current input statement.

mysql> set password=password('oh-come-on');
Query OK, 0 rows affected (0.00 sec)

mysql> exit
Bye
I have installed MySQL 5.6. Now I access as root without password. Not a word of complaint. Not a warning. Nothing.
But what happens when I set a password and use it?

$ mysql --no-defaults -u root --port=5000 -h 127.0.0.1 -poh-come-on
Warning: Using a password on the command line interface can be insecure.
Welcome to the MySQL monitor.  Commands end with ; or \g.
Your MySQL connection id is 2
Server version: 5.6.9-rc MySQL Community Server (GPL)

Copyright (c) 2000, 2012, Oracle and/or its affiliates. All rights reserved.

Oracle is a registered trademark of Oracle Corporation and/or its
affiliates. Other names may be trademarks of their respective
owners.

Type 'help;' or '\h' for help. Type '\c' to clear the current input statement.

mysql> 

WTF? So a password is insecure, but no password is OK?
I know the risks of using a password at the command line, thanks for telling me. Now I don't want to see this message anymore.

I wonder how I can remove this warning. Scripted testing gets borked horribly with it.

Sunday, December 02, 2012

Solving replication problems with Tungsten replicator

On Monday afternoon, Neal Armitage and I will be speaking at Percona Live in London. It will be a three hours tutorial about Tungsten replicator.

Percona Live London, December 3-4, 2012

The contents of this tutorial are mostly new. We have released recently a new and easier way of installing different topologies, in the shape of cookbook scripts, which are distributed with the replicator tarball.

Using this cookbook, any user can simply install multiple topologies, from the simple master/slave to all-masters, fan-in, and star.

There are recipes for showing the replication cluster, switching roles between master and a chosen slave, taking over MySQL replication, installing direct slaves with parallel replication, testing each topology, and uninstalling all.

All the above will be demonstrated during the tutorial, with the addition of conflict prevention and more management issues.

The Tungsten cookbook in the wiki has been updated to reflect the changes.

Saturday, November 10, 2012

MySQL 5.6.8 - Broken compatibility ahead

Users are safer

MySQL 5.6.8 was announced a few days ago. You can download it from the MySQL downloads page

This is the second release candidate of MySQL 5.6, and it is strange. My understanding of a release candidate is something that is stable, its features committed long time ago, and the release will just attempt to fix bugs. Instead, there are features that were not in the first release candidate. This one strikes me as really odd (quoting from the announcement) :

On Unix platforms, mysql_install_db supports a new option, --random-passwords, that provides for more secure MySQL installation. Invoking mysql_install_db with this option causes it to perform the following actions in addition to its normal operation:
  • Create a random password, assign it to the initial root accounts, and set the "password expired" flag for those accounts.
  • Write the initial password file to the .mysql.secret file in the directory named by the $HOME environment variable. Depending on operating system, using a command such as sudo may cause the value of $HOME to refer to the home directory of the root system user.
  • Remove the anonymous-user accounts.

As a result of these actions, it is necessary after installation to start the server, connect as root using the password written to the .mysql.secret file, and assign a new root password. Until this is done, root cannot do anything else. This must be done for each root account you intend to use. To change the password, you can use the SET PASSWORD statement (for example, with the mysql client). You can also use mysqladmin or mysql_secure_installation.

For new RPM install operations (not upgrades), mysql_install_db is invoked with the --random-passwords option. (Install operations using RPMs for Unbreakabkle Linux Network are unaffected and do not use this option.)

On one hand, this is a very commendable feature, one that many users (including me) have been asking for years. It is especially pleasing to see that this feature removes the anonymous-user accounts, which have been source of chagrin and gotchas for as long as I can recall.

Some users are safer, whether they want it or not

On the other hand, this feature is a potential disaster. Making the new feature mandatory for new RPMs means that people used to the old behavior and relying to a MySQL RPM to perform a repeating task will have to rethink the job. Existing scripts and provisioning recipes will be broken, and the way this feature is created makes it unnecessarily hard to script it appropriately. You will need to find where the password was saved, depending on how $HOME was intended by the application, and parse the file to retrieve the password.

Here is what the .mysql_secret file looks like:


cat ~/.mysql_secret 
# The random password set for the root user at Sat Nov 10 10:30:19 2012 (local time): 0aGUREOO

BTW, if you are not aware of the new feature, it is likely that you will never notice. As noted already in MySQL 5.6 is too verbose when creating data directory, the amount of unwanted data that is shoved to your screen is so big that the tiny message about the new random password being saved in a location near you or far far away gets lost in the flood.

Another consequence of this feature is that it is sandbox-unfriendly. Tying the secret password file to $HOME without the possibility of telling where we want it (I found already a workaround, but it is not pretty) means that the file can be overwritten and I can end up with one or more servers that are locked in.

Users of Oracle Linux have the right not to be safer

The oddest thing of all is the last sentence in the quoted text. While everyone else using a RPM will be struggling with this last minute addition, Oracle's own Linux distribution won't be affected. I can only speculate why that is happening, and my imagination conjures scenes of product managers for MySQL breaking the news to product managers for Unbreakable Linux, being told that this new feature is too much hassle, and in the end deciding that Oracle customers can be spared the aggravation. But this is just my unruly mind working overtime.

More to come

Ready to upgrade yet?

Better wait a few more releases. The next release, which could be another release candidate or the GA, is not out yet, but the release notes show that there are at least some more incompatibilities waiting for you.

If you were trying out the global transaction ID, be aware that the odd-looking --disable-gtid-unsafe-statements server option will be renamed --enforce-gtid-consistency. That sounds much better. However, the manual page of how to set up GTID uses the new variable name, and if you try it with MySQL 5.6.8, it will fail.

More changes will come. Currently, if you use GTID you can't restore a backup made with mysqldump, and there is a partial solution to that in the next release, which requires setting some global variables that are read-only now and will become writable. And again for GTID,

the server allows single statements on nontransactional tables.

Whatever that mean is not clear. I will report back after testing the next release.

Until then, have fun with MySQL 5.6.8!

Monday, October 29, 2012

Tungsten Replicator 2.0.6 released - Multi-Master replication made easy and more

Tungsten Replicator version 2.0.6 was released today.

You can get both the binaries and the source code at the project's downloads page.

This release contains many bug fixes, and various improvements. All of them are listed in the Release Notes. The most interesting ones are the improvement in multi-master topologies. Using this release with star topologies you will get less traffic than before, because we have reduced some duplication of transaction history logs that were sent between servers.

And speaking of multi-master topologies, this release includes the cookbook recipes mentioned in this blog some time ago. Normally, these recipes are in their own repository, but for the 2.0.6 binaries we've made an exception and included them in the distribution. You can finally deploy a star or fan-in topology with ease.

Other improvements are a batch loader for data warehousing and more stability for heterogeneous replication. There are also more instrumentation that helps when you are using row-based replication. trepctl status -name tasks gives more detail than before, to let you know what's happening when dealing with huge transactions that were transferred in several chunks.

For an example of deploying a star topology, let's see a quick demo:

  1. First, we get the binaries:
    $ mkdir someplace
    $ cd someplace
    $ wget http://tungsten-replicator.googlecode.com/files/tungsten-replicator-2.0.6.tar.gz
    
  2. Then, we make sure that we have fulfilled the pre-requisites
  3. Inside the cookbook directory you will find a script named simple_services. You should copy it in a directory that is in your $PATH (for example, $HOME/bin)
  4. We can now set the cookbook recipes for our purpose. Inside the ./cookbook directory, there is a file named NODES_STAR.sh (There is such a file for every topology). The file looks like this:
    #!/bin/bash
    
    export NODE1=server1.mydomain.com
    export NODE2=server2.mydomain.com
    export NODE3=server3.mydomain.com
    export NODE4=server4.mydomain.com
    
    export ALL_NODES=($NODE1 $NODE2 $NODE3 $NODE4)
    # indicate which servers will be masters, and which ones will have a slave service
    # in case of all-masters topologies, these two arrays will be the same as $ALL_NODES
    # These values are used for automated testing
    
    # for all-masters and star replication
    export MASTERS=($NODE1 $NODE2 $NODE3 $NODE4)
    export SLAVES=($NODE1 $NODE2 $NODE3 $NODE4)
    export HUB=$NODE3
    
    # MMSERVICES are the names used for services when installing multiple masters
    export MM_SERVICES=(alpha bravo charlie delta echo foxtrot golf hotel)
    export HUB_SERVICE=charlie
    
  5. If you have 4 nodes, all you need to do is fill in the nodes list, making sure that the server you want to use as a hub is the third one.
  6. If you have more nodes, or less nodes, you also need to adjust the lists for ALL_NODES, MASTERS, and SLAVES.
  7. Once the servers list is ready, you can start the installation.
    $ ./cookbook/install_star.sh
    
  8. If you have all your pre-requisites right, you will only see the list of servers being installed and at the end the list of services being activated for each server.
  9. To make sure that the cluster is installed correctly, you can run
    $ ./cookbook/show_star.sh
    $ ./cookbook/test_star.sh
    
  10. If you need it, you can also remove the cluster using
    $ ./cookbook/clear_cluster_star.sh
    

Happy hacking!

Overwhelming response from the MySQL community in Barcelona

Within hours of my post about meeting the MySQL community in Barcelona, we got several offers to help, and within one day, an event was created and agreed upon.

Thanks!

Continuent barcelona

Today the event was posted at Evenbrite. It will take place on Tuesday, November 13th, at 7pm. It will be a one hour talk about State of the art in MySQL high availability and replication, followed by one hour of Q&A, networking, beer, and snacks.

Registration is necessary, because the seats are limited. If you want to attend, you should register as soon as possible!

Thursday, October 25, 2012

MySQL community in Barcelona - Let's meet in November

Update: With the enthusiastic responses that we have received from Barcelona, there is now an event defined at Evenbrite. If you are in Barcelona on November 13th, please register!


My company, Continuent, will have an engineering meeting in Barcelona, Spain, from November 11th to 16th.

We are meeting because, as we all work from home, we need to get in touch face-to-face at least a few times a year, and every time we try choosing a nice, inspiring place where we can both work and relax. This time, the choice went to Barcelona, which happens to be one of my favorite towns.

Now comes the community. We build software that is mainly directed to MySQL users (although we also dedicate much effort to replication to and from Oracle, Postgres, MongoDB). We use MySQL a lot, and we use many open source resources to build our software: Linux, Java, Ruby, Perl, Jenkins, Subversion, Eclipse, to mention just a few. We give back to the community in two ways: by releasing open source software (the foundation of our replication system, Tungsten Replicator, is open source) and by actively sponsoring and participating in open source events. Our company has frequent speakers at these events. In addition to myself, you may have seen on stage Robert Hodges, Neil Armitage, Ronald Bradford, Stephane Giron, Jeff Mace, Gilles Rayrat, and Linas Virbalas. We mostly talk about MySQL and replication, but we are also keen on touching other technology topics, such as virtualization, cloud computing, performance tuning, networking, and more.

We are a friendly bunch and we like to meet people. If there is a MySQL user group in Barcelona, we would like to organize an informal event with local MySQL users (and occasional traveling MySQLers who happen to be in town). Without being too formal, we would like to be contacted on this matter, and continue the discussion by chat or email. If you are in Barcelona in that period, please reach us at contributions AT continuent DOT com.

Monday, October 22, 2012

Tungsten Replicator cookbook. Advanced replication topologies made easy

I have been asked many times to provide an easy way of deploying fan-in and star schema replication schemas. So far, I have been delayed by more pressing duties.

Now the time has come. Since we are about to release a new version of Tungsten Replicator, I made the effort of putting together the steps for an easy deployment.

Recipes

The package (with downloads and svn code available at Tungsten-Replicator Toolbox) includes some juicy goodies. There are recipes to install.

  • Master/slave, the classic replication topology. Nothing fancy, but with the tools mentioned in the next section, it becomes as valuable as the other topologies.
  • All-masters. This is the Tungsten no-SPOF topology. Every node is a master, and every node has a direct slave service to every other node. A bit heavy on the network, but quite robust.
  • Fan-in. The legendary multiple-source replication, where one slave can get instant updates from many masters.
  • Star schema. The most efficient multiple-master deployment, where all the nodes are connected through a central hub. Here the trade-off is less traffic in exchange for a SPOF.

For each topology, there is a NODES_xxxx.sh file, which you need to edit, to add the list of your nodes. The nodes must be reachable by the O.S. account used for the installation, using ssh wit an authentication key (and no password).

Once you have set the list of nodes (the README file has more details), you can run the installer using the corresponding ./cookbook/install_xxxxx.sh.

Easier administration

In addition to the recipes, there are some tools that come with the package. For each topology, there is a script that shows the cluster, one that performs a simple replication test, checking that data generated in the masters reaches all the slaves, and a script that removes all replication in one go. Again, the README file has all the details.

All the scripts are written in (hopefully simple) Bash shell language. You can use them as they are, or use them as a basis to create additional administration tools.

Happy hacking!